
vnavone
-
Posts
106 -
Joined
-
Last visited
Content Type
Profiles
Forums
Events
Posts posted by vnavone
-
-
My question is: what are the other advantages of the rig? I ask because as far as I can see the same level of control can be achieved by nesting poses. Is this easier to animate? Am totally missing something else? If so would you recommend glasses?
Hi Parlo,
In my mind, the advantage of using bone motion over nested muscle pose motion is that bones naturally make points move in arcs, whereas muscle motion wants to move points in a straight line (unless you put in some inbetweens). Because the Giant's head is spherical I wanted a rigging system that would move the points of his mouth in a way that followed the radius of the sphere. All the mouth bones start at the center of the sphere so the points naturally orbit from that location. I could have done this by hand with muscle motion, but again, I would have had to ad inbetweens to all the points to make sure that they move in arcs rather than straight lines. Otherwise you will get problems of inconsistent mass.
One thing I did in all my mouth poses was set the pre- and post-extrapolation methods for the spline channels to "linear". This means that the animation continues to go in the direction of the last keyframe I set to infinity. That way if I ever decide that I need to push a mouth shape just a little further I need only increase the range of the pose slider. I don't have to go in and ad more keyframes to the pose because it naturally continues in the direction it was already heading. Make sense? Normally I try to build headroom into my poses to make them a little more extreme than I think I'll need, but it's good to have this method to fall back on as well.
Don't give up, Rob! I hope you are more inspired than discouraged. The bone structure is complex, but that doesn't necessarily mean better animation. I'm just very anal about how I do things. I was hoping for a much simpler rig - I've been trying to keep this character very simple overall - but sometimes making things "look" simple can be very complex. As for the texture, he has decals for the nose, brows and horns, but that's all. The rest are basic materials. I think perhaps you're reacting to the lighting, which comprises of one warm key on the right, a few cool rim lights back on the left, and lots of reddish fill lights in between to give his flesh some warmth.I saw it and just wanted to stop working on animation forever ... Your bone structure is really complex but I guess the more complex it gets the better the animation. You are an inspiration to everyone.! Keep it up. btw how did you make the texture?It is amazing how much of the acting is done with those little eyes next to the big mouth - even when they don't have pupils. I would be interested to know what guided the decision to go un-pupiled.Thanks, John. Again, I was going for a really simple design and dot eyes are about as simple as you can get. For me they also suggest a harmless animal, like rabbits or dear, whose eyes rarely show their whites. There's something innocent and mysterious about them. I'm sure I was probably influenced by Calvin of Calvin and Hobbes, who has dot eyes much of the time. I've been looking at some of Hank Ketchum's Dennis the Menace drawings for inspiration - he got a lot of character and directionality out of dot eyes.
-
Beautiful test! How long did it take to animate that 'rough little animation'?
Thanks! The animation itself probably only took 4 or 5 hours (spread out over a week). As I animated I would find problems with the rig so I would go back in and make changes. That ate up much more time.
-
Have you thought of a solution to attaching those horns?
I'll probably use the Conform plugin as mentioned above. That will at least get the bases of the horns to lie flush on the head; then I have to tweak the bias handles to make the tangents at the intersections smooth. That's going to be a pain. I'm wary of trying to actually model the horns into the head because I don't want to disturb that nice, smooth, even mesh.
This would all be relatively easy if I were using Nurbs. Fillet tool, anyone?
-
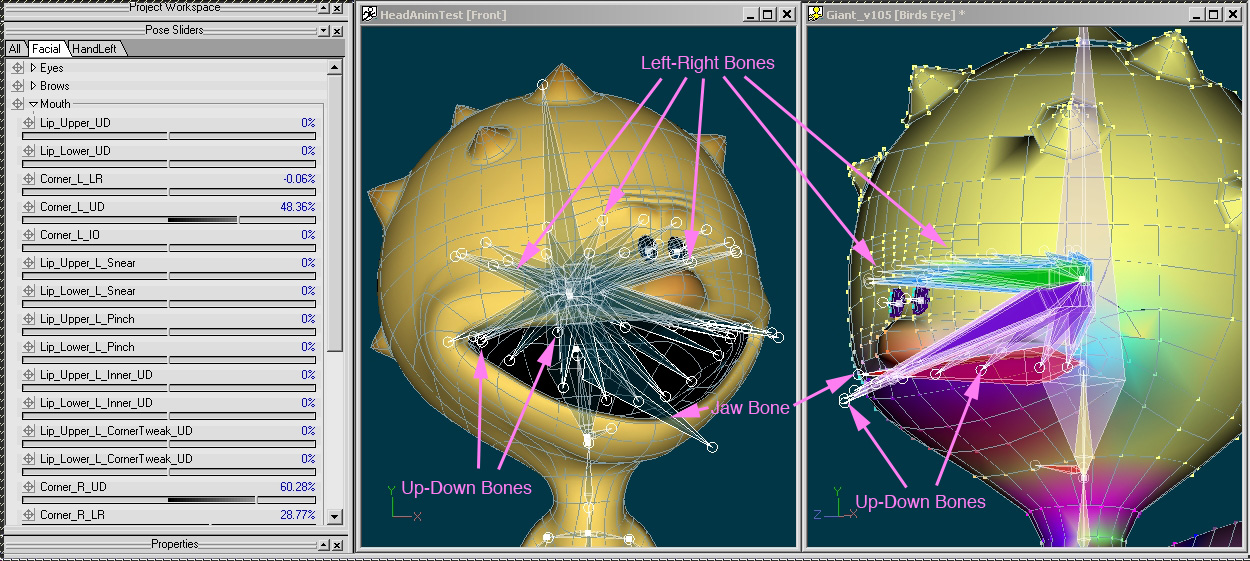
I'll try to briefly explain the rig. For every span of the mouth (splines running to and from the lips) I have one bone for the up and down motion and one for the left and right motion. Each UD bone is a child of the corresponding LR bone. It had to be two bones instead of one for a few reasons that I would have difficulty ariticulatng here. The points around the mouth are assigned to the UD bones and are weighted using AMweights to give them a nice falloff. This was a tedious process, and luckily version 11 will have the AMweights functionality built in.
Next I set about creating a series of poses that moved the mouth bones in different combinations to create different shapes. For instance, the Corner_R_UD pose moves the UD bones on the right side of the mouth to form the curve of a smile or frown. The bone rotation alone gets me most of the way there, but for complex areas like the cheeks I do some custom muscle animation on top of the bone motion.
The advantage of using this kind of modular bone setup in a face is more consistency of deformation between poses, since they're all driving the same underlying bone structure. Once you articulate one part of the mouth you can use it with multiple combinations of other controls and always get predictable results. I find there is too much room for variation and inconsistency when relying on straight muscle motion for facial articulation. Also, this character's mouth is such a dominant part of his image and this method allows me to control the shapes very precisely. If his mouth were tiny then I might get away with regular muscle motion, as I did in the brows.
Currently the mouth has about 24 controls and I've still got some more to add.
Below is a screen shot of all the mouth bones. It looks like a mess, I know, but I hide all the bones except for the jaw when animating. The jaw itself uses rotate relationships instead of poses, but the effect is the same. On the left you can see some of the Pose Sliders controling the mouth.
As for they eyes, they are controlled with poses and some simple bone rotation, scaling and translation. The poses were created using deformer lattices. I can taper them, bend them in different directions and blink them with poses.
The head bone has a volume-preservation expression on it for easy squash and stretch. Anytime I scale the Z value the X and Y change value accordingly. I've also made a pose to move the mouth up and down to help the squash and stretch (or "squetch" as we call it at Pixar). The rest of the squetch is achieved with good old-fashioned animation tricks.
Many people have asked me to do a tutorial and I wouldn't mind but I just don't have the time. It's taken me years just to do this much on my spare time, and with a kid on the way I can't imagine I'll have more time soon!
-
This is a little animation I did to test the facial rig on my Giant character for my short film "Big Bang". The rig is a mishmash of fan-bones, weighted CPs and pose motion. The animation is rough and the model isn't done yet - still needs some smoothing in places and the horns aren't attached to the head yet. Mostly I was curious to see how the mouth would hold up and how much expression and directionality I could get out of the dot eyes. Here's the link:
Here's a picture of the mesh:

Enjoy! I must sleep now.
-
Justin, you were clearly robbed. Your animation was much better than the two rated above yours.
-
Animation: Master gave me the tools I needed to quickly jump into learning 3D Character Animation. As a beginner I found it intuitive and fun to use, and as a professional I continue to find it powerful and flexible. It's certainly the best animation software for the money, and the programmers and support staff are helpful and responsive.
-
I've seen DOF abused in CG by people who either it is use too much or in the wrong situations. I would use it sparingly, and only in places where you're using a long (narrow) lens, or there is an object just inches from camera. Using focal blur on a wide angle shot will make the scene appear to be smaller. Shallow depth of field usually only occurs when long lenses are used over large distances, or when light is low. When in doubt, look at live action movies for specific reference.
-
So Jim, what's up with the folder called "Shrek Captures" on your desktop?
-
Why not find a digital image of a fireplace on Google and sample the RGB color from there? I think you'll find that the color will vary widely depending on the particular fire and the shooting conditions. There are many variables that determine how a color is perceived by photographic emulsion, a digital sensor, your retina, a render engine, etc.; you should choose the color that best suits the mood you are trying to achieve.
-
Pixar actually does rerender the entire movie for DVD, but still at 24 fps with a 3:2 pulldown. The rerendering is for the 1.33 aspect ratio of fullscreen video; we prefer to rerender with a wider camera than to crop with pan & scan. Of course if everyone just accepted letterboxing we wouldn't have to do this. Rendering at 29.97 would likely ruin our animation because you would get a lot of extra inbetweens that were not accounted for by the animator. This could result in constraint pops, ugly arcs, etc.
-
I suppose I can provide some eye-witness information for this question. Sully did indeed have about 500 controls, which encompassed everything from LeftKneeFB (ForwardBackward) to RightNostrilFlare. Many of the controls were also "modelling" controls that weren't meant to be used by the animators. Stuff built in to fix ugly deformations, etc. As animators we probably only used about 300 of his controls on average.
I'm not at liberty to go into a lot of detail about our software, but suffice to say that Menv's controls back in 2000 were not what I would call "modern". Only recently have we been able to work in a way that would be familiar to other 3D animators, involved the direct manipulation of body parts in a camera window. On shows like Monsters and before we were in effect using the equivalent of pose sliders for every detail, in that we would scrub numbers in tool window to make the character move in camera. Took some getting used to. Now we have the option to do both and it's much more fun.
I do not recommend setting up your character with a pose slider for every control as this would be to cumbersome to rig, manage and animate. Bones are great from direct selection and manipulation of just the body part you need. Save the pose sliders for the parts that don't have obvious implementations for bones, such as facial articulation (though even this can be controlled with bones if you like).
Hope this has been informative!
-
Stuart, you're right about the spikes not being critical to animation. I could indeed put them off until late, just like lighting and shading. The will be seen close-up, so they have to look pretty clean.
Xcott, I don't have any renders of my failed attempts - those were a long time ago and I tend not to render to file for that sort of thing. Perhaps I will revisit the transparency idea with some additional geometry, as you suggest. I've gotten so many good ideas from this thread that I need a chance to sort through them all now. Magnet tool on a dense mesh wouldn't give me what I want. The spikes need to have perfectly round bases, so they'll need custom geometry. They will be seen close-up, as in the story reel of my opening scene. I may end up doing some 2D retouching for the close-ups.
Of course I'll be using Porcelain.
-
(removed - double post)
-
Pretty clever idea, Phillip. It may be just crazy enough to work. I'll try this.
-
I played around with Carl's project file which is very clever. Then I remember that I have this nifty plugin called "Conform" (can't remember the name of the developer) which does basically the same thing - it conforms selected CP's to a surface. This is perfect for getting the bases of the spikes to lie directly on the head, but I still have to tweak a lot of bias handles to get tangency. I'm hesitant to try to actually integrate the spike models into the head geometry because I don't want to upset this pristinely smooth surface.
When I finally decide on a solution I'll post images.
-
Wow, so many useful suggestions! I haven't checked out Carl's project file yet, but I'll probably give Jim Talbotski's method a try. John, thanks for answering my question about the polar geometry before I could ask it. I'll likely "cap" the head as you suggest. Hopefully the 3-point patches wont be a problem.
Thanks, all!
-
I'm looking for a good way to model the spikes on the head of my giant character. The tricky part is that the head is an irregular spheroid and I want the spikes to fillet smoothly into the surface of the scalp. End result would ideally look like this:

And here is my model as it stands:

I've just modeled one spike, scaled variants and manually placed them all over the head. I'm dreading going in and tweaking points and biases on all the bases to make them flush with the head. Is there a better way?
I considered using displacement maps instead of models but the resolution is insufficient to produce smooth spikes. I've also tried creating one horn and instancing it all over the head using Action objects and surface constraints. This causes other problems that I would rather not deal with, and still doesn't solve the tangency issue. Again, the head is not a regular sphere. I also tried adding a transparency map to the edges of the spikes' bases so that they "feather" into the surface. This worked okay when the spikes were pointing towards camera, but at extreme angles I ran into problems with shadows and being able to see into the interior of the spike.
Hope someone has a clever solution!
-
-9/11/03 : Added Ambiance Color to surface attributes
Oh thank you, thank you!
-
Hi Victor,
I tried it and sure enough, no channels.
 Doh!! This is clearly an accidental oversight. We'll have it fixed up for you in our next release.
Thanks,
Bob
Thanks Bob, that was sure quick! You guys make me feel so special.
While you're on it, could you make it possible to change spline interpolations for multiple CP channels in the PWS? I'm talking about the three little iconographic buttons controling the spline bias and the behavior before and after the knots.
Rock on, Hash!


*UPDATE on Page 2* Facial rig test
in Showcase
Posted
Lots of both, I think. The head was formed primarily with a lathe, hence the radial splines. I probably used extrusions for some of the limbs and digits. Other parts, such as the shoulders, hips and mouth, are hand-stitched meshes.