

digman
-
Posts
63 -
Joined
-
Last visited
Content Type
Profiles
Forums
Events
Posts posted by digman
-
-
Great modeling there and I like those wrinkes...
-
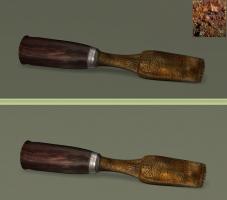
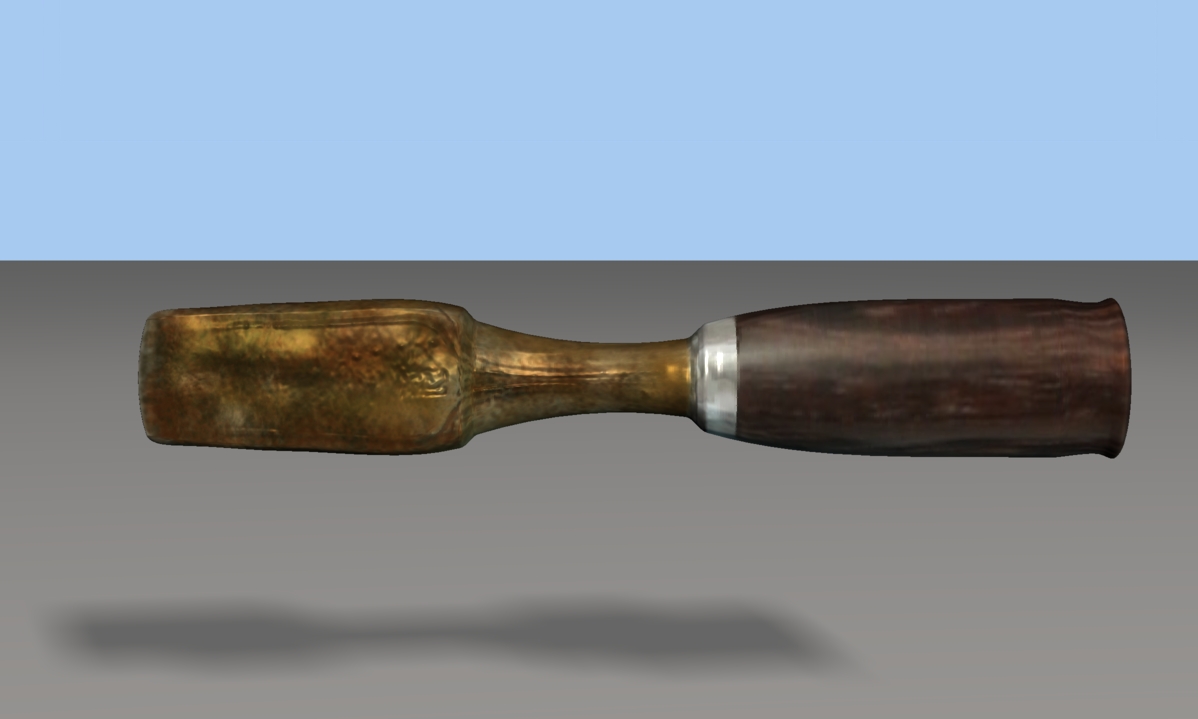
Chisel is done now but I still have to setup a better lighting routine... The upper small right image is the reference image that was used for some of the colors I painted for the rust texure.
-
Bump map will make it shine.
Ok Eric, I used the grayscale diffuse as a bump map to add some more texture the normal map did not show and rendered with some radiosity.
Yes, the gray is funky, just working on the chisel for now...


-
I took a break from rigging and made this old chisel today. A generic render. no radiosity
The model has diffuse map set to color, a grayscale map set to diffuse, 2 spec maps, and a normal map.
The spec maps I'm still working on as 3Dcoat and how AM renders them is different. 3Dcoats spec map will work,just have to tweak them some more.


-
Thanks Homeslice andf Paul for the information, very helpfull to know.
-
I'm working through Barry Zundels videos on charactor rigging. The videos are from 2005 so that raises a few questions.
Fan bone = cosmetic bone, I believe these are the same but just different naming. Correct?
Control bones, naming has not change, Correct?
With the advent of smartskining and cp weighting how important is it still to add a lot fan bones and control bones. I know that smartskin and cp weighting can't care of everthing but in Barry's tutorials he sure has a lot of different fan bones(cosmetic) and control bones. Do you still have to add that many or now can you reduce the number of fan and control bones with the use of smart skin and cp weighting? I'm sure their are many ways to skin a cat ( sorry cat) so any anwsers for this newbie rigger would be helpful... thanks in advance.
-
Thanks for the input...
-
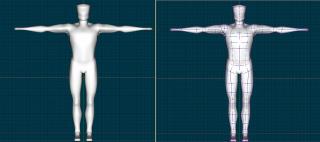
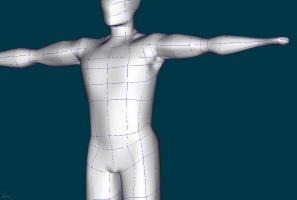
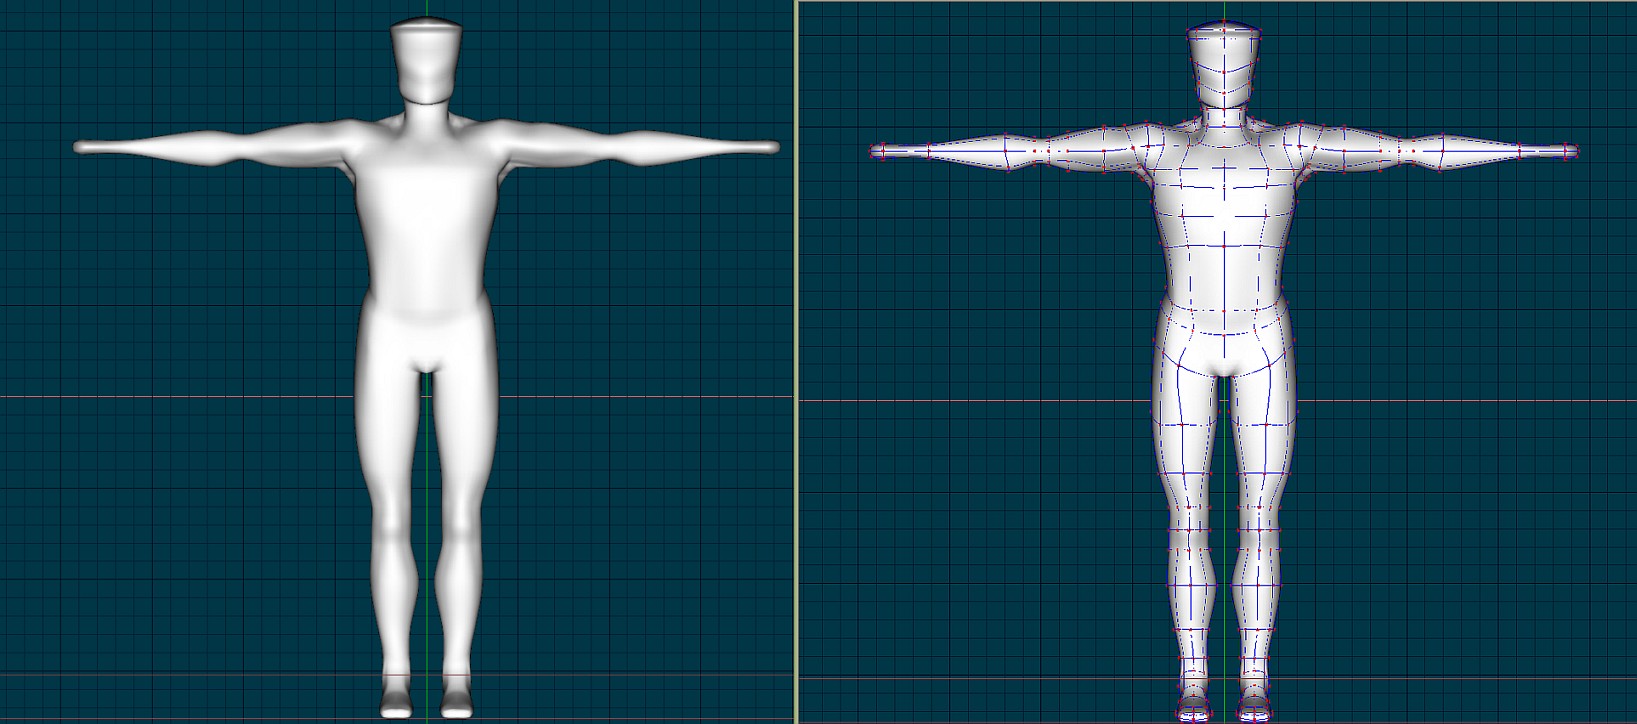
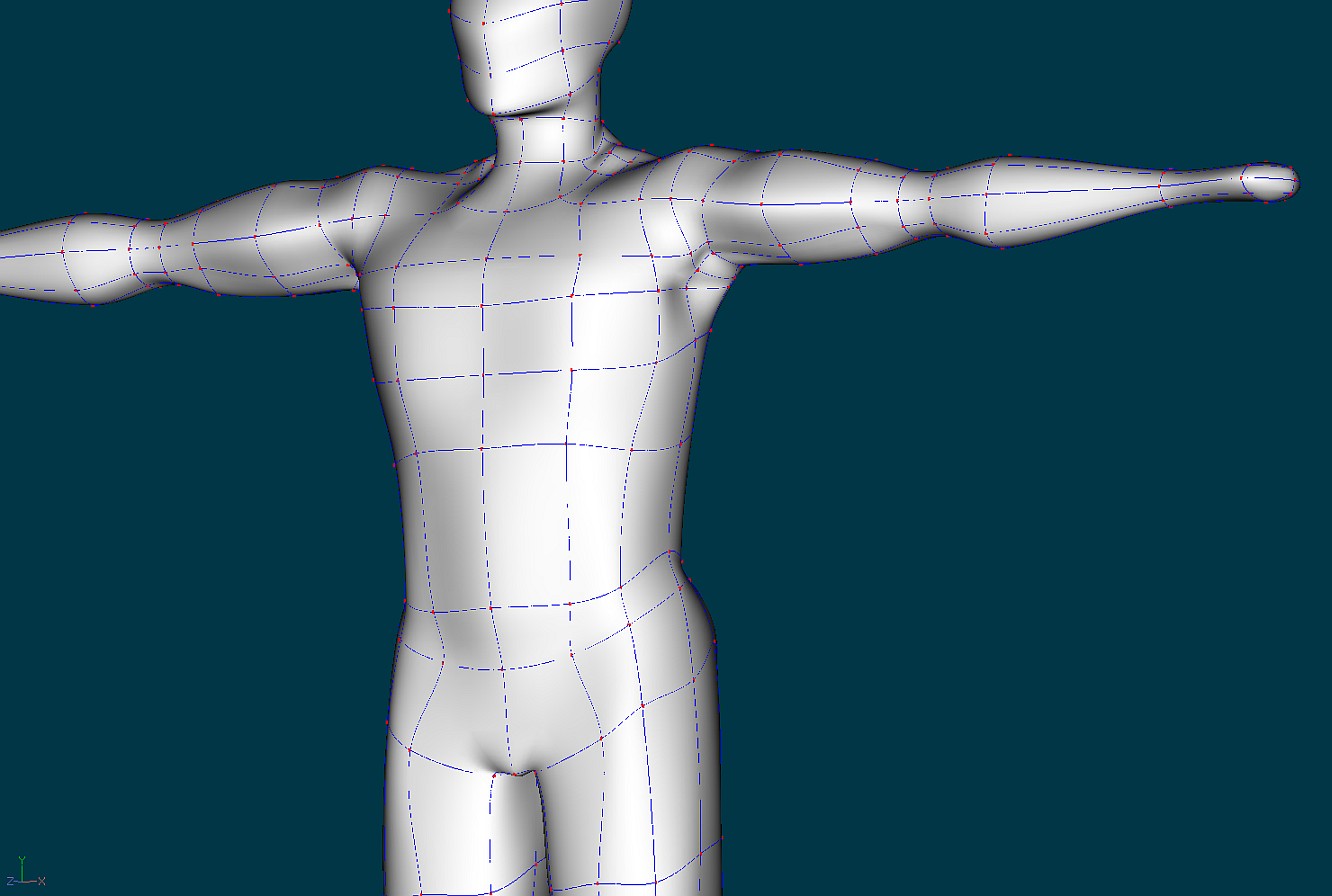
Hi all, I finished my second generic human type male. He has no toes, face or fingers. Still refreshing myself on AM modeling techiques. I'm going to concertrate on rigging basic model first.
Is this model in an ok state to rig? . I could have done a better job from the neck area out the shoulders. Rigging experts throw in your comments...
-
Welcome back digman! How's your son?
Thanks for the welcome back and my son had a very,very rough year with a severe illness but he much better now...

-
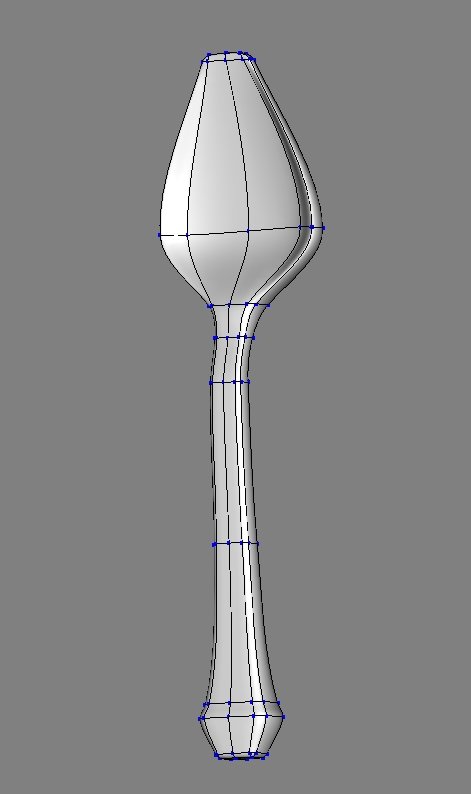
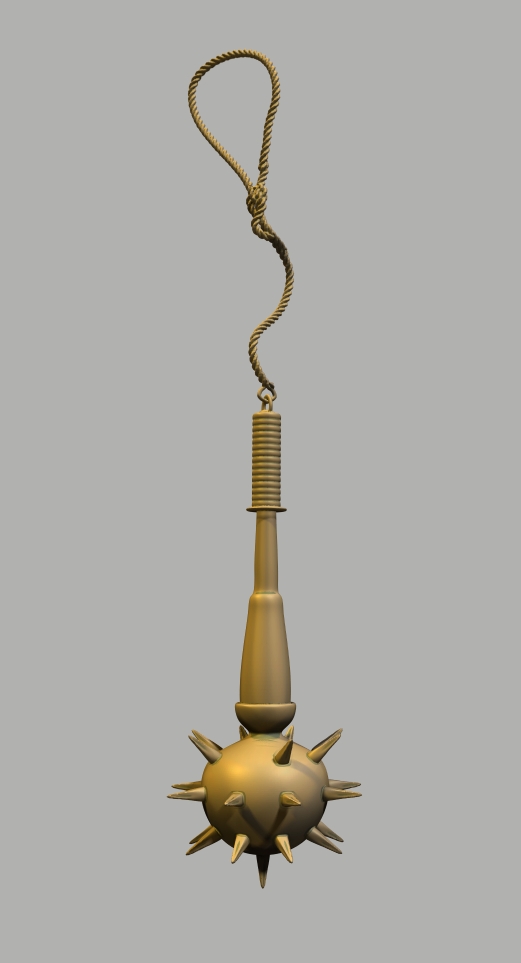
Hi all, it's been a long time since I posted. Real life medical problems kept me away, not mine but family. I just got another year of Animation Master. To refresh my spline modeling I'm working (WIP) on this simple Mace type weapon. Normal map details will be done in 3DCoat.
This year, I will work on learning the nuts and bolts of animation. I got Jeff Lew videos ( his older ones when he used Animation Master and Working through Barry Zundels videos as I buy them)
It was good to see the the King's Throne I modeled in some of Nancy's draft videos from the Scarecrow of Oz...
The rope to the mace's handle was added in another program.

-
My son is still in the hospital, I'm havn't done any 3D texturing. I been easing my mind with some 2d painting. I hope to return but as of now I can't give a specific time....
-
Hi all
My son's medical condition was better but has deterioated significantly again. I will again be tied up for awhile but I do want to continue on the throne. However, I am unable to make any deadlines to complete the texturing.
-
Thanks for your encouagement for my son, though he is an adult. He needs some very special medical attention right now.
Here is the UV breakdown on the throne.
These items are the most prominent so they will have get the largest texture space.
Each leg will have it's own UV decal
Seat, one UV decal ( will uv just the top an sides, The bottom can just be a darker material color)
Front and Back seat rest each with it's UV decal
Curtains each having a seperate UV decal
The two largest trumpet flowers with their own UV decal
-----------------------------------------------------------------
Next:
2 arm paddings, One UV decal
2 arms, One UV decal
2 top spheres , one UV decal
2 arm spheres one UV decal
2 simple birds, one UV decal
2 side plants, one UV decal
4 small Trumpet flowers, One UV decal (might break it into 2 decals if does not seem like enough texture space for detail.)
------------------------------------------------------------------
All knobs on one, UV decal
Precious stones and holders, one UV decal
All leg buttons on one UV decal
-------------------------------------------------------------------
That is about 20 texture decals, plus assoc. bump and normal. Also added if you want them are the diffuse and spec maps.
Auto-tiling on the legs, buttons, precious stones,holders and knobs to make things just faster for now.
How does this break down look to you? Any changes you like to make just let me know. This break down has been banging around inside my head and It's the first time I wrote it down. Now to copy and paste it to notepad. LOL
-
Hi all, I've been busy with my oldest son in the hosptial with some major medical problems but I havn't given up on finishing the throne. Here is the start of some fabric creation textures, rough concept to get a heavy fabric look for the throne seat curtains.
Bump map at 135%
Normal map at 50%

-
Howdy all
A.M.'s rendering of bump and normal maps is quite good. To all the newbies (I'm one too.) texturing in A.M. is fairly easy to learn once you understand decaling in A.M. sense. I use a combination of 3D painter and some 2d work. Also Shader Map Pro to produce the bump and normal maps from the texture map. I hope to make a texturing tutorial for newbies in the near future.
-
I'm fairly new to A.M. (since Nov 2008) but here is my two cents worth. I think a number of people will install a rig that "might" be easier to install but as they advance in their animation skills they would be looking for a rig like yours to use. I am a novice in animation but after awhile I would be looking at more advanced rigs so your hard work is and will be appreciated. Hope you keep your rigs updated.
-
3D Painter has it's advantages by using a auto uv which divides the model up into alot of planner patches. Then you use projection mode to paint across the seams in 3D. Also you can make a regular UV map ,paint it in a paint program. After that you bring it into 3D Painter to get rid of your seams by using projection mode.(3d painter will load your handmaded uv map). The only drawback of using projection mode in 3d painter is that you lose some texture sharpness when you apply your projection texture to your model.
3D Painter works as a plug-in inside A.M. or as a seperate program. http://3dpainter.com/
There is another way also by exporting your model as an obj file. ( I used 16 polygons per patch to get the model to match the A.M. model.) then bring the obj model into another 3D paint program. Now most 3d paint programs do not handle triangled polygons well ( These are made when exporting from your 5 point patches or 3 point patches). I have found that some work better than others in handling them.
Tattoo 3d paint: http://www.terabit-software.co.uk/
older program but works well with Hash exported obj models. Limited in some of more modern features but has projection painting too. Great for quick texturing and fixing seams.
Blacksmith 3D: http://www.blacksmith3d.com/
It also works well with Hash exported obj models. The free version is limited but still works well for texturing and it's free...
3D-Coat: http://www.3d-coat.com/index.html
The most powerfull of the above programs. Has lots and lots of features but does not handle 3 point triangles very well. I work around this because it is my fav. 3d paint program. In version 3 that is coming up
it will have direct poly painting so the triangle issue should be solved.
Edit: I forgot to mention that you just save the texture file and apply it to your A.M. model. You do not have to load the obj model into A.M.
-
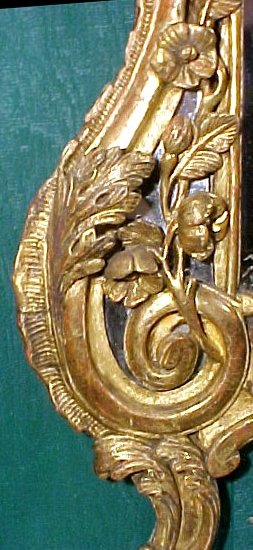
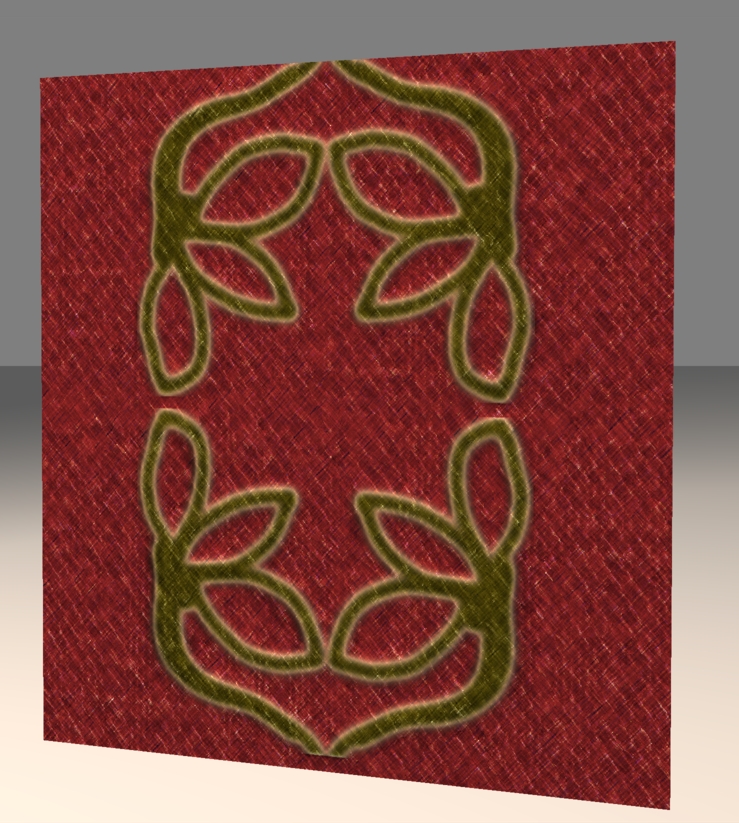
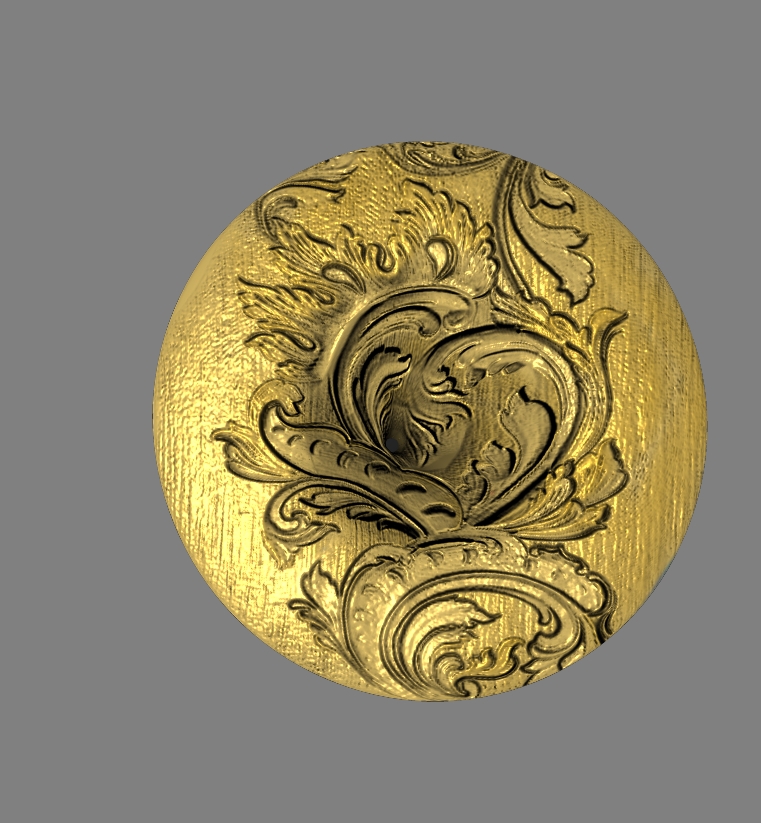
I had some pressing family matters arise but still will continue to work on the textures. Will use auto tiling to make it go faster as my time is limited. Anyway, here is a pic of an idea of rococo stytle, that can be on the trump flowers. Still in the process of learning the in and outs of flattening etc....

-
Hi all
Is the Animation Master 2006 book by David Rogers a good resource for those of us who are new to A.M in additon to the great information you can find on these forums. Thanks!
-
Nice work, Holmes. The action has gotten really smooth. I was enjoying the story. Your hard work is paying off.
-
Just a heads up, I'm working on learning the uv mapping in A.M.
William Stutton's and Collin's tutorials have been invaluable plus all the other tutorial threads in the forums.
Virtualmediastudios.com has a tutorial that ranges from creating your groups to the end of the texturing process. Very good and detailed.
One feature I like is that you can in real time interactivity adjust your uv points to get some stretching fixed. Flattening takes some skill in a more complex object.
Scale to (0) Z works well on some parts too
It's also good to have 3dpainter to check on how well the uv stretch fixing is doing on a texture map.
I have a few simple areas uv mapped already, working to the more complex ones.
-
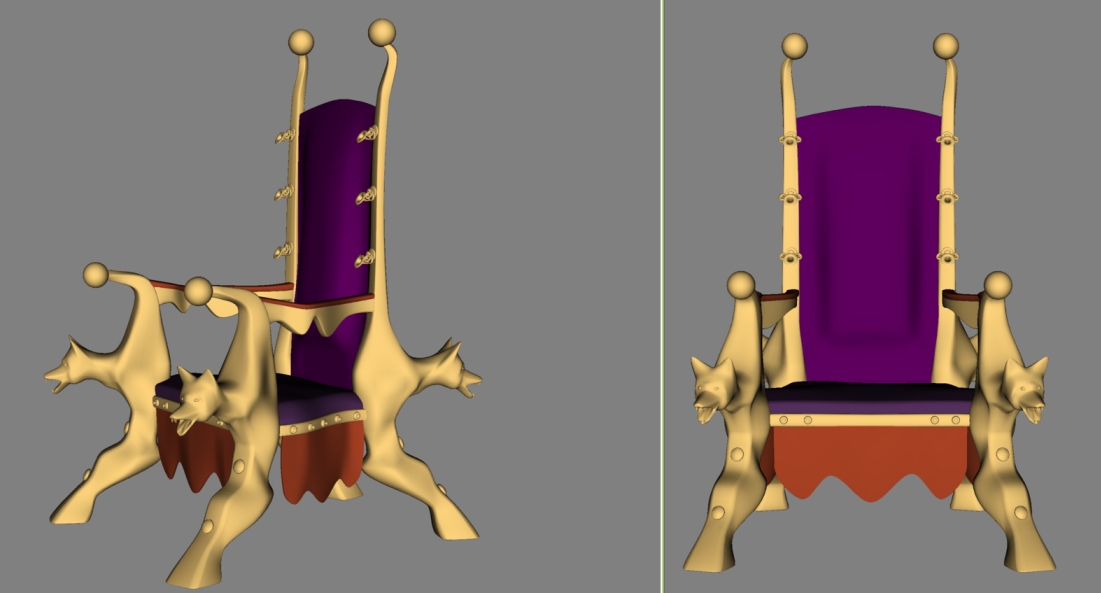
I thought this was a good place to end adding real details. If ya like it, I will start UV mapping, yikes, hair pulling time LOL. I have downloaded some good tuts on A.M. uv mapping. SVN has been updated. There are a few minor problems to fix, let me know whatever errors you find. I would have uv mapped each feature when I made it but wasn't sure if the feature was gonna be in the final throne or not(would have been better though). That means some more work for me. I will have some questions for sure on uv mapping.
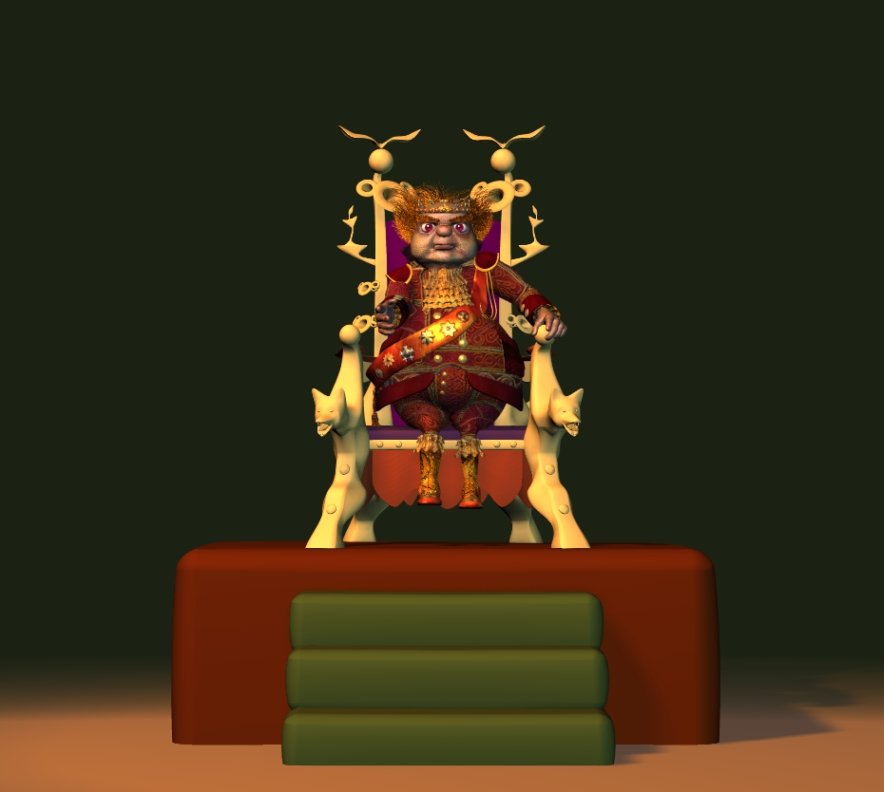
I added a pic of King Krewl on a very generic platform but what self-respecting tyrant would not have one! Just plain A.M. 3 point lighting.

-
Nancy
1) it is not necessary, nor desirable to upload the .hinfo files - just need to commit the .mdl files. Eventually should delete the hinfo file off the svn. - but don't worry about it2) eventually - before decaling, it would be best to translate the throne up so that the bottom of the legs rest as close to possible to y=0. You can do that in modeling mode
3) its not necessary to add bones (eg COG) to the throne - unless you have something in mind to animate on the throne?
Ok, only upload the mdl file in the future
Model now resting on y=0 plane
Not sure how I got that bone there but deleted it.
I have added some more detail and will rotate the trumpet flowers about 45 degrees, they do stand out much better.
Phato
Model toes and claws into the front feet. Not deep relief or terribly detailed, maybe just a normal map. Something that suggests fox paws.I was thinking of horse hoves normal mapped in but I like the fox paws too, I will see what I can do on adding in some detail for that and see what it looks like.
-
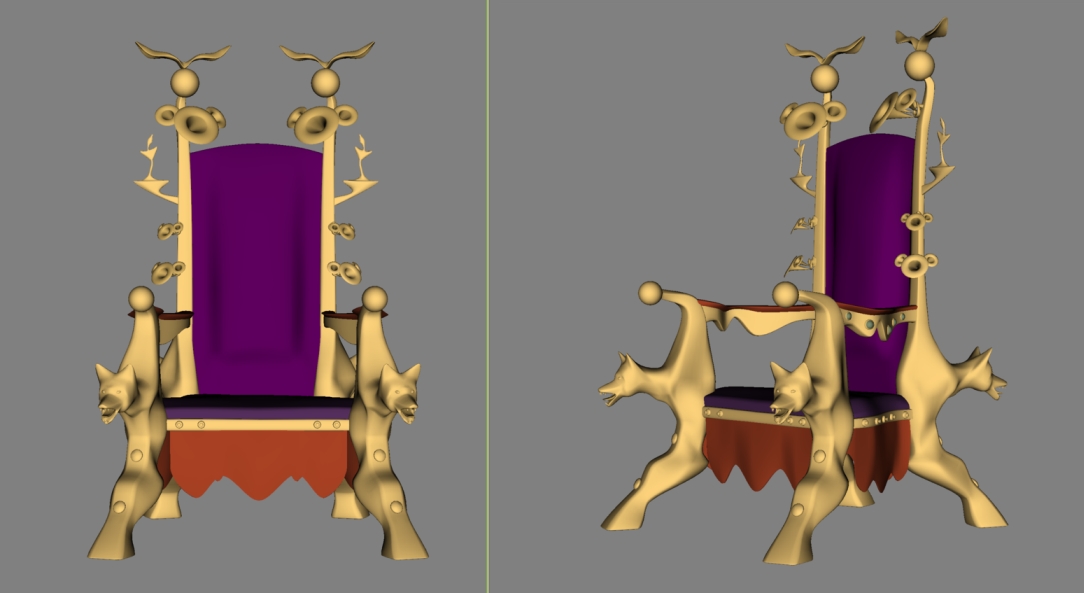
Hi all, hope ya had a very Merry Christmas. I added some items to the throne.
Patch count, appox 2400
Trumpet flowers on the post,Knobs, buttons, fabric top for arms, raised out the back seat for more of a cushion look. I also think that small precious stone on the back spheres would look good and tongues for the fox heads. I included a picture with a sample of rococo features that can be normal mapped all over the golden areas of the throne. Seat curtains will have a heavy rococo embroidery look.
Need some feed back before continuing to add stuff or even if it's needed.How do you like the direction of the throne so far etc.....
edit: SVN updated.


Old chisel
in Work In Progress / Sweatbox
Posted
Thanks Eric for your replies. Though I might disagree with the shinnies of your rust, I saw that my rust had too many indentations.
Yes, I know what bump maps are, I have used them for quite awhile though now I will use a normal map. Then use a displacement map but put it in the bump channel to help bring out the details of the normal map. On this occasion, I went a little different route. I did reworked my normal map to futher give the chisel an even older look and to reduce some of the indentions. The rust color reference map was just use as color reference not the details.
I like creating my own textures as you can see that way I will improve my skill.
The lighting is terrible I know but this just started out as a quick Sunday fun project, LOL but as lighting in AM is new to me I will study that part and make a better lighted scene.
Oh, I did change the chisel model alittle. The handle will need to be reworked in the normal map to give it an older look to match the blade...
Thanks again for the input as it makes us strive to be better...
AM version 15.j
MJL, That is a nice trade wood (very very hard,I went and looked it up)you spoke of but nope it's just a generic wood style on the chisel...