

iGeek
-
Posts
264 -
Joined
-
Last visited
Content Type
Profiles
Forums
Events
Posts posted by iGeek
-
-
I couldn't get the cylinder to work either. Here's a project I'm trying to do, just to get a grasp of how Newton Physics works. I'm having serious problems with it. I made it in 13.0 Beta 1. Here's the project file with the simulation calculated. What's wrong with how I set it up?
-Zev
-
Well done Bob. I like the specularity on it.
Oh, the specularity of it all!
-Zev
-
Yeah, but it was completely self-assigned. It wasn't really an assignment, per se, more me sucking up to my teacher. She seems to like me for some reason; I've been made a teacher's pet against my will. So now it's more of a personal project that I work on in my copious spare time, and that I'll bet getting credit for. So let me explain what you see:
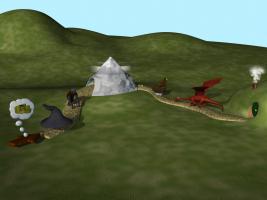
This is Joseph Campbell's Hero's Journey as it applies to The Hobbit. Here are the steps in this image:
1. The call to adventure: the prospect of getting the dragon-guarded treasure intrigues Bilbo. There is a refusal to the call, but I didn't show it.
2. Helper: the hat is that of the wizard Gandalf, who helps Bilbo on his quest.
3. Test: Bilbo and Thorin's company encounter three huge trolls eating mutton in the forest. Here's one of them. It is a first test for bilbo. It's also the threshold to adventure, In my opinion.
4. Another test, I think: the Misty mountains. In them, Bilbo finds The Ring, seen at the mouth of the cave. When he escapes, he loses his brass buttons on the doorstep.
5. Helper: the lord of the eagles rescues Bilbo, Gandalf, and the dwarves from the wolves and goblins.
6. The final test (I think): Smaug the dragon. Though Bilbo doesn't kill him, facing the dragon is the bravest thing Bilbo does.
7. Return with the "elixer": Bilbo gets home to Bag End, Underhill, and his kettle is ever more musical yadda yadda yadda
That's the basic idea. I have to give it a bit more thought.
By the way, I figured out a fix for the mist: use a box instead of a cylinder.
One more question: what exactly is Ambient Occlusion? Is it something I should worry about on this project?
Thanks for the comments.
-Zev
-
Here's a render. I've added a texture to the door so it doesn't stand out as much. The updated project is still available at the same link.
-Zev
-
Update: I got the smoking chimney working. It turned out the smoke was there, it was just very very small. I messed with some scale settings and got it working. I wonder if the scale issue is causing the mist to behave weirdly?
I also moved the eagle down to street level. I think it looks a lot better.
-Zev
-
annnnd after months and months, I'm working on it again. I decided to do the troll after all. It wasn't as hard as I thought. I learned a lot along the way, and I realized how much I need to take an anatomical drawing class.
Changes:
1. Troll with mutton in his hand (From the chapter "roast mutton")
2. the One Ring is inside the mouth of the Mistiy Mountains tunnel
3. The Lord of the Eagles (might add a crown) is perched outside the mountain. I learned a lot about hair by using it to do his feathers. I retrospect I should have used decals.
4. slight modifications to the lighting and angles.
Still unanswered:
1. that darn mist! I might go back and use johnl3d's example, now that the "dark smoke render" bug is fixed.
2. The chimney is still not smoking. I think I'll do the smoke as a separate model.
3. Is the Eagle's perch and position alright? Too busy?
feedback = good
I've posted the updated project here. It's 30MB and it decompresses to 94MB.
-Zev
PS This render took 51 minutes on a dual 2 gig G5 16 pass 1600x1200. I tried rendering in 12.0t but it kept crashing. I had to render in v13 alpha 9, and it worked like a charm. I haven't had any other issues recently with rendering the same project in v12.
-
Another option is using QuickTime Pro. It costs $29 from Apple, works on Mac and Windows, and has some really nice features for importing image sequences and exporting the results. But on to your question:
Right-click on the Images folder in the Project Workspace. Choose New Image/Animation... from the popup menu. Navigate to your folder of images. Select either the folder or the first image, I forget which. Click OK.
This might be inaccurate, I don't have A:M sitting in front of me at the moment.
-Zev
-
As you may imagine from my avatar, I am something of a Cube geek. My fastest time for the regular Cube (3x3) is 26 seconds with a modified F2L/layers method, in cube-geekese. I tried to figure out how to rig a cube... in fact, a bunch of us tried, and there's a thread floating around somewhere with that topic. It would be really nice to just have pose sliders labeled "Front," "Right," etc. and have the cube move. The closest analogy for the feature I could think of at 3 in the morning is a layer mask in Photoshop: a image that you don't see, but it controls another image. Imagine geometry with bones that you didn't see, but it controlled whatever geometry happened to be inside it. It would be like a Cube within a cube. You'd build a bunch of interlocking rectangles that enclosed the actual Cube and give them pose sliders. Then, when you turned them, any points inside the affected area would move. This would solve the problem I see with all the examples here: there is still some scaling during the turning. I think building this functionality into a plugin or A:M itself would open up possibilities for a whole new class of movement and automation. It would be great for manipulating specific entities within a swarm or crowd, for example... or is there already a way to do that? Gotta read the manual...
-Zev
-
Wow, what a concept, a contest with no strings attached! WEEEEIRD.... Anyway, count me in. I'm 17 and waited too long to update to Sorcerez. Now I'm thinking I shoulda waited. Please, count me in. Oh, and I promise I'll finish TAoA:M soon! Really!
-Zev
-
Here's another update. I deleted the dust and started over, and it still has the same hole in it. Might I be better off painting it in later? Here's the look I'm going for: link. Any ideas? Also still working on that smoke... and I think instead of modeling a full troll, which I'm not looking forward to, I'll do a clump of trees with dark figures and a fire burning.
-Zev
the project is still up here.
Edit: oops, forgot the image

-
I tried it, but I can't get the look I'm going for. That looks more like smoke over a volcano. I'm going for clouds forming a ring around the mountain. Also, anyone have any idea why the smoke for the chimney isn't showing in the choreography at all?
-Zev
-
Anyone have any ideas on the "mist" around the mountain? I can't figure it out....
-Zev
-
Wow, this sounds like a neat idea. The old terrain plugin is long in need of repair/replacement. I've had two projects recently where I would have been able to use a terrain plugin. One was a model of K2. I had to get someone else to map my terrain map onto a plane for me because the terrain plugin doesn't work on the Mac. The second you can find here. So here's my request for the plugin: add an easy way to create tunnels like in my WIP. I was going to use my old K2 model, but it's really high res and I'm not terribly interested in either cutting a hole in it or using booleans. Good luck with the plugin!
-Zev
-
I didn't have any guidance with the smoke. It's there because that mountain represents the Misty Mountains that Bilbo and the Dwarves travel through. But aside from the hole, what's wrong with the mist/steam/smoke that it has a hole in it? I've posted the updated file here. Anyone want to download it and check it out? Thanks.
-Zev
-
Here's an update. I've fixed a few problems and have a few more. I like the grass a lot better. I'm getting better at mixing up materials using combiners, learning what the different options are, etc. I originally envisioned the image as a sort of cartoon image, but it seems to be drifting more towards a model/diorama. Because of that, I'm trying to make the mountain look, if not real, more realistic and less like a cartoon. What's a good way to do that? I'm not happy with what I have now. Also, what do y'all think about the green arrow? Now it seems out of place. Should I just get rid of it? I also changed the camera angle to give more focus to the scene.
By the way, is the hat easily recognizable as Gandalf's? As always, I'd love to hear any questions/comments/crits.
-Zev

-
I tried messing with roughness and got some results I like. Thanks. I'll keep messing with it. Anyone have any thoughts on the other questions?
-Zev
-
Yeah, it's really looking nice. Now, on to the part that interests me

The cube looks cool, but there could be a bit more of a raised edge on the stickers. Although you could have one of the older ones with flatter cornery stickers. I've tried to rig the cube in my avatar– wanted to make an animation of it solving. No could do. I think the only way to do it would be to set something up where it turned the points in an area, not specific points. If we get enough interest we should start a new topic on this... I have some ideas. It involves turning constraints on and off, could that be part of a pose slider? Sorry to go off topic, but as you may have noticed, It's something of an obsession with me. You can find some great solving tips at www.speedcubing.com. Oh yeah, and the render looks great. I still haven't touched radiosity or advanced lighting. *shivers*
-Zev
-
Hello all
I'm using this project as an excuse both to get a lot of A:M practice in and get some extra credit in my English class. I'm not on any deadline, I just thought it would be fun to make this poster. It depicts Bilbo's Journey from start to finish, with focus on the generic elements of a Hero's Journey (call to adventure, helpers, etc.). I've been working on and off on it since school started. Here it is about halfway done. I still have to put in the Eagles and/or a bear, the goblins, some background stuff, maybe Gollum, pose the Dragon, and anything else you all think of. I have a few questions about what I have so far. You can download the entire project (10MB) from my iDisk.
1. What's wrong with the mist around the Misty Mountains (the purple one)? It worked at one point, but now it has a hole in it.
2. I put smoke in the chimney using a modified smoke material I found on the CD. It shows up fine in the modeling window. I can't get it to show in the choreography though. I tried messing with camera settings, draw particles/hair, etc. Any ideas?
3. What will make the grass look more like grass? Is there a material with that? In conjunction with that:
4. What is a good way to light a scene like this? I'm most likely printing it as a poster for my English classroom, and I'm also wondering if I should just have the road and objects against a white background (there will be captions/labels)?
5. I accidentally did part of the shaping of the terrain in modeling mode and part in muscle mode. I know, I know, "don't do that," but is there a way to transfer the positions of all the cps from the choreography to the model itself?
6. How is the portrayal of scale? In the zip file there's an old render that has a different camera angle. I'm thinking maybe lower the camera and use a wider angle. You need to be able to see the thought bubble with the coins all the way to the brass doorknob. Your thoughts?
7. Write your own question, then answer it!
Thanks in advance for your brilliant and insightful comments. Here's the picture.
-Zev
UPDATE 11 November 2005: I've posted a newer version of the project again at the same link.

-
Wow, this is an old topic... Did anyone happen to download the model and keep it? I lost this model and a few others I did in a weird backup thingy, and This one in particular I'd like back. Anyone? Thanks.
-Zev
-
The "Sorcerez" CD comes with Mr. I as one of the models in the library. Just look at that and see how they did it. Also try the "Cooper" face tutorial.
-Zev
-
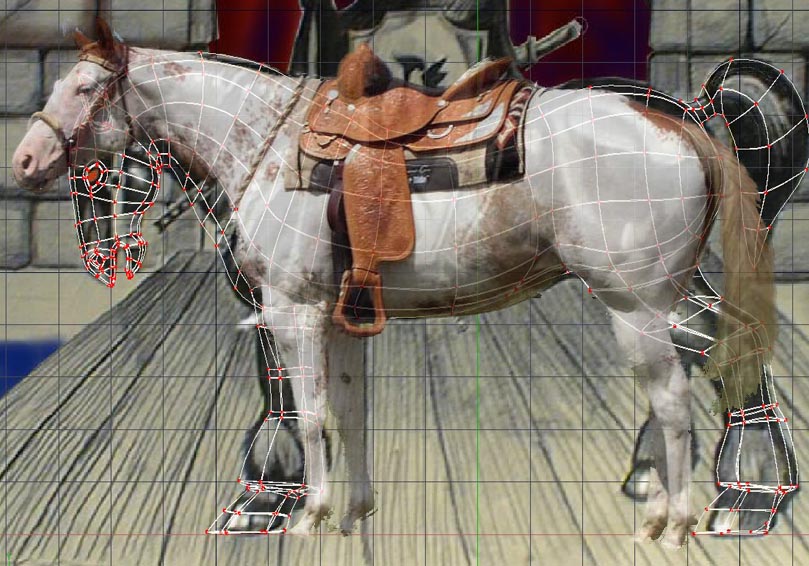
Sure, here's the horse pic:
http://www.uark.edu/depts/agripub/Publicat.../horse-sale.jpg
It's the only good one I could find with a google image search. Cool helmet, nice splinery on the face part.
-Zev
-
Lookin' nice so far! One small note: I know the Death dealer's horse is normally seen in that pose, with the left hind leg slightly back, it is not quite believable to model him with both feet back. he looks slightly unbalanced, and if he straightened out both legs, they would be far too long (think stegosaurus). Just a thought... here he is lined up with a real horse so you can see the balance. Otherwise looks good. Keep it up!
-Zev
-
Name: Zev Eisenberg
Exercise Completed: Exercise 10 "FW-190 Fighter"
Date Competed: 11 July 2005
Remarks/Suggestions: I had done this very early on, a few years ago, but it was cool, going back and doing it again, after my modeling chops had improved. I also had trouble with the propeller spinning. I created a new action for it and, at frame 1, I set the Z rotation of the prop to 5760º. didn't work. I set it for something lower, and it still didn't work. In the render here, I ended up with something like 4 frames per rotation I think. In regards to blur: When you render, under the render options, set Multipass to On. In terms of number of passes, I have found that 25 is the lowest acceptable value. Then render.
-
Yes, the normals were flipped- but that wasn't it. The normals were also flipped on the leaves. They're the same geometry as the petals. I flipped the normals, and nothing happened. Here's the prj.
-Zev


Newton Physics
in Work In Progress / Sweatbox
Posted
Cool that did it thanks.
-Zev