

alano
-
Posts
75 -
Joined
-
Last visited
Content Type
Profiles
Forums
Events
Posts posted by alano
-
-
-
Started using AM after many years away now that I have more time to devote to animation projects again.
I've got this cauldron steaming very nicely and I want to change the color of the steam to pink (love potion) over time. I keyframed the shortcut to the streak emitter's attribute's diffuse color to change over a few frames and I get a lovely gradient of this on the timeline (see pic). Alas, the actual attribute's color remains stubbornly gray. I've tried reloading the project in case things needed to be started from scratch but no joy. I feel I must be missing some simple switch or something. Any help would be appreciated.
Thanks,
Alan

-
This has happened before, of course, and the most elegant solution is to flip the camera 180 degrees so it renders from the "bottom" up and then rotate it back to normal in photo software or whatever. It seems the toon renderer saves time or something by not starting to render until it hits the top object in the frame. Particles and hair are not objects from the renderer's point of view apparently so they get unlined until that first object is contacted and then it works great.
Alan
-
I haven't posted in a while since I haven't had any AM problems recently but here is my latest short done with AM. Enjoy.
Alan
-
Not much to add to what Robcat already said, but I thought the sound was a couple of frames ahead of the picture. Try delaying it a frame or two and see if it doesn't synch up better. Also, the inside of her mouth is too red and it looks like the background so it seems as though you can see right through. Perhaps if you darken it.
These are all relatively minor things of course - you've got a good sense of timing and are really getting somewhere.
Alan
-
I suggest showing at least five repetitions of any walk or run cycle from the side view - even more for short cycles like runs. That way we can see how the cycle "hooks up" from the end back to the beginning.
That said, I think you want to have the front leg go straight either one frame before or right at contact. The arms need to pump further forward for a sprint or less far back for a jog. The whole thing needs to be faster (fewer frames) unless you are doing a slow-motion run. Runs are, indeed, more difficult than walks, but you're getting there.
Alan
-
You've got the moves, but it all seems to be the same speed. Robcat's right about the falling and I think the actions should be a touch faster and the holds a few frames longer. This will help give the guys more of a sense of weight. Good job!
-
Thom's walk was a little "runway" for an office setting, but the characters waiting in line were quite good though some of the stretching could be slower. People in line like that have got plenty of time. I really liked the variety of poses you had for the Thom's in line. It looked like the coffee in the pot was anticipating the drop rather than reacting to it.
All-in-all a fun piece.
-
Are you using hair in this model. Hair/particles slow things up considerably. If so, you can go to the bottom of the hair material properties and turn off real-time display of the hair.
-
The start is quite good and the arms work pretty well throughout but the footwork bothers me a little. Usually the push foot (right one for right hand throw) steps forward after the throw so that the right arm and right foot end up closer to the target than the left. Your footwork was closer to something like a shot put where the "puter" can't step beyond the line. No such requirement for throwing a baseball.
Really good start.
-
My chors, models et al tend to be like me: simple. I'm more interested in animation than modeling so simple is better. I had no trouble using dialog as separate actions on my last short. I can easily see how several complex characters (especially with hair) and a generous amount of background could slow these refreshes up.
I just found it easy to sit down with my dialog wavs and generate the lip-synch and basic facial expressions all at once for each character. Of course a one person short has a different work-flow than a large group feature but there is an advantage to having one person do all the lip synch for a given character to keep it consistent.
-
I like Nancy's advice about doing dialog. I'll do the mouth and facial expressions for the dialog so that I can concentrate on them flowing properly without worrying about anything else. Then I can drop that action into the chor and focus on the body motions.
-
I think streaks (in the particle materials) are a good choice for this type of thing. I would also model a few "splashes" and make them particles that are constrained to the surface of the umbrella.
-
I agree with Robcat, the weak staging made your impressive character animation suffer. I particularly liked the walk and would have liked to see a bit more of it. I would like to see our hero struggle a little more with the lever. I have a feeling you could have done a very nice job with that bit of business. All-in-all, an outstanding effort.
-
Very nice!
-
It's looking pretty good but I can't tell for certain how much hip rotation you have. It seems under rotated to me. I like to judge walks from a side view and multiple (like 5 or 6) steps. With one step you can't see how it hooks up properly. I do like the character quite a bit - his clothes look spot-on.
Alan
-
I double click on the image file in the images folder (to open it up in a window) and that seems to get it to reload the new version.
That's the ticket! Thanks.
-
I prefer to use PNGs since alpha comes over without trouble. I think TGA's need Photoshop to save the alpha as a selection or something to make it save properly... or I could be smoking crack and I use PNGs because it's easier to say, "pings" than, "TaGas".

On a related note, is there a good way to update an image in AM after I've made changes to the file in Photoshop or whatever? I've been closing the project and reopening it but that just seems lame.
-
That thread was removed because of perceived negativity. In short, the best solution if you have this problem, is to make sure that the entire visable patch(es) are covered by the decal and the decal hasn't any alpha. You can also try decaling the entire model and then a decal with alpha should work OK on top of that. There has been a suggestion that a fix is in the works.

Alan
-
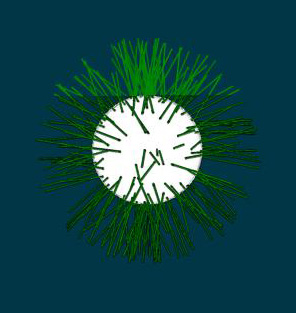
I'm doing a project using toon render with hair. It works beautifully for the most part, but if there is any hair above the highest patch it isn't rendered the same as the hair below. I threw together a simple test to illustrate below. Has anyone else run into this and if so, what did you do? It also happens if the hair has an image attached.

Alan
-
At the risk of getting the thread deleted, this seems to be a problem with some users. Version 15f is expected to fix it. In the meantime, Nancy G. suggested decaling the entire mesh before applying any decals with alpha and this seems to work well with color. Covering all the visable mesh with the decals also seems to be important. Your bump map looks like a similiar symptom but without alpha, I'm not sure if it is the same or not. Someone suggested something along the lines of "dirtying" the white on the bump with just a little noise would help. Let us know what works out for you.
Alan
-
Any idea when 15f will be available?
Alan
-
Looks just like the decal artifact problem a few of us have been having with v15e. Two solution/workarounds: 1) Don't use 15e with decals or 2) Make your decal big enough to cover all the patches you need to and don't use transparency. File type makes no difference. This only happens with some users and no one knows what we have in common.
Try scaling your avi up so that it completely covers all the visable patches when you apply it.
Alan
-
Looks like you have hair dynamics on but didn't pre-roll so the gravity effect happens during the shot.
Alan
Trouble with keyframing material properties
in New Users
Posted
Thanks for your efforts. I just recreated the problem in a new project included here. I can keyframe the emitter to change the Rate of Emission and that works, but keyframing the attribute won't actually change the surface properties. I think an easier workaround for my particular situation is to have two emitters, one gray and one pink, and cross-fade their rates of emission. I will check it out.
Weird. This is the second time I found a bug doing stuff I didn't think was all the groundbreaking. The first was years ago when I was using the toon shader on models with hair.
Thanks again,
Alan
streak.prj