starwarsguy Posted April 11, 2005 Share Posted April 11, 2005 And some cracks in the wall might be cool. I'll play around with it. I love texturing! Quote Link to comment Share on other sites More sharing options...
Newbert_Zero Posted April 11, 2005 Author Share Posted April 11, 2005 wait hold on!starwars guy! I went on google and got a bunch of images for texturing the wall. Id appreciate it if u guys got the files im about to post and say wich image you would suggest I use for a different wall texture. Wall_decals.zip Quote Link to comment Share on other sites More sharing options...
Newbert_Zero Posted April 12, 2005 Author Share Posted April 12, 2005 and the other file with more pictures. wall_decals_2.zip Quote Link to comment Share on other sites More sharing options...
Newbert_Zero Posted April 12, 2005 Author Share Posted April 12, 2005 also is it just me or does the shadow that the sheild is casting look funny? Quote Link to comment Share on other sites More sharing options...
starwarsguy Posted April 12, 2005 Share Posted April 12, 2005 I think the shadow's fine. As for the texture, I think "grey wall" works best for your image, but it's hard to tell with the bright lighting on those pics. It comes down to what you feel works best in there. Quote Link to comment Share on other sites More sharing options...
Newbert_Zero Posted April 12, 2005 Author Share Posted April 12, 2005 ok now what would be the best way to apply it? Quote Link to comment Share on other sites More sharing options...
Zaryin Posted April 13, 2005 Share Posted April 13, 2005 I love the lighting you have going. You might have to add more light for the character though when they get in there. With compression the lighting might pixelate alot of the movies -- or maybe not . Looks great so far. Quote Link to comment Share on other sites More sharing options...
Newbert_Zero Posted April 14, 2005 Author Share Posted April 14, 2005 I cant think of a way to apply that decal i need a little help here. Quote Link to comment Share on other sites More sharing options...
Newbert_Zero Posted April 14, 2005 Author Share Posted April 14, 2005 I got the idea down for what im going to do for the first couple seconds of animation before the fight scene starts. Im going to have the camera start at the sheild then slowly back out into full screen. as it is backing out the camera will flash at one character for a split second. back out some more then flash at the other character. Then it will fade out and It will show the title. For now it is just swordfight 3d. Im gonna have fire burn under the letters like a wave. were it goes from the first letter to the last. Then it will make a pounding noise and the fight begins!!! but first i gotta get this metal made. And i gotta texture the walls. I just dont know how to texture it correctly using the image starwarsguy recommended. let alone any texture like that. Quote Link to comment Share on other sites More sharing options...
Newbert_Zero Posted April 15, 2005 Author Share Posted April 15, 2005 Well it looks like D.Joseph Design is gonna be sending me his metal material so thats now covered but i still need to update the wall. Quote Link to comment Share on other sites More sharing options...
Newbert_Zero Posted April 15, 2005 Author Share Posted April 15, 2005 Im having trouble with the material on the letters and i still am looking for advice on the wall texture.... hint hint. Quote Link to comment Share on other sites More sharing options...
JoshB Posted April 16, 2005 Share Posted April 16, 2005 http://www.imageafter.com/image.php?image=...d6976b5dc2b0d7f That's a tilable texture. All you have to do is scale it to the size you want--set your repeat for x and y until the bricks are the size you want--then right click and hit apply. If all goes well that should be it. Im having trouble with the material on the letters and i still am looking for advice on the wall texture.... hint hint. What letters? Need something more to go on. J Quote Link to comment Share on other sites More sharing options...
Newbert_Zero Posted April 26, 2005 Author Share Posted April 26, 2005 wow i havent been working on this for a while... Quote Link to comment Share on other sites More sharing options...
Newbert_Zero Posted May 1, 2005 Author Share Posted May 1, 2005 ok ive been working on this for a little bit now but it doesent really seem like ive got anything done. ive only got one of the characters in the first pose and edited his sword and junk and fixed some bone problems. im using tom by the way. I moved the windows up and it streched the decals out. i think im gonna give it a different texture now anyways. but im having a problem applying a brick type decal. i cant repeat it. i dont have much time to explain right now but just look at it. how am I gonna set up this wall decal? Quote Link to comment Share on other sites More sharing options...
bentothemax Posted May 1, 2005 Share Posted May 1, 2005 I've just barely skimmed this, so i dont know if someone has mentioned this . . . but i think that the shadows coming through the windows are to . . . hmmm whats the word . . . hard -- i guess. I would suggest increasing the amount of rays cast from the light you have shining through, to allow for a softer shadow. If your looking for hard edged shadows then it's fine. But your image with a fire and an evening setting, i think would look much better with a more soft and glowy feeling to it. . . Ben Quote Link to comment Share on other sites More sharing options...
heyvern Posted May 1, 2005 Share Posted May 1, 2005 but im having a problem applying a brick type decal. i cant repeat it. i dont have much time to explain right now but just look at it. how am I gonna set up this wall decal? Is the image tiled? Have you edited it in photoshop or image editor so that it is a seamless tillable image? That is the only way it will tile without a seam if it isn't large enough to cover the whole surface that you are decaling. Vernon "!" Zehr Quote Link to comment Share on other sites More sharing options...
iGeek Posted May 1, 2005 Share Posted May 1, 2005 Here's a tileable version I did in Photoshop. tile.tga.zip Quote Link to comment Share on other sites More sharing options...
Newbert_Zero Posted May 3, 2005 Author Share Posted May 3, 2005 ok slowly im working on this project. I dont know if it even looks better yet though. I cant tell if the brick texture is gonna look better. im not very good at texturing so the bump map looks kinda bad. its bumpy where the light is but not where the light is really dim. it also isnt bumpy between each brick. I also didnt texture the inside of the windows. Im not sure how im gonna make the bricks turn around on the windows yet. Oh and i have 1 guys set up for the first pose lol.... i guess i have to start somewhere. OH and thanks for the tiled version zev Quote Link to comment Share on other sites More sharing options...
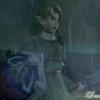
Newbert_Zero Posted May 3, 2005 Author Share Posted May 3, 2005 Heres a close up render of the sheild and where the texture is the most....texturury now if only i could get the bump map working a little better, the inside of the windows textured, and maybe even volumetric light poring through the windows. I think i would be satisfied enough to start animating. I guess at the rate im going thats gonna be a while! Quote Link to comment Share on other sites More sharing options...
heyvern Posted May 3, 2005 Share Posted May 3, 2005 Those bricks look great! You're getting the hang of it I think. I think the bump looks good as it is. And the lighting is very dramatic. .. not sure what is in your head of course, but consider how close and how the wall will be seen in the animation. You may not need to tweak this as much as you think. Vernon "!" Zehr Quote Link to comment Share on other sites More sharing options...
Newbert_Zero Posted May 3, 2005 Author Share Posted May 3, 2005 I guess your right. Maybe its just me looking at it to long. its just the bottom that bugs me. because the top looks all sharp and bumpy and the bottom looks blurry. but i dont think its worth me worying about right now.... It seems like i work on one thing and it looks better than everything else. so i work on somthing else then that looks better than the other thing. and it just repeats. does this ever happen to anyone else? It reminds me of Mowing super fast growing lawn.... i mow the first half go to the second half and mow it then the first half grows back already. Quote Link to comment Share on other sites More sharing options...
heyvern Posted May 3, 2005 Share Posted May 3, 2005 I guess your right. Maybe its just me looking at it to long. its just the bottom that bugs me. because the top looks all sharp and bumpy and the bottom looks blurry... That is real life! That is contrast! If the wall had the same look all over there would be no drama. It gives focus to the light area. You might even consider going darker at the base, to accentuate the darker shadows that are there. This would also increase the "mood". Good progress so far. Vernon "!" Zehr Quote Link to comment Share on other sites More sharing options...
Newbert_Zero Posted May 3, 2005 Author Share Posted May 3, 2005 youre right it would look like that in real life. lol now i just need to make the inside of the windows. wich will be hard cause it has to continue the brick pattern. Quote Link to comment Share on other sites More sharing options...
Newbert_Zero Posted May 3, 2005 Author Share Posted May 3, 2005 now how would i set up the wall for volumetric lights to come through the windows? As JoshB said my splines are running wrong but I cant find out how to fix them. How would i model the wall? Quote Link to comment Share on other sites More sharing options...
Newbert_Zero Posted May 3, 2005 Author Share Posted May 3, 2005 sorry double post. i guess i could say somthing though. the blade on his sword is really dim. how would i brighten it up? Quote Link to comment Share on other sites More sharing options...
bentothemax Posted May 3, 2005 Share Posted May 3, 2005 for your brick problem, i suggest getting simbioant AM, unless you already have it. That has a great brick texture that can be used for anything, it comes complete with bump maps, and it would be easy to apply because it has depth two, so it would compensate for you window problem. As for the sword, perhaps a light in the middle or near the front of the scene, somewhat like a central light, or maybe torches around the walls or in his hand. for the volumetric lights, if you dont want them to interfere with your current lighting, turn of cast shadows, defuse, and everything except volumetric, then i would suggest adding a turbulence such as sine with 5 octaves. I really like the scene so far, it's really progressing Ben Quote Link to comment Share on other sites More sharing options...
Newbert_Zero Posted May 4, 2005 Author Share Posted May 4, 2005 for the volumetric lights, if you dont want them to interfere with your current lighting, turn of cast shadows, defuse, and everything except volumetric, then i would suggest adding a turbulence such as sine with 5 octaves. What i mean is how would i fix my splines on the wall with windows. my splines arnt layed out right and it wont let volumetrics come through. heres the model final_window_on_wall.mdl Quote Link to comment Share on other sites More sharing options...
heyvern Posted May 4, 2005 Share Posted May 4, 2005 First off... you have TWO copies of the wall in this model. One is locked. Second... you have internal patches everywhere. I would advise you to do some of the tutorials and pay careful attention to how patches are created and also avoiding internal patches. Read the definitions and explanations on patches and splines carefully until it makes sense to you. Practice in AM with simple things. Internal patches can be created when you extrude a grid of patches, like a wall. All the points "inside" the grid get extruded as well... but you can't see them since they are "inside". To extrude a grid properly... only select the CPs on the outside edge for extruding. You must delete those splines that are connected in such a way as to cause internal patches. The splines that go "through" the wall inside it but are not "visible". These are internal patches and will cause more trouble than you have with volumetric lighting. This is the basis of modeling in AM. It is important to understand how patches are created and how to connect CPs properly to avoid internal patches. The previous series of threads from Josh with his screen grabs illustrates precisely what needs to be done. Read all of the links he provided in one his posts! One of the Basic Splinemanship tutorials specifically addresses this exact situation. I promise I am not trying to be mean or a jerk. I really want to help and I think you have made great progress so far but, it is harder to explain some things... when some basic concepts aren't there to base them on. Good luck.... I am on your side dude! p.s. I am a strict teacher... just ask my mother... I make her cry sometimes when she doesn't pay attention in "computer class". That "I'm too old to learn this" line is no excuse in my book. Vernon "!" Zehr Quote Link to comment Share on other sites More sharing options...
Newbert_Zero Posted May 4, 2005 Author Share Posted May 4, 2005 um wich method would i use for my model? i dont know wich one would work for a wall with 2 windows. http://www.am-guide.com/TinCan/Room-tut.htm Quote Link to comment Share on other sites More sharing options...
iGeek Posted May 4, 2005 Share Posted May 4, 2005 Here's how I would do it. Actually, I would build it all again, beveled. Or use Zevel to bevel it... But here's what I did with yours. Just a baseline... -Zev final_window_on_wall.mdl Quote Link to comment Share on other sites More sharing options...
heyvern Posted May 5, 2005 Share Posted May 5, 2005 um wich method would i use for my model? i dont know wich one would work for a wall with 2 windows. http://www.am-guide.com/TinCan/Room-tut.htm The second one is the way I would go. Vernon "!" Zehr Quote Link to comment Share on other sites More sharing options...
Newbert_Zero Posted May 6, 2005 Author Share Posted May 6, 2005 .... im having a hard time modeling this and resizing it. the normals are screwing up on me just from clicking on the peak button twice. Quote Link to comment Share on other sites More sharing options...
Recommended Posts
Join the conversation
You can post now and register later. If you have an account, sign in now to post with your account.
Note: Your post will require moderator approval before it will be visible.