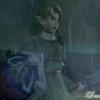
Newbert_Zero Posted April 3, 2005 Share Posted April 3, 2005 (edited) ok i think im gonna make the sig below 3d. but first i want to get the light to squirt through the windows. What light do i use to light it up through the windows? Comments/critiques are extremmly welcome. if you bothered reading this thread please post... im begging you NEWEST UPDATE Edited May 3, 2005 by Newbert_Zero Quote Link to comment Share on other sites More sharing options...
starwarsguy Posted April 3, 2005 Share Posted April 3, 2005 Klieg, and if you want to see the light (I love that effect) set it to volumetric and adjust the intensity and other settings until it's to your liking. Quote Link to comment Share on other sites More sharing options...
Newbert_Zero Posted April 3, 2005 Author Share Posted April 3, 2005 I dont see a kleig light all i see is keylight fill light and rim light options. how do i make a kleig light Quote Link to comment Share on other sites More sharing options...
pancho simpson Posted April 3, 2005 Share Posted April 3, 2005 right click the object folder, select new/light. In the properties diag, change the type to klieg and turn the volumetric options on. Quote Link to comment Share on other sites More sharing options...
Newbert_Zero Posted April 3, 2005 Author Share Posted April 3, 2005 thank you guys for your help. but now another problem there are no shadows its going right through the wall. Quote Link to comment Share on other sites More sharing options...
starwarsguy Posted April 3, 2005 Share Posted April 3, 2005 You have to make a light. It's not already there. Quote Link to comment Share on other sites More sharing options...
Newbert_Zero Posted April 3, 2005 Author Share Posted April 3, 2005 i made the kleig and everything but the light goes right through the wall. Quote Link to comment Share on other sites More sharing options...
starwarsguy Posted April 3, 2005 Share Posted April 3, 2005 Really? Are you sure it's not just set really bright or something? Try playing with the settings. Quote Link to comment Share on other sites More sharing options...
JoshB Posted April 3, 2005 Share Posted April 3, 2005 Your normals are facing into the room. Therefore, when you put a light behind the wall it doesn't read as a solid object--thicken the wall--like a real wall. By putting another plane behind it with the normals facing backward. Also, the klieg is a type of light (it's the rim light in the default chor). It is supposed to replicate stage lights. There is also directional (sun) lights which are lights that go in one direction and do so from the light origin to infinity in all directions. There are also bulb lights which radiate from the center out in all directions and there falloff can be adjusted. J Quote Link to comment Share on other sites More sharing options...
Newbert_Zero Posted April 3, 2005 Author Share Posted April 3, 2005 i feel really dumb the problem is that i didnt turn on the shaded in the rendering options. this is looking alot better now but the torches fire isnt brightening anything. how do i fix that? Quote Link to comment Share on other sites More sharing options...
Newbert_Zero Posted April 3, 2005 Author Share Posted April 3, 2005 ill try to attach the project file. Swordfight_3d.prj Quote Link to comment Share on other sites More sharing options...
Newbert_Zero Posted April 3, 2005 Author Share Posted April 3, 2005 would the sun light acually work better? cause the kleig causes the light to leak through at weird angles and it makes it appear like a light close up. Quote Link to comment Share on other sites More sharing options...
Godfrey Posted April 3, 2005 Share Posted April 3, 2005 this is looking alot better now but the torches fire isnt brightening anything. how do i fix that? Do you have a light source attached to the torch? (If so, if it's in the flames, make sure the flames themselves aren't casting shadows.) Quote Link to comment Share on other sites More sharing options...
Newbert_Zero Posted April 3, 2005 Author Share Posted April 3, 2005 i used the fire emmiter on this website fire emmiter its the third from left to right Quote Link to comment Share on other sites More sharing options...
JoshB Posted April 3, 2005 Share Posted April 3, 2005 Need to embed the models on your project file otherwise they won't/aren't there. Just the choreography. J **EDIT** emitters don't create light in CG only lights do. Therefore, you need to add a light to the torch for it to cast light. Quote Link to comment Share on other sites More sharing options...
Newbert_Zero Posted April 3, 2005 Author Share Posted April 3, 2005 ok ill try again.... Swordfight_3d.prj Quote Link to comment Share on other sites More sharing options...
JoshB Posted April 3, 2005 Share Posted April 3, 2005 Still no dice. J Quote Link to comment Share on other sites More sharing options...
Newbert_Zero Posted April 3, 2005 Author Share Posted April 3, 2005 it should work now oh and how do i add a light to the torch? Quote Link to comment Share on other sites More sharing options...
JoshB Posted April 4, 2005 Share Posted April 4, 2005 Simple--put a light there. Complex--you could do it multiple ways. One would be to actually build the lights into the model itself. Right click in your model window--new light. Or, you can just start adding light in the choreography. Let me play for a minute. J Quote Link to comment Share on other sites More sharing options...
JoshB Posted April 4, 2005 Share Posted April 4, 2005 Your concrete slabs have a bunch of internal patches which are GREATLY effecting your render times. Also, it is just not a good idea. Your splines are not running around the model the way they should. It appears as though you used the grid wizard--then extruded the grid. Which is causing weird things to heppen to your surface normals and causing the internal patch problem. Basically a good rule of thumb is that if someone cannot see the patch you just built--don't build it. To build your base slab: From top view put a spline running down your monitor from half the depth you want your model to be--then run it across the X axis half as well. Select the spline and extrude it to the width you want. Then from the side view select the newly formed patch and extrude down to the height you want. Now this will give you weird curves--DON'T freak out. This is the nature of splines. Once you have the "box" made select the whole thing and hit the peak button. This will give you a model exactly like the one you are currently using. Still not the best splinemanship--but it will give you what you have now. It will render A LOT faster. Your surface normals will be correct. And, you won't have internal patches. **EDIT** also your backlight has been increased in size along one axis to a length that is unnecessary. As I said before directional/sun lights are infinite in all directions--and have no falloff. Imagine it like this. Take a plane that emits light in one direction--the light will never fade the further away your are--and the plane goes on forever in both directions. J Quote Link to comment Share on other sites More sharing options...
Newbert_Zero Posted April 4, 2005 Author Share Posted April 4, 2005 k i think its looking alot better now. I still havent gotten the torch to work though. But it looks alot better. I think it would take to long now to remake and reposition dozens of slabs. here is the updated pic Quote Link to comment Share on other sites More sharing options...
Newbert_Zero Posted April 4, 2005 Author Share Posted April 4, 2005 Simple--put a light there. Complex--you could do it multiple ways. One would be to actually build the lights into the model itself. Right click in your model window--new light. Or, you can just start adding light in the choreography. Let me play for a minute. J i tried putting a light on the torch but it just looks like a normal light and the fire doesent give off light. Quote Link to comment Share on other sites More sharing options...
JoshB Posted April 4, 2005 Share Posted April 4, 2005 If you rebuild your room model you won't have to reposition any slabs because they won't exist--here is an image using a real quick model I made using the instructions I placed above. It isn't just a matter of convenience of having one model it's a matter of render time--material effectiveness, and if you plan on animating your camera you may get back artifacts from the internal patches. Here's what I did: I rebuilt the floor and wall with windows using your originals as a guide. I took your torch model and added two new lights. One bulb and one klieg. I played with them a bit to get the position proper. The bulb light is lit a reddish orange color (as depending on the temperature of the flame the bottom will tend to be red). And, I made the klieg a yellow (as the tip will tend to be yellow). I took the backlight and made it white--I just copied the "key" light from the default chor. There are three fill lights in the scene. One blue--and two orange. The blue is placed under the models and meant to add just a little bounce light from the sun light. The two orange fill lights are there to add bounce light from an assumed wall and/or torches on the other side of the room. Also, they pick up the slack from where the torch light falls short--and finish filling out the light in the room. The texture files did not come across so I did not play with those. I hope my advice helps. J Quote Link to comment Share on other sites More sharing options...
Godfrey Posted April 4, 2005 Share Posted April 4, 2005 I think it would take to long now to remake and reposition dozens of slabs. Actually, that wall could be done with five boxes: two long ones on the top and bottom, which reach to the bottoms and tops of the windows, respectively, and then three more boxes to the left of, between and to the right of the windows. Quote Link to comment Share on other sites More sharing options...
Newbert_Zero Posted April 4, 2005 Author Share Posted April 4, 2005 not sure i got what u were saying joshb can i see a wireframe? Quote Link to comment Share on other sites More sharing options...
Newbert_Zero Posted April 4, 2005 Author Share Posted April 4, 2005 oops ok sorry spoke to soon now i got the box but how to i put a hole through it. Quote Link to comment Share on other sites More sharing options...
JoshB Posted April 4, 2005 Share Posted April 4, 2005 Now this isn't the best modeling job so keep that in mind. Also, because the splines are peaked it's going to be impossible to tell what are complete splines and what arent. But, I will try to explain. The frame (rectangle) that makes up the back wall is a complete spline. Which means the splines that connect the front and back of the wall are "floating" splines. The windows are made by the horizontal and verticale splines that wrap around the wall--which are complete. This causes a problem though because the window will become solid. Easily remedied by adding a cp to each spline in the center of the window top and bottom. Now comes the second problem. When you try to connect the front window rectangle to the back you will get internal patches again. To remedy this cut the spline in half again (pressin Y with the spline selected). Then run a complete spline around the inside of the window. I did a copy flip attach method so the windows would be equidistant. The floor itself was easy enough. Snap to grid. From top view go to the right pretty much wherever you want to. Draw a 2 point spline--as long as you want. Select the spline--extrude to the left--as far as you want to. This will give you a patch. Now switch to side view--select the patch--extrude down/up as far as you want to. Use the scale tool until you get it to the right size and poof you're done. J Quote Link to comment Share on other sites More sharing options...
starwarsguy Posted April 4, 2005 Share Posted April 4, 2005 I like that sky you put in the background, Newbert. I can;t wait for you to finish this. Quote Link to comment Share on other sites More sharing options...
Newbert_Zero Posted April 4, 2005 Author Share Posted April 4, 2005 thanks for everybodies help. you guys are helping alot. now im gonna try to fix those splines. Quote Link to comment Share on other sites More sharing options...
Newbert_Zero Posted April 4, 2005 Author Share Posted April 4, 2005 Picture update. I resplined the ceiling sides and floor. now for the window wall. I put a light on the torch and it lit up the room alot. but it lights sortof weird. Its lookin alot better now. thanks to you guys. Quote Link to comment Share on other sites More sharing options...
Newbert_Zero Posted April 4, 2005 Author Share Posted April 4, 2005 ahhh!!!!!! i resplined the window wall.... but how do i resize it to fit to the other windowed wall. I can only do it in choreography mode. But then i cant texture it. can i save the models changes made in choreograpy mode and take it back into the modeling window to texture it? Quote Link to comment Share on other sites More sharing options...
Newbert_Zero Posted April 4, 2005 Author Share Posted April 4, 2005 JOHN B were are you?............ Someone... Anyone... help Quote Link to comment Share on other sites More sharing options...
Newbert_Zero Posted April 4, 2005 Author Share Posted April 4, 2005 i think im gonna start working on the animation. Should i just get thom and make him flat to get the stick figure look in my sig? Well im going camping for a couple of days so if anyone has any comments please post them. I apreciate all your help in advance. Quote Link to comment Share on other sites More sharing options...
JoshB Posted April 4, 2005 Share Posted April 4, 2005 ahhh!!!!!! i resplined the window wall.... but how do i resize it to fit to the other. I don't understand the question. If you copied the model I made you should be able to look at from front view. Select all the cps for the window. Switch to scale mode. There will be little grab handles that will allow you to scale along a the Y or X axis. J Quote Link to comment Share on other sites More sharing options...
Newbert_Zero Posted April 6, 2005 Author Share Posted April 6, 2005 no i mean i can make it fit and all but then i cant save the changes the model in choreography mode. I need to save the changes so i can texture it. Quote Link to comment Share on other sites More sharing options...
Mr. Jaqe Posted April 6, 2005 Share Posted April 6, 2005 Then try scaling it in your model window? Quote Link to comment Share on other sites More sharing options...
Newbert_Zero Posted April 6, 2005 Author Share Posted April 6, 2005 I know but its hard cause i dont have the reference of the old windowed wall. Quote Link to comment Share on other sites More sharing options...
Mr. Jaqe Posted April 6, 2005 Share Posted April 6, 2005 Then texture it in your model window first, then scale it in coreography? Quote Link to comment Share on other sites More sharing options...
Newbert_Zero Posted April 6, 2005 Author Share Posted April 6, 2005 wouldent that stretch out the textures though? there has to be a way to do this. do i just have to resize it over and over again tell i guess right? Quote Link to comment Share on other sites More sharing options...
Mr. Jaqe Posted April 6, 2005 Share Posted April 6, 2005 I have no idea, how about trying it? Quote Link to comment Share on other sites More sharing options...
JoshB Posted April 6, 2005 Share Posted April 6, 2005 Yes it would stretch the decal. However, you can right-click the decal and hit edit which will open the UV texture editor and you can change the position of the UVs. Which can fix the stretching problem. Or, you save your old model as a prop (as long is it was within the model itself that you sized the windows), then import the prop under your model. And, use it as a reference. Or, you could do a straight on render of your window wall, save as tga, import as rotoscope, and use that for scale comparision. J Quote Link to comment Share on other sites More sharing options...
JoshB Posted April 7, 2005 Share Posted April 7, 2005 Or, you could guesstimate. Or, you could even go into muscle mode in the choreography and scale the window that way. But, all of these will tecyhnically stretch/distort your decal--because you're not changing where it is you're change the surface it's on. Think about a balloon with a stamp on it. If you stretch the balloon the stamp changes--same concept. Therefore, the best method to do this, in my opinion and experience is to use the UV texture editor. Resize the window to the size you want. Then do a split screen of the model and the UV texture window. Adjust the points until you get a "clean" decal and you're done. No fuss--no muss. I think that's all the ways I know of to scale that window. J Quote Link to comment Share on other sites More sharing options...
Newbert_Zero Posted April 7, 2005 Author Share Posted April 7, 2005 Thank you I think I will try that. I just wish you could save the changes you make to a model in choreography mode. Quote Link to comment Share on other sites More sharing options...
Newbert_Zero Posted April 8, 2005 Author Share Posted April 8, 2005 ok i finnally got that taken care off. now i just need to make the room a little brighter and I think I will add some objects into the backround. I'm thinking of putting weapons or some medeival things in the backround but I cant find any rotoscopes for modeling. Quote Link to comment Share on other sites More sharing options...
Admin Rodney Posted April 8, 2005 Admin Share Posted April 8, 2005 I just wish you could save the changes you make to a model in choreography mode. You can... just save out as a MDL file. You can do the same from an action. Quote Link to comment Share on other sites More sharing options...
Newbert_Zero Posted April 8, 2005 Author Share Posted April 8, 2005 i added a light in choreography mode for my torch. i tried to flicker the fire but the light intensity wont tween. if i type in 300% on frame 0 then type 200% on frame 2, frame 0 would change to 200%. *EDIT* Never mind its working now. Quote Link to comment Share on other sites More sharing options...
Newbert_Zero Posted April 8, 2005 Author Share Posted April 8, 2005 What should i add to the scene. what could i do to make it look better? Quote Link to comment Share on other sites More sharing options...
starwarsguy Posted April 8, 2005 Share Posted April 8, 2005 People fighting. That was to get back at you for my Fight Scene post. Maybe put something by the wall? A table or statue or something. And if you really need something to add, I suggest adding windowsills. Windowsills are always good! Quote Link to comment Share on other sites More sharing options...
JoshB Posted April 8, 2005 Share Posted April 8, 2005 It's your room. Looks more like a castle so, think castle. Or you could go with a roman style room by adding some columns at the four posts. Personally, I would animate the scene first. Plan it out if the characters aren't interacting with the scenery then anything you add right now to the scene will be arduous and only act to increase your render time. So get animating. J Quote Link to comment Share on other sites More sharing options...
Newbert_Zero Posted April 8, 2005 Author Share Posted April 8, 2005 newest update. i still dont have any objects in the backround though but the patches are all fixed and the lights a little bit better. Quote Link to comment Share on other sites More sharing options...
Recommended Posts
Join the conversation
You can post now and register later. If you have an account, sign in now to post with your account.
Note: Your post will require moderator approval before it will be visible.