Search the Community
Showing results for '"snap to surface"'.
-
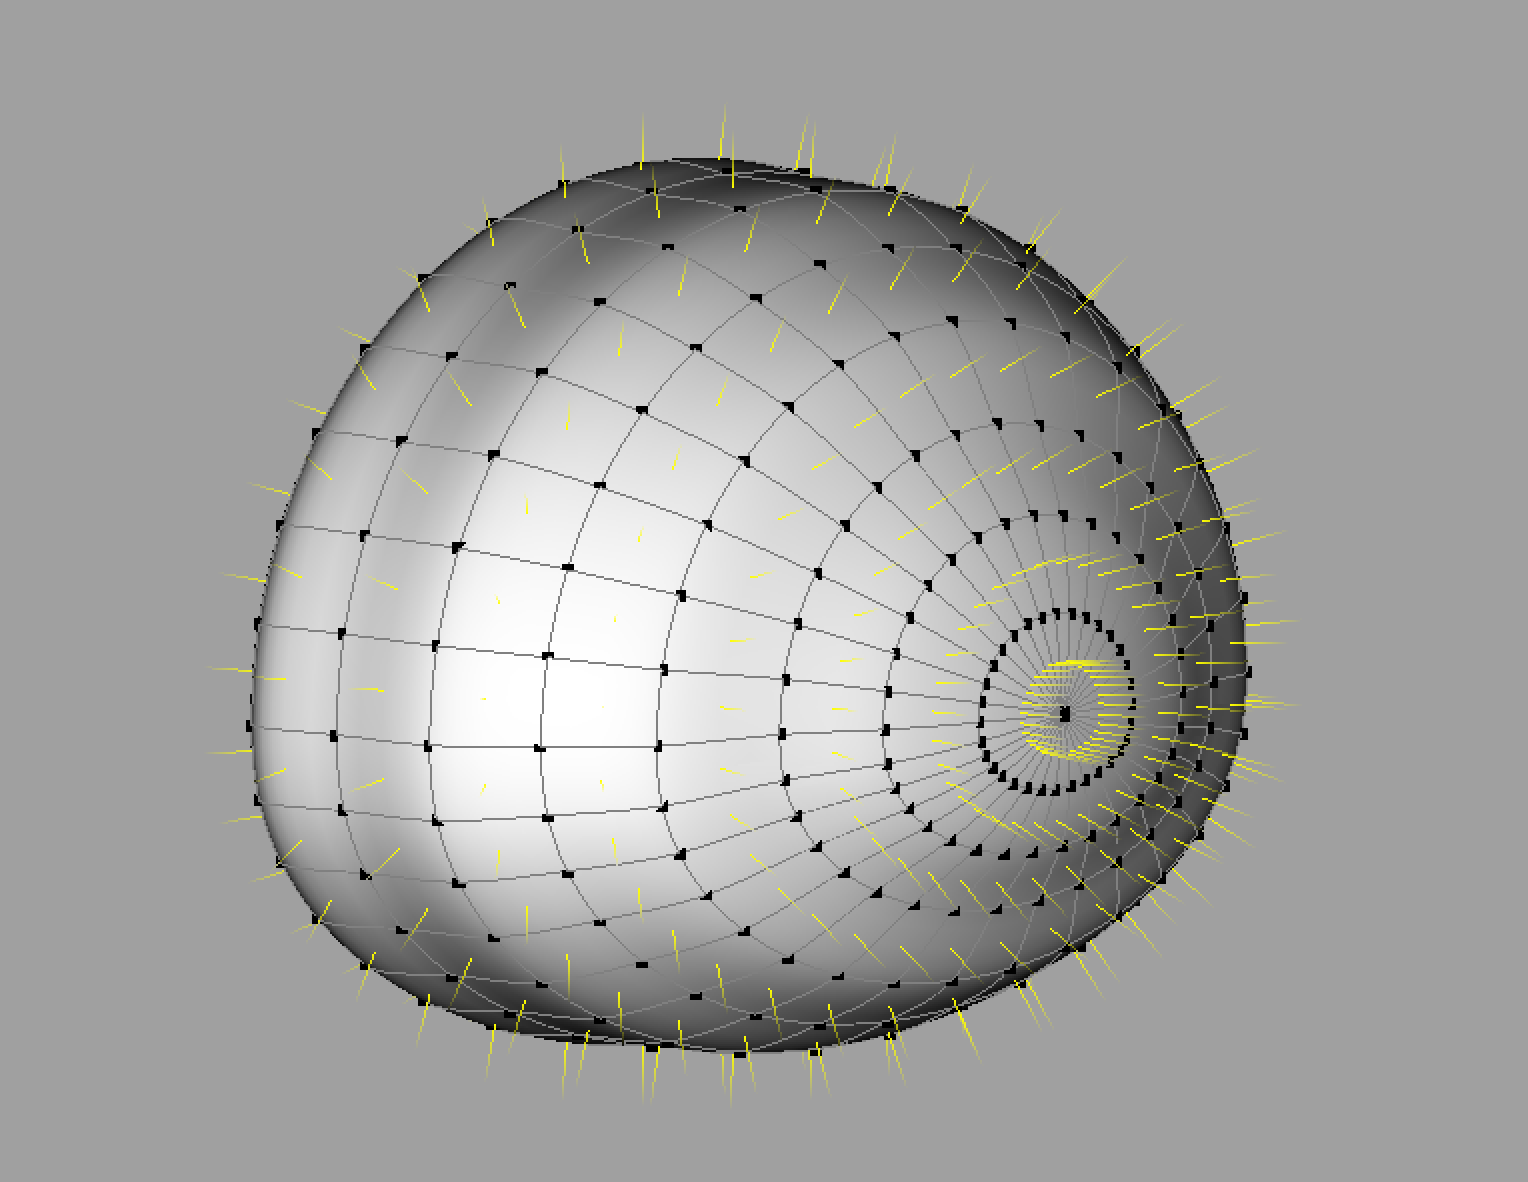
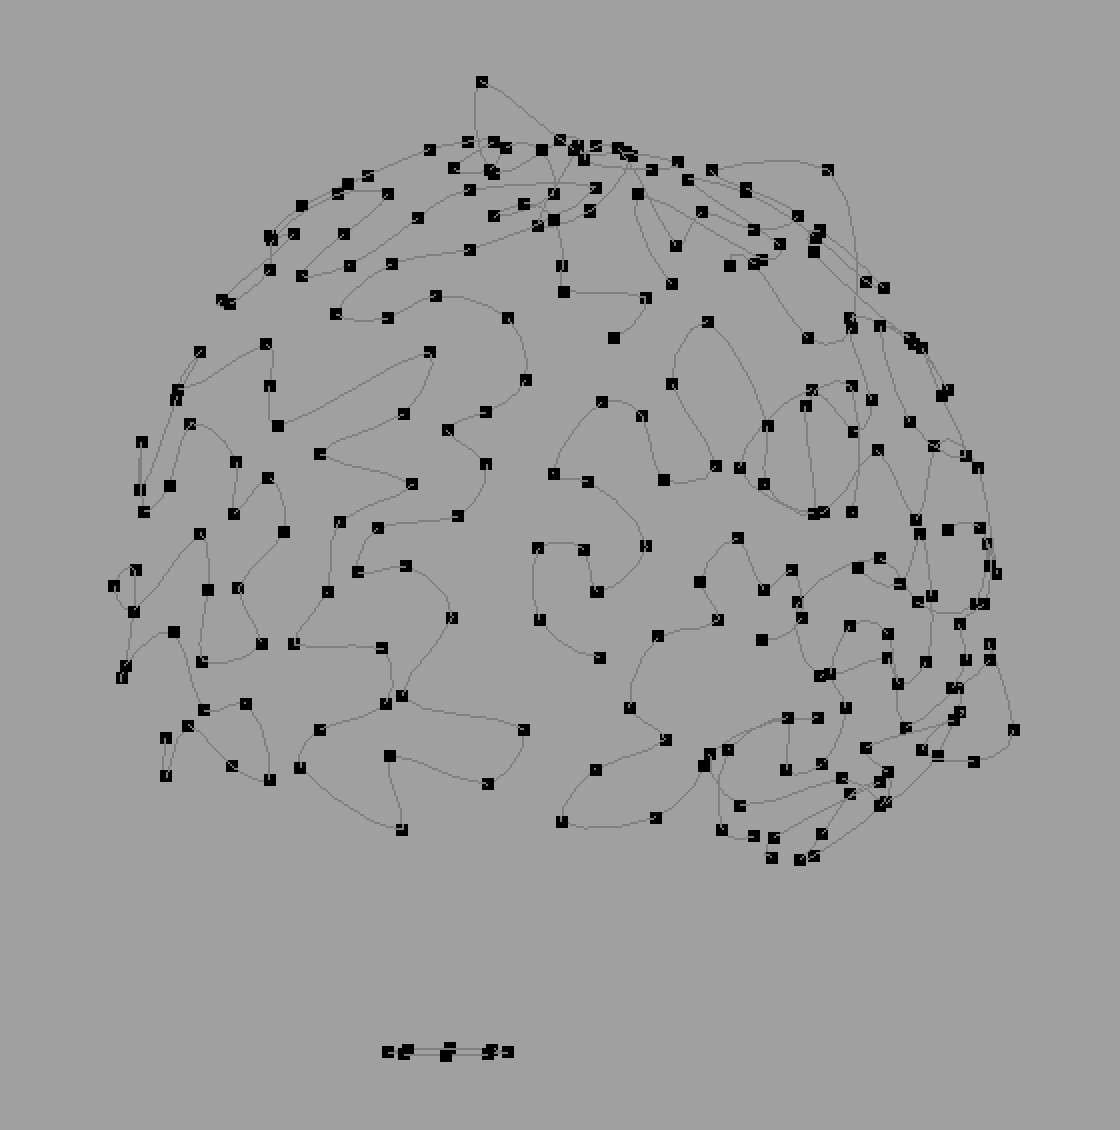
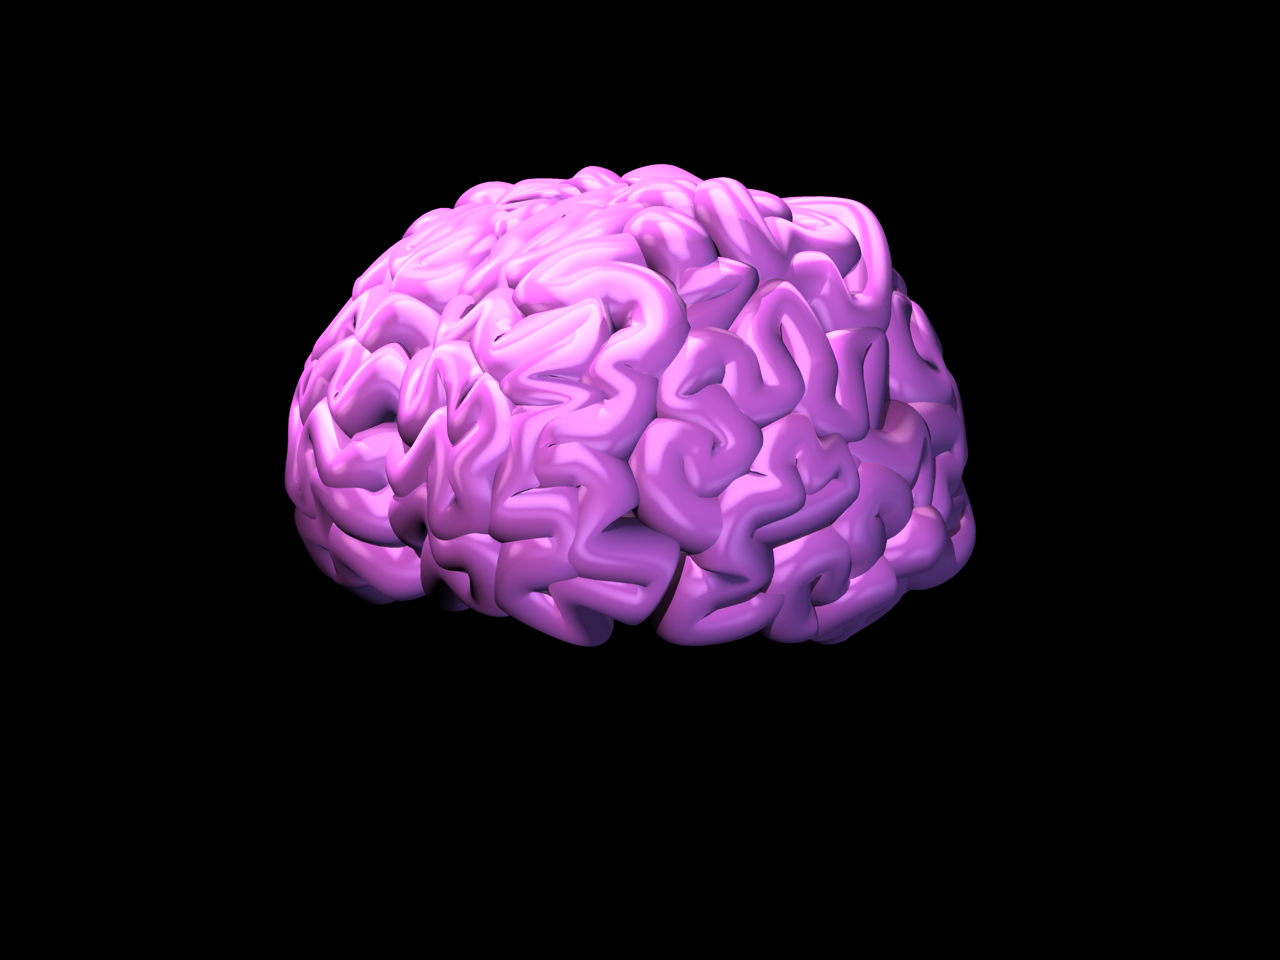
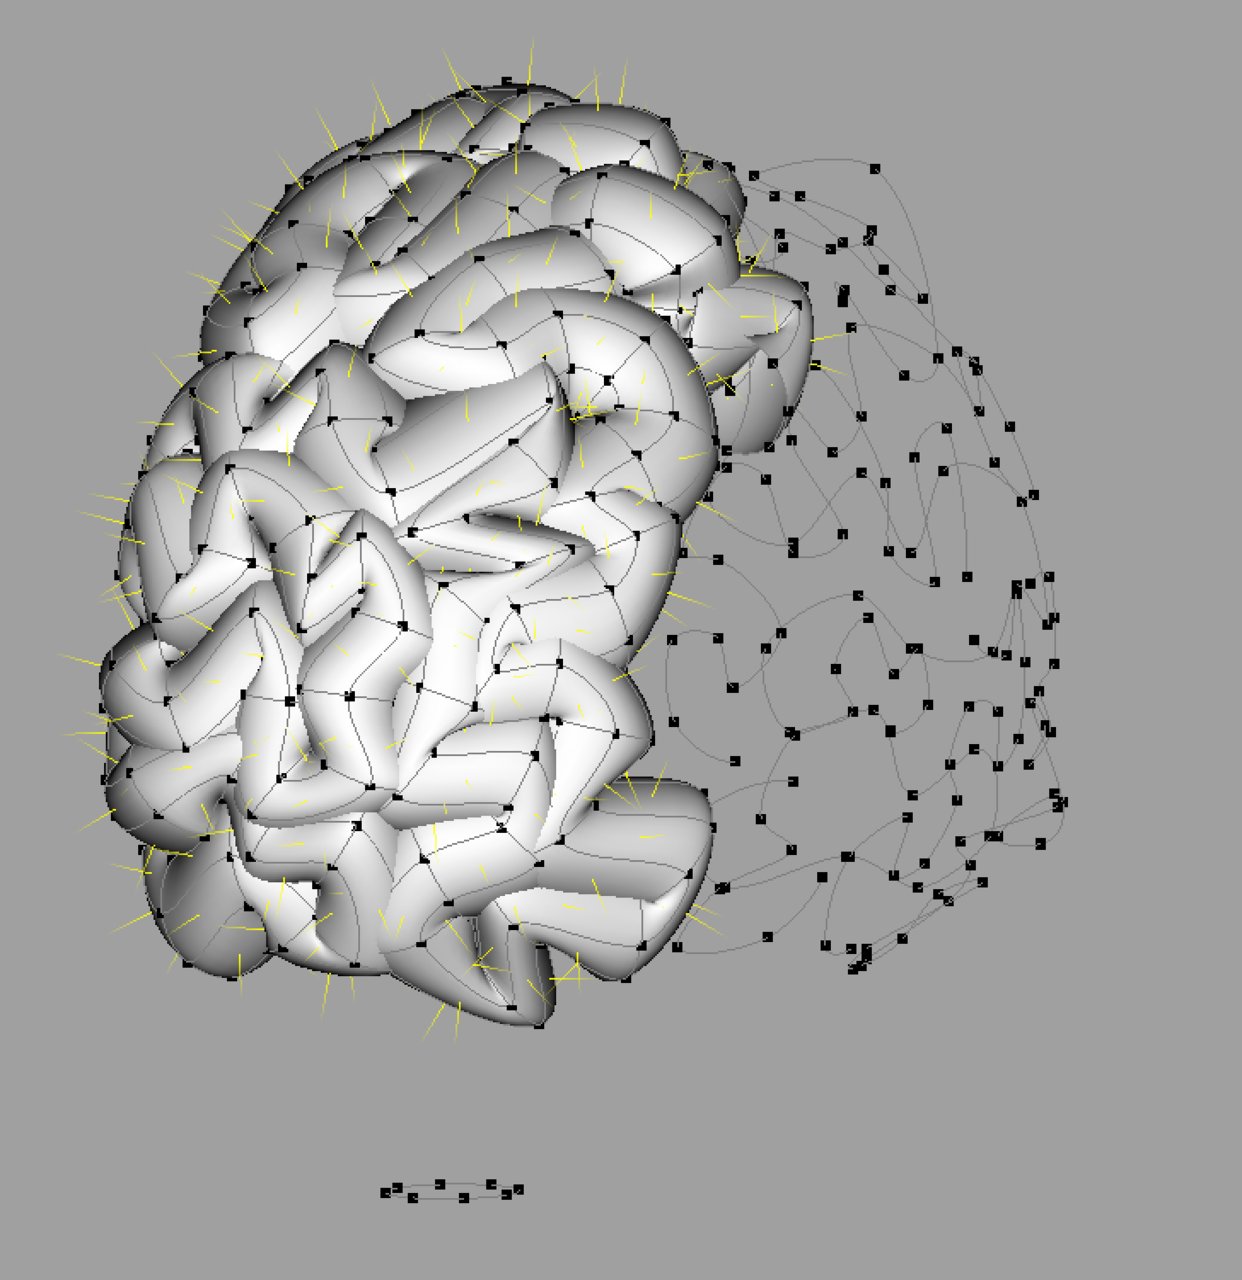
In v. 17, we got a new feature: Retopology. Something like six years later, I finally got around to using it! :-) Here's a quick bit of niftiness. I needed a cartoon brain for the image I'm working on and it seemed a daunting modeling challenge. Seeing how someone else was able to do it with another piece of software, I realized I could do the same in A:M. I started off with a fairly dense sphere model I created with the Primitive wizard and cut it in half and worked it into a reasonable "lobe" shape. I created a new Cho and placed an empty model for the brain and the dense model and set to work. Once in model mode (with snap to surface clicked), I began drawing squiggly splines on the surface of the dense model, just trying to cover the area. I wasn't actually trying to recreate the actual brain structures. With that, I had a model with a bunch of squiggly lines that matched the shape of the brain. I created a cross section and used the Sweeper Plug-in to turn those squiggly lines into tubes. I then duplicated and flipped it to make the other side and Voila! A quick, squishy brain!


-
I sat down to make a quick demo of it and found that Snap to Surface wasn't working right, so I've sent a note back to Steffen on that for him to look at. I see it sort of working like this: First you use Snap to Surface to get your CPs close to the intended targets and then you select them and Choose Snap to CP to bump them all in place exactly.
-
I believe Kevin did say he had used the "snap to surface" feature with the imported obj, when laying down new splines. My guess it would be the "snap to surface" that is possibly creating the problem. Hard to tell from his description of his process.
-
The video was great, thank you, thank you! And yes I was more successful with modeling and using S2S in the chor using an obj model as the template, based on what you demonstrated in your video. However, it seems like not all modeling functions are available - particularly "y" to add a cp to a selected spline, or to "drag selection" in the chor (must click on lasso first instead). So, I again tryed to model in modeling window with snap to surface (offset=.5 cm - the default) - I had an awful time trying to get the CP's to snap to the front surface - almost impossible (was not successful ever). It keeps snapping to the furthest surface - the projection of new CP's onto the surface seems weirdly wrong, regardless of any changes in offset value or if I have the option to "draw selected cps on top" checked or not. I also experienced crashes. Not sure what I did. How do you keep the new cps, or when moving the new cps, from snapping to the furthest (screen space) surface?
-
It's possible you have something called "snap to surface" on. This new feature is for drawing splines/resplining on an imported polygon prop. Ray traced lights are slow, but you can get accurate fuzzy ray-traced lights by setting the light "width" wider and increasing the "rays" parameter. Use the narrowest width and fewest rays you can get by without grainy looking shadows.
-
Installers: http://www.hash.com/ftp/pub/updates/window...ta/AM_32BIT.exe (Windows 32bit) http://www.hash.com/ftp/pub/updates/window...ta/AM_64BIT.exe (Windows 64bit) http://www.hash.com/ftp/pub/updates/osx/v17_beta/AM.zip (Mac) Change All: Changed Log Rotoscopes empty rotoscopes are not longer loaded/saved rotoscopes for figures having also now their own folder (like camera/lights in the chor), but only when You create a new rotoscope, existing rotoscopes are displayed as before outside a rotoscope folder in a chor this folder is only displayed , when "Show more than drivers" for the model is active New All: [bug]6107[/bug] Snap-To-Surface: Offset-Value it's now possible to use a offset , when adding cp's and Snap To Surface is active the offset value can changed under Tools->Options->Modeling and is used when You hold down the Shift-Key while adding cp's the offset is added in the normal direction for the underlying object patch it work's in the same manner also for "Snap Group to Surface" Fixed All [bug]6119[/bug] particle system keys corrupted after reload of PRJ Fixed All [bug]6133[/bug] Refresh-Problem for fluid-particles in shaded mode Fixed All [bug]6131[/bug] Newton creates keyframes at 25 fps, not the PRJ fps setting Fixed All [bug]6132[/bug] CP weight editor displays incorrect values Fixed All[/b] [bug]6122[/bug] Composite doesn't free memory after each frame resulting in a rapid buildup of memory and hanging the computer Fixed All [bug]6124[/bug] NetRender "elapsed" column diplays strange numbers Fixed All [bug]6115[/bug] Invisable Particle Sprites in "Render Lock Mode" Fixed All [bug]6120[/bug] Closing PRJ during progressive render causes crash Fixed All [bug]6121[/bug] Translate manipulator appears as solid box in Bones Mode Fixed All[/b] [bug]6118[/bug] Refresh-Problem for some materials > Results in a Crash Fixed All [bug]6113[/bug] Rotate manipulator not visible when editing Distortion Box CPs Fixed All [bug]6112[/bug] Editing Distortion Box causes crash Fixed All[/b] [bug]6114[/bug] Dragging CPs in model window causes crash Fixed All [bug]6117[/bug] "selected" tab doesn't wok in Actions
-
Most CAD programs excel at drafting with precision. As such, if you know precise measurements you'd be well served to create your shapes in CAD and then export them to A:M. In A:M then simply import the Models as Props. This isn't to say that A:M can't create very precise mechanical shapes but only that CAD programs are designed with tools for such static shape precision in mind from the beginning. Most CAD programs do not do well at creating animatable characters and organic shapes. For those you'd want to create them in A:M and then export them to AutoCAD (or the CAD program of your choice. Whereas the most animation you are likely to get out of a CAD progam is a walkthrough A:M is designed for full articulation and animation. There are several new tools in A:M that increase precision such as the Snap to Surface, Snap to Group and Snap to Control Point methods. A tool you won't have in A:M and a lot of CAD programs is the tool that cuts, welds and overlays shapes. But you can create those shapes in any vector (besier) drawing program such as CorelDraw and Adobe Illustrator. Both Corel and Adobe have created a slew of programs to augment and push that technology further. Taking your lego example, several impressive animations have been created with lego pieces and there are lego models available in the A:M Exchange forum. You can create those in approx. 5 seconds by dragging and dropping the models into A:M or (once added to your Library) from your Library panel into a workspace window. The biggest difference is probably price. With the exception of free CAD programs you'll pay considerably more for a CAD program because tolerances are much tighter in the precision modeling and manufacturing world. To achieve the best of both worlds use both A:M and the CAD program of your choice.
-
Yeah, to reiterate Fuchur, the tool is simply called Snap-to-Surface- probably a wise move by our Yoda. WE are the ones who have monickered it as Retopology... we should probably thus start referring to it in it's proper context. OR, how about this... wait....... wait for it........... S2S !!! I have to say that it was me who called it "Retopology-Tool" for the first time. Sorry about that. The feature-request for it initiated the "Snap to Surface"-button so. Anyway to let people know what it is about more or less it is easy to say "Retopology". In the end it is retopology + X so. I don't think that it is too bad to call it retopology-tool so... what does it harm? But okay, lets call it "Snap-To-Surface"-Tool from now on. See you *Fuchur*
-
Nancy is correct. Snap to Surface works much better in a Choreography. AND it works much better when you are working on top of an .obj prop. However, in this case, the mesh is so dense, you'd quickly lose track of the splines. A snap to cp feature the works similar to the "Snap to Grid" would be ideal.
-
I was not very successful with snap to surface (but I tried awhile back) - but: 1) I suspect the model that I was trying to snap to did not have a dense enough mesh, and 2) I believe I was a little bit more successful (it's been awhile) when I tried to snap patches (4 cps) rather than just one cp. And 3) perhaps it worked better in the chor (rather than modeling window, or pose?) - with the model being snapped to was imported as a prop, maybe? As I said - I can't remember, as I became impatient, and really didn't have a use for this, other than trying it out. At some point I thought I might want to model a rough 3D rotoscope model first in A:M (made of spheres, primitives), and then use that to guide my modeling for a more detailed model. I didn't/don't have any high density polygon models that I wanted to bring into A:M from any other program, as it seems that's what this feature is more suited. s2s did seem very touchy to me.
-
Welcome back, Al! Remember, that ease comes because it take many fewer CPs to make a shape in A:M than vertices in a polygon modeler. 1) Keyboard 4 will constrain a CP to the direction of the spline at the point it starts from. If the spline is curved you will change the shape of the curve as you drag it but I use this quite a bit to adust CPs in a mesh, none-the-less. Also... 5 will constrain the CP to motion perpendicular to the original spline. 6 will constrain it to motion perpendicular to the surface. 2) the CutPlane plugin can do this in simpler situations. It can insert a spline ring (or unsplined CPs) at the intersection of the cutting plane with a mesh. 3) I think so? 4) You may define any res you want, limited only by your RAM and patience. 5) The Snap To Surface tool allows you to draw new splines on the surface of another shape as a guide. Informally called "retopolgy" on the forum. 6) That should be fine. That's way more than I have. 7) Besides the goat?
-
Something you'll love in v17 is the Spline to Surface tool. With it you can model on top of an existing construct and even change/replace that underlying construct too. It's also great for modeling extra (unconnected) details right on top of a model. Note to those using Spline to Surface in a Modeling Window: I find it best to lock down the template after drawing a small 2 CP spline using the Lock key/icon. Then delete that spline and model over the locked geometry. Of course... make sure you select the Spline to Surface icon before splining or else you'll model a lot of geometry that isn't on the intended surface. Doh! I hate it when I do that. Snap to Surface, not Spline to Surface Rodney, but other than that: Yes, good suggestions. See you *Fuchur*
-
Are you baking your particles? As far as my approach to geometry based hair there are quite a few tutorials on cloth so it might be best to point you to those. In the meantime I'll offer this: ---------------------------------------------------------------------------------------------------------------------------- Cloth Simulation ---------------------------------------------------------------------------------------------------------------------------- The basic approach is: Create two materials: 1 - Cloth 2 - Cloth Deflector 3 - Apply those to meshes and then simulate Rename these materials as Cloth and ClothDeflector or something easier to find later. (A:M doesn't automatically name them anything particularly useful so we have to do that) Create the mesh that you will use as hair, fire, smoke or whatever you will be attempting to create via the cloth simulation. Considerations: When dealing with cloth simulation there are several 'tricks' to getting it to perform with maximum control. Here are a few: - Use Named Groups! By naming Groups we can not only better understand and organize we can layer in effects. For instance, having a group of objects that will serve to deflect the cloth (i.e. it has the Deflector Material applied to it) that is invisible (turn its surface property to Transparent=100%). In this way you can channel and direct the simulation in interesting ways. - Consider leaving dangling splines outside of the area to be simulated. These will ground the cloth to something stable that will not be directly effected by the simulation. In the case of hair these might be below the surface of the 'skin' that the hair will appear from. I try to select these dangling splines and name them something like 'base' so that they can be modified later. - Consider the distance from each object you've created. Overlapping meshes will cause the cloth simulation to error out because it can't properly calculate the interactions and directions. (i.e. it doesn't know which way is up because we've confused it by having interpenetrating meshes) - Consider saving out/exporting a frame of the animated simulation as a separate model. In this way you could generate thousands of resources simply by launching one simulation. We then can animate those separately or... simulate them again in other ways. ---------------------------------------------------------------------------------------------------------------------------- Forces ---------------------------------------------------------------------------------------------------------------------------- Adding forces (via Right Click/Add/Force) in an Action or Choreography allows us to push and pull geometry around in a dynamic way. This is especially useful for cloth simulation. We can hide or lock objects or add invisible objects in between the force and their location to 'protect' them from being effected in the same way as those areas that are fully effected. ---------------------------------------------------------------------------------------------------------------------------- Render As Lines (RAL) ---------------------------------------------------------------------------------------------------------------------------- Render As Lines is considerably more basic than cloth simulation and is not as versatile because there are no patches. It is important to note however that RAL can and generally should be augmented by the use of patches. For example you might have a cool looking robot and just add some detailed lines over the top of the robot's mesh to add the appearance of additional details. With v17s new 'Snap to Surface' features adding splines to the surface of a model is easy whereas before we had to painstakingly turn our models around or view them from multiple angles simultaneously to make sure the lines were on the surface. In my estimation the secret to RAL is using Named Groups to layer in of additional properties on the same splines/shapes. Using a little roughness and then adjusting the scale of that roughness can create some very interesting effects. Because RAL does generate some rendering artifacts on occasion it's often best to take this one step further and convert the splines to geometrical (patch rendering) shapes. This is trivial and easy to do with use of the Sweeper plugin. Just draw a little spline shape (say three CPs connected) and name it as a Named Group (because I will delete it later I often name mine, "Use Me". Then I can easily find it in the Sweeper dialogue. ---------------------------------------------------------------------------------------------------------------------------- Sweeper plugin ---------------------------------------------------------------------------------------------------------------------------- The Basic Steps to use Sweeper: Create the splines you wish to sweep (It's best to Name this as a Group although technically it isn't necessary) Create the shape or object you wish to sweep (name this Group) Select the splines you wish to sweep Right Click and go to Plugins/Sweeper Select the shape you wish to sweep from the list of Named Groups in the drop down menu Adjust other parameters as necessary Launch the sweep The swept shape will automatically be named so it will be easy to move away from the splines used to create it. That original spline can then be adjusted or used for additional sweeping or discarded. If the swept object isn't to your liking simply delete it and sweep again with different settings. Move them to the side if you wish to compare multiple sweeps with different settings. That is a basic primer for the areas under consideration. As I mentioned before, I haven't actually pressed into the classic use of decalled hair that is then cloth simulated. This is especially powerful because we can use Patch Images (with all of their various Image Types) to layer in the hair. That hair can then be further animated/simulated. It should also be noted that once we've got the geobased system in place we can further augment that with particles based effects (to include but not necessarily requiring particle hair). For instance, geobased hair might be further enhanced through the use of sprites or blobby effects. The general premise being to accomplish what we can with simple geometry and use particles to achieve what cannot be easily achieved complex geometry and interactions which is what particles attempt to simulate.
-
This is getting hard... okay so what I can remember is: Version 15 (2008) Liquids, Baked Surface (bake materials and decals to decals), Hash Animation:Master Realtime (HA:MR) integration (no longer available in newer versions) Version 16 (2011) 64-bit Version, Netrenderer-integration with Multicore-support, 3d connexion device support, OBJ-MDD-Animation-Export, overall performance-boost Version 17 (2012) Snap to Surface (Retopology-Tool), Animation:Master Answers, SSE4 instruction support, Create your own "Support"-page, Animate-Mode indicator, Improved Cloth-Simulation with Hi-res Simulation, STL-Export (with resolutionlevels up to 64 instead of formerly 16 polygones per patch) You can find tutorials for Snap To Surface on my website. (see below) There is very likely much much more that I am not aware of now... See you *Fuchur*
-

"Paint fall" Image Contest WIPs
robcat2075 replied to robcat2075's topic in Work In Progress / Sweatbox
As time was running out I decided to try helmet hair instead of particle hair. I started by using "snap to surface" to draw a spline where the part in the hair would go and then extruded that up and across the head one section at a time to make "the big flip." Then I did that again in the other direction to do the small side of the part. I didn't worry about the back too much since that wasn't going to show in my still image. Turns out, I do my hair pretty much the same way our President does his! (click to animate)
-
There is a new feature called "Snap to Surface" You import a model or prop and you can draw new splines on it. This would be a way to create a thin spline mesh on a dense polygon model.
-
DJ added this to his report: Requested Tools: 1. Snap to intersection. (with a button instead of a key so you can turn it on and off) 2. Set "Y" key to snap to midpoint of line as in the model window. 3. Mouse right click and drag to select is not available and would be handy. 4. Distortions Box as in model window. My initial thought is to consider if these features already exist for Snap to Surface workflow within a Modeling window. This provides a framework from which to study and better understand the workflow with Props in the Chor window. The image DJ provided isn't exactly clear with regard to what he is after: Image Link But Fuchur helped determine what he was after: Fuchur asked: DJ responded: This appears to be a new feature request and not just an enhancement.
-
Thanks for the quick response folks. If I do come back to A:M, then I would most likely be giving up the polygon modeling. It's just that I have so many models that I have made and rigged right now, it would be kind of hard to say good bye to them. But, this might just be the way to go in order to do the animations that I want to. I suppose I could still use FaceGen and/or Poser to create human characters, then bring them into A:M, and use the Snap To Surface to recreate the model in A:M. I still suck at organic modeling. I would imagine the renderer has improved from when I used it. Does it support things like sub surface scattering, ambient occlusion and global illumination? Actually, is there a manual I can download which would probably answer a lot of my questions instead of bothering you folks?
-
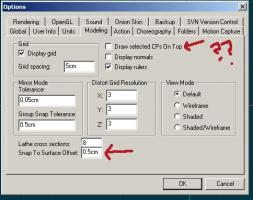
Additional Background: Snap to Surface is the underlying feature Steffen brought to life from the initial request for a tologology tool from Fuchur: Ref: Report: 5999 I want to also add this from yet another request/report that Steffen coded into A:M. That is the ability to set the Snap to Surface distance in Tools/Options/Modeling tab. He also says (and I paraphrase): A:M uses the normal direction from the underlying object, so the distance is the same at every added cp. To activate the offset, hold the Shift key down while adding the CP. In this way you can work in 'mixed' mode. Offsetting or Not Offsetting as you feel the need. Ref: Report: 6107
-
What's the latest on this potential feature. Is it working out? I hope so. If so, will it operate like the snap to surface? Wonder if there would be a way to automate the process where within a certain distance, all the cp's of one model would snap to the cp's of another model. That way, if yopu had the cp's close, they would automatically cling to the nearest one. Would be cool. Dreaming a bit here Cheers, William
-
Ah Yes - true. I'm not finding I need anything denser So, for my purposes, I am finding that it is just simply easier to create a new spline model with both the chor and model windows open, and not necessarily always use the snap to surface tool. I would only use it when it helps, and primarily in chor. What I am finding easiest (and probably, maybe, the way others have been doing it before): 1) Start new chor. Delete everything. Drag/Import the 3D mesh that is to serve as a template into the blank chor (as a prop if .obj) or as a simple primitive model if created in A:M. 2) Start a new blank model, drag into chor. 3) Make the 3D template model unpickable in chor. Optionally make it a color, with transparency. Make it display either as shaded or shaded with wireframe. Make the new model display as wireframe (or whatever), different color. Select the blank model in chor. Go into modeling mode (F5). 4) Open the window for the new blank model. With both model window & chor window open (alt V), start laying down new splines in chor window and model window (thus having access to all tools), and observe in chor window how it conforms to the 3D template. If I want to use the snap to surface feature, then I do it in the chor window and simultaneously observe what's happening in model window.
-
When snap to surface works I can match the CPs pretty quickly. A Snap-to-CP tool would be ideal in this situation.
-
Just an advisory note: you'll want to make sure you turn off snap to surface when you are finished. It causes all-new kinds of unexpected behavior in the modeling window when it's left on. Inadvertently leaving snap to surface and mirror mode on might even tear a hole in the space-time continuum. :-)
-

Dragon Malificent made with A:M by Charles Babbage for Disney
DrPhibes replied to robcat2075's topic in Showcase
Thanks for the kind words. I try to use A:M when ever it makes sense in our workflow. This dragon started as a smooth, primitive foam scale model (looked like a white Brontosaurus) that was free of any surface detail. I laser scanned the model and then using the snap to surface feature of A:M I created my patch based model of the original foam real life model. This base model is then sent to my mechanical engineer as a solid model (generated using a workflow we have developed with a few other tools) who begins to design the frame and structure inside the dragon. Simultaneous to that I build all the detail into the model (every thorn and rivet) and most importantly rigged the model to run it through all it's motions to check for clearances and collisions of the body parts. When everything is ready, I export STLs and send to a get milled on a variety of large CNC machines including a really cool robot arm. Then most of the parts get laid up with fiberglass directly (to save molding costs) and then assembled and painted. Obviously there is a lot more to it, but that sums it up. Unfortunately with this particular project I cannot publicly share any of the process images or A:M renders. I like using A:M, and have been for more than 20 years now, but it's just one tool in my large toolbox. I don't think I would be able to use A:M as much as I do without the support of a few other tools. Right now about half of my projects run through A:M in some way. I am working on 2 large Disney attractions right now that don't open until 2016 and A:M has been an important part of the process. I also have a large sculpture for the Wynn casino being built in Cotai China that was originated in A:M. You can see more of what we do at www.michaelcurrydesign.com Thanks, Charles -
If the retopo works anything like 3d coat then the lathe and extrude probably aren't applicable but instead you draw over the reference surface and I'm guessing simply stitch the patches together. This will be awesome! Is this how it works in AM? Any chance for Bias handle freezing? Be nice to be able to turn off the auto adjusting when doing mech models. Also like to see visibility and lock icons show up next to the groups much like the roto shows. Would find that to be extremely handy on complex models with tons of groups. Yes it works like that. In short: 1.) Import a Prop (for instance an OBJ) into the chor-window. 2.) Create an empty model in the PWS and drag and drop it into the chor too. 3.) Good practice is to make everything but the empty model in the chor unpickable. 4.) Now select the model and go to the modeling-mode in the chor. 5.) Click on "Add Spline" and activate "Snap to Surface". > Now you are ready to go. You can now create splines as you are used in A:M by clicking on a point visible on the mesh below. (for example the OBJ, but doesnt have to be one). A:M will determine the position of the mesh below an put the new inserted point on it. If you select the point again and move it around, it will slide over the surface of the model. This is possible for polygon-meshes and for patch-surfaces. That means, you can not only use it to "import" very polygon-intensive models but you can although use it to model for example cloth on your patch-based characters, etc. It is very handy and I will surely do a video-tutorial on it in future... See you *Fuchur*