Search the Community
Showing results for 'project'.
-
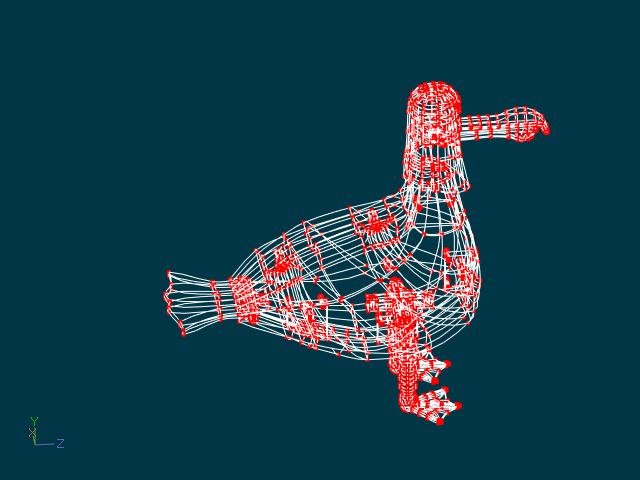
Yeah, my desk is a bit of a clutter. Basically my office is an homage to disney. The shelves and walls are covered in disney parks and movie props (spent way too much time and money in auctions!). As far as my seagull project, I've spent the week printing one half of the body. Each half had to be broken down into 3 pieces in order to fit on the printer. Each chunk is taking a full day to print, and gobbling up filament like it is going out of style. I've gone thru a whole spool already and just order two more to make sure I can get the body printed. I figure I will put the one half together, then dry fit servo mounts and build a basic arduino controller to make sure everything is copacetic before moving on. Also added the wings in to the model, and figured what the hell, I'll animate those as well. That makes movement on the head, beak, legs, wings, and tail to rig and program. Might get all that done before the snow flies!
-
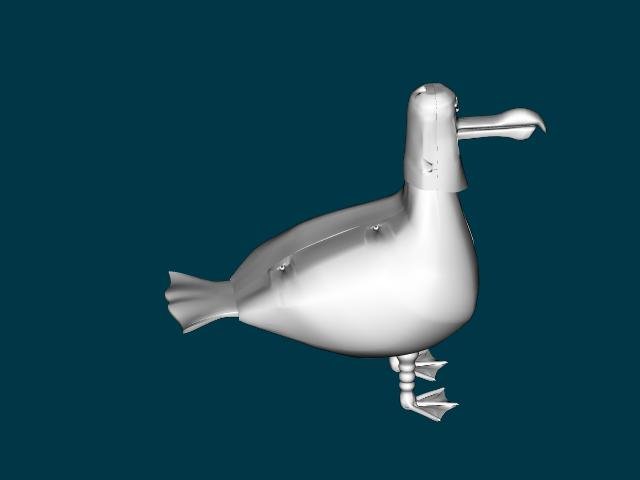
It's been quite a while since I've been on the forums. I've been heads down on my latest 3D printing project. This one is actually the one that got me into 3D printing to begin with. If any of you have been to Disney World, Epcot in Orlando you might remember the Finding Nemo ride, and the animatronic seagulls outside the entrance. I have been wanting to build one of these for the longest times, and this project was the reason for buying the 3D printer I did, since it was the best I could afford that would print the largest model. So a few months ago I started modeling one in A:M and this is where I'm at so far. I've been able to print the head and beaks, which is broken up into four separate parts. The legs are in three parts. The body is too large to even print on my printer and will have to be broken up into at least four separate parts. On the animatronic front, it will have animated beak, head, tail, and legs. It will be a challenge for sure. The head alone I spent over two weeks on and printed at least five versions before I was satisfied to move on. The legs I got better on, and have only needed to do two copies. The body needs to have mounts perfectly aligned for all of the servos to add the movement to, and I'm sure I'm going to go through a spool of filament before I get it right. Once all that is done, I move onto the electronics where I need to design and build a controller and program that. It will be based on an arduino, we'll see how many a fry in the process!

-
It's a very simple test project. It is baffling because the same project worked before I changed it to render with AO. IT has to be the same version of Netrender since everything is coming from the AMRoot directory on the server
-
Is it a complex project or just a very simple one (start with the second of cause ). It really is just a guess but are you running the same version of A:M/Netrenderer on both systems? Are you using GPU features in the project? I think I could even run different versions of A:M, but I am just not sure at the moment. Best regards *Fuchur*
-
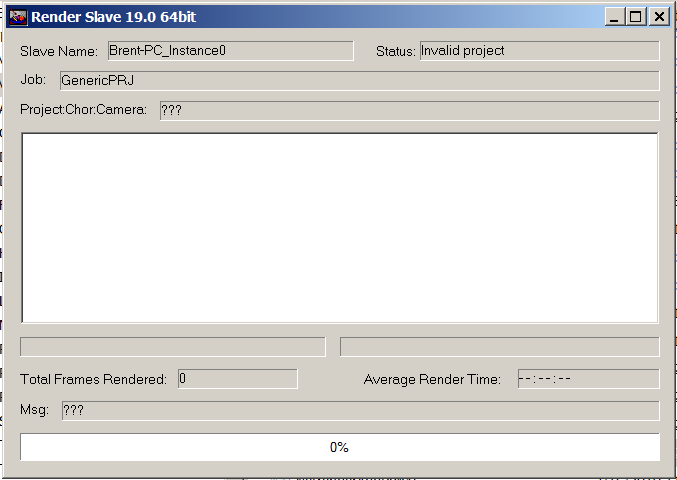
If a Project loads and renders OK in A:M, what makes a render node decide it is "Invalid"? The nodes that are on my server computer still render it fine, but the remote node can not. On the Render Server display the nodes is just perpetually stuck at "Loading frame" with no error reported.
-
I got the p2p services "started" The problem with Homegroups seemed to be that each computer had one established but they were not the same Homegroup. I killed one of them and joined the other and now I can indeed see shared folders remotely. However, my remote Netrender node still is "unable to load Project." I did this and now there is a user named "Remote01" on my main computer but... that doesn't seem to change anything about my remote computer.
-
Trying to finish off the Learning curve, using V18g in OSX 10.85. Made some modifications to one of the models, saved it as an iteration. Looked ok visually so tried to test it it as a render using the action window previously worked in. When I tried to do a quick render, the process seemed to stall, with the message appearing, "calculating the visible patches". That went on for some minutes and eventually aborted that render. Tried again, the render crashed the program. Opened up again, same project, same settings, same problem with calculating the visible patches. Went out to do some food shopping and leave it to get on with it. Just checked progress and, the render was going through but, instead of taking 2 seconds or less per frame to render, it was taking 20 minutes. Closed out AM, rebooted and just tried again, its back to taking 2 seconds or less per frame, and not ( touch wood) crashing out. Is this a known problem ? I've experienced it before with the extended calculation time but thought it must be an error on my part. This happened just after modifying the model but, only realtively minor mods saved after each change. regards simon
-
I think I see what is going on. You need to share the folder that holds the project and the the project will render too. All my projects are in a folder called "AM_Data" Right click the folder select "Properties" click on the sharing tab(Your use name for windows should be in the box as owner). Your name should be all you need if that is what you log into every computer on your network as the same log in name. But if you log in with different names on other computers you need to add that name too or "everyone"(There is risks to using everyone anyone on the network can over write or delete with out logging in) Now hit share This will give you a path to the folder(this is mine) \\jason-gaming-pc\AM_Data Now when you open a project on render server user that path. \\jason-gaming-pc\AM_Data\so\data\Act III\Seq03-Departures\Sc03 When you set the save path you also need to do the same thing. \\jason-gaming-pc\AM_Data\so_render\Act III\Seq03-Departures\Sc03
-
Stop the presses! Now the transp. in Action works.
v.Oi Action now shows the transp. channels listed with the bone channels in the tree and it's working! Whereas before only the animated bone channels were listed. (even after turning "list all" icon on.)
Thanks again robcat, if it weren't for you guys still there I'd have been forced to give up on A.M. a long time ago.
Here's a pic from my project (if I haven't sent this already)

- Show previous comments 7 more
-

Many thanks. So you just assigned surface properties instead of making a material assigned to a group. OK but you had the same result. So I'm NOT hallucinating again (tho oft times I miss them).
Let me know if there is any update in the future on this please. At eas602@sbcglobal.net and thanks so much for your time helping me on this. Till then I guess I'll just keep the Action window open.
-

-
-
Where are the project files placed? Netrender will not share the project files (or textures, etc.) over the network or something. It needs to be accessable by every computer in your network by itself best by using the same network drive letter or you have to replace the path-string "c:/project/myproject/" by "g:/project/myproject/" or something like that. See 6.) for where to do that. Or can you already access it like that on your windows file explorer using the same path and it can not access that? Best regards *Fuchur*
-
So far, all of my remote nodes are still "unable to open project"
-
Chris, I'm a bit late to the feedback party but I enjoyed your short film. You kept me interested (with minor exception) to the very end.** Others have commented on the style/look and the one thing in that arena that I initially thought could use some finessing is the contrast. The idea being that if we were to place a dot of light on the object/area where we want the audience to look all other factors should support that. Easier said than done.. I know! In reviewing the short to look for specific examples to illustrate what I'm talking about I was a little surprised to see that your setup was much more on point that my memory had recalled. In particular, I thought you incorporated some nice use of silhouetted shapes and that helped in reading the action tremendously. I do think that the girls face could be lit more perhaps simply by adjusting the ambiance intensity. There are some instances where the girl looks rather sinister and while this might be intentional I'd say that the shadows/lighting should have a source and one in the film is very obvious... the robot/creature's face screen. The contrast then for purpose of mood might then largely be controlled by the background and environment which if darker would make the characters -pop- out of the scene*** Robert suggested Jeremy Brin's book and I wholeheartedly agree. If there is only one thing you get from his book however I believe it should be the methodology of turning off (or even deleting) all lights except one and then perfect that light to the greatest extent possible. When we think we have that light set ideally then turn it off (maybe renaming it in a way that helps us recall it's primary purpose. TIP: In current A:M releases we can Right Click and Duplicate Lights. This is a useful way to finesse lighting starting from a known location/setting. For instance, we might duplicate a primary light and move it slightly to the left or right and then adjust it's color or intensity. This is how such stylistic lighting as red hues on one side of characters face and blue on the other can be created. The primary light then lights the main part of the face so we can accentuate the facial expression and help it read. Moving on to the story a little. Love the shots/replays of the pratfalls echoing the main action as seen on the robot's screen. Nice. I really like the twist ending but agree that it isn't entirely clear what is happening. This is too bad because it's a nice surprise and I think unexpected by most in the audience (hence the reason some aren't quite following). How to accentuate? One idea might be to consider the girls eyes... especially after spending so much time peering into the -eye- of the robot creature. After the switching off of the girl (which could use a little more highlighting... perhaps zooming in to a closer close up?) a view of the girls eyes as they 'turn off'... changing from normal eyes to the black eyes in the subsequent scene. This could then be echoed in the other characters in the final shots... their black unliving eyes could also be emphasized as the camera moves into/through the scene. Lot's of opportunity to really sell the ending there! ** I seem to recall a few transitions that had me slightly losing interest. The one that stands out in my mind is where the interior changes to exterior just prior to the characters going outside. The establishing shot is important but I wonder how that might be played up a little so as not to slow down the pace too much... slowing is good... but it seems to slow a bit too much. One idea might be to start the film with the establishing shot of the exterior of the building so that when we see them exit later there is no question of where they are. They start in the building... exit and consider the stars and the heavens... and then... into the finale. This is a nice opportunity here as most of the film is inside the building. It is this climactic movement when they move outside of building that sets up the punchline/ending. *** I'm still not sure exactly what I might do with regard to background, lighting and such if this was my project but my initial thought is to render without a background so that the background can be manipulated independently (via compositing) to more easily control the mood and focus of the scene. For purists that want everything rendered -in camera- this can still be done by inserting a 'color card' at the back of the scene which could be manipulated; even with decaled images where needed. One reason that compositing works well with backgrounds is that blur can be added independently to control the DOF (Depth of Field) and pull the focus forward to where it is needed. A final thought regarding the comments on 'flatness'. It's always good to consider at least three levels of depth in any scene: - Background - Foreground - Character space It can also help to move the camera slightly off center and then point it at the characters. Then converging lines in the background, foreground and throughout the scene can have a chance to direct the viewer's eye to where it needs to be from shot to shot and scene to scene. Having the camera straight on (or perpendicular to the BG, FG and Character planes) is often best used for comedy whereas more dynamic camera angles enliven the environment by allowing the audience to feel as if they could move through the scene. A thought here is that your story starts out as light hearted and even comical... with the robot creature echoing the shots on his face screen... so those moments lend themselves to flatter camera setups. It might be interesting to see how you might transition from the flatter camera to more dynamic as the story unwinds to it's ending. All this... just random observations. Not necessarily suggesting anything should be implemented. Bottom line: Nice job. I was entertained. Keep up the good work and I'll look forward to your future animations.
-
robcat thanks for the response. I go thru this every time using the forum. I'm looking at your response and NOWHERE do I see a button that says "respond" so I'm writing this directly to your link.
As for the Action transparency issue. I was doing exactly what you were suggesting. Created groups, assigned material to those groups and then made keyframes in Action animating the levels of transp. (making lights blink on and off) EXACTLY as you described and when I bring it into the chor. - NO animated transp. Upon re-opening the Action file the transp. animation channels are all GONE. I would send the prj file but it's massive with 5 characters and a shitload of props and images used throughout.
I'll try to repeat the problem with a simplified project file and send it along to the forum.
thanks
-
Hi Robert, a good starting point might be that: It is a shame, that the pdfs are not available anymore here, but there is still nice information in there. And here the PDFs are still available: Important: All computers need to be in the same network of cause! It is very helpful, if you have the render-data at a place where every computer can access it. Best is a NAS or another type of network drive. If you do not have something like that, you can still copy the data (A:M files, textures, etc.) over to each computer on the same position like for instance "C:/am_project/my_project.prj". Important: Do not copy it on your desktop, since the path will vary from computer to computer if the computer user name is different(!). In general it is pretty easy: 1.) Start RenderServer_64.exe on one of your computers. Make sure it has at least one Core assigned, which is not occupied by a Messenger/Slave. Theoretically it is not necessary, but I think it is the best option. 2.) Now you should read out the IP-address and Port of this computer / the Render Server. You should be able to see that by going to "Tools > Options > Connection". 3.) You can use the other cores of the computer (renderserver) to render too. 4.) Double-Click on RenderMessenger_64.exe in the A:M folder and use the wizard. There your NetRender Server should be automatically set to the IP address you got from step 2. If not, put it in. Same with the port. 5.) On "User defined data" you do not have to put something in, but it is a good idea to write something in that helps you to identify the computer with. That makes it easy to find out, if something is happening with that computer (this is not very hard to guess if you have only 1 or 2 computers in use, but I did it with 12 computers before and than this is really helpful). 6.) If the path of the project files (etc.) is different for the computers (so you could not use a NAS / network drive with the same letter (P:/, etc.) on the computers or you could not copy the files to the same position, the next step can help you. I would try to avoid it, but you can try it out here. 7.) Now start the next computer and install A:M on it. You do not need an own license for that computer or something. After install, just click on "RenderMessenger_64.exe" and follow the Wizard here too. Be sure to put in the right IP and Port of the RenderServer now. 8.) Check the connection of the Rendermessenger. You can see that, in the task bar (next to the clock on Windows). If the icon shows a connection (both "lines are next to eachother without a gab inbetween). If that worked, go back to the Renderserver and have a look. In the lower area of the RenderServer-Window you should now see the other computer-Netrenderslaves and the one of your own computer. 9.) If that is the case, the connection is working and you should be pretty ready to go :). After that just open Render Messenger on both computers as often as you've got cores (or virtual cores if you use HT/SMT). Only on the Netserver computer leave one to the server. So if you have a 4 core computer with HyperThreading (HT, Intel) or Simultaneous Multithreading(SMT, AMD) you can use 8 instances on the other computer and 7 on the the server (if the server is a 4 core too). 10.) Now on the Render Server go to "File > New". This will open a new window (Pool1 or something like that). In that at the top right-click and choose "New Job". A wizard will pop up. Give it a name (this is only for you if you render a couple of different jobs in a row for instance you can see what you do there... for instance "Peter's day out - Walk animation Scene 01 - Take 01" or something like that is a good idea, especially since I leave the jobs in there in general even if they have finished. Browse for the project-file (or chor) on the next button. Be sure, that the path is available on all computers in the same way (or use the option of 6.). Select which camera and chor in the project you want to use below that. In general you can leave OpenMP off and GPU is only needed if you use for instance FakeAO/SSAO or something like that. But first I would just try it with an very easy project. 11.) Next put in the render settings you want or use a preset. At the path at "Filename" make sure that the path is available for any computer. You can render to your own c:/ or a net-drive. For the net drive be sure you can access that from any computer. Anything else should be clear. It is mostly the normal render settings you already should know. 12.) After that the new job should be available in the Pool1-Wndows. Now save the job on the server somewhere. (or a net drive... this does not need to be available to other computers) 13.) Now drag and drop the Instances in the lower area of the Window to the lower part of the Pool1 window. After that, the Netmessengers on the computers should start Renderslaves and render the things. You should be able to watch that on the computer displays and you should be able to see that on the REnder Server too. It refreshes every few settings. If something is not working, you should get an information about errors and so on. If you get some, check what it might be on the computer or by having a look at the render server. Notice: In the Pool1 Window the right mouse button is key. There are a couple of different options there which are really helpful (and pretty straight forward). I hope I could help a little. If you have any kind of question or problems let us know. Best regards *Fuchur* PS: And this might be interesting for a lot of cores too: https://www.patchwork3d.de/start-am-netrender-185-en
-

crash when rendering multiple frames at Super35
cribbidaj replied to cribbidaj's topic in A:M Rendering
Hi Robert - yes, rendering to image sequence (.tga). As a follow up, I'm assuming now that the problem is in some part of the specific scenes I've been rendering. Perhaps lighting, or transparency over a model's eye's, or something I'm not catching. These scenes take place within a house I've modeled, but the lights in the choreography are in their default states, which causes some camera angles to render with different shadows, darkness, etc. Because I really don't have a deep grasp of lighting I just render with something that "feels" cool. When I have rendered scenes without the house as the "environment" all rendering works without crashing. I've finished rendering the scenes, so . . . I may upload the project soon so that I can hopefully learn from you or someone else on the forums what is going on in those specific projects. Thanks man! -
Try loading this project and do an onscreen render from the camera view. simple cyl01.prj Do you get anything other than blue sky? I just get blue sky. Other projects load and render normally, but in this one the ground and model don't render. What is different?
-
A revisit of an old idea/project done to test the working method. The old one was a bit of a mess too but liked the idea. The scenario is that, the Mum is starting to learn to play the piano, and the baby has yet to walk. But will by the end of Day Three. This is a rough pass at Day One. Any Critical feedback very welcome. It was animated and rendered in AM, the notes hand coloured in TVP and the composite done in After Effects. The composite will need some work as I have very little knowledge or experience of AE Simon BEWARE of Sound !!! TLC S1 003S.mov
-
I'll note that "Build Composite" in A:M will create a composite project that lets you manipulate all the shadow and light buffers in A:M if you are inclined to do so.
-
I just updated to the latest Mac OS and wanted to let the Mac A:M users know what to expect. As expected, A:M is NOT really usable in Mojave. Many things still seem to work, but the primary problem is that the Project Workspace is unclickable. It's responsive in that selecting something in a model window or choreography will highlight the specific element in the PWS, but no amount of clicking on it will allow you to select it or interact with it via the PWS. Fortunately, the menus and item specific pop-up menus are still functional. Most of the other windows do seem to function: Timeline, Properties, Poses, etc. Some of the tool panels are also unclickable. Ironically, I haven't once encountered the old Finder access problem that has plagued A:M Mac users for a decade or more. It's possible, with a different workflow that you could still use A:M. Some of the tools that can't be clicked should be able to be mapped to keyboard shortcuts. I don't have the time to explore all of the elements to see what works and what doesn't, so there may very well be other obstacles I've not come across. Mojave is supposed to be the last Mac OS that allows use of 32-bit applications, so beyond this, A:M will no longer be usable at all on the Mac. From my experience, I would recommend not upgrading your Mac beyond OS 10.12 (Sierra) if you plan to use A:M. (My experiences with using it under 10.13 were frustrating.) If, like me, you just want to open some of your old models and export them to other formats, this does seem to work.
-
One last question....completely unrelated to the decal mapping question. I am trying to create a plume of smoke like the kind that happens when a rocket is about to launch. (see the "red line" in the picture below) I am struggling to understand how the sprites can react to the force AND gravity and create that cool looking plume that rolls in on itself. In the zipped Project I attached I create an invisible channel to help shape the plume ........but my smoke is a dud. The project file is zipped (but it is in V. 18) so if any adjustments are made, please do them in V. 18...thank you, Any suggestions are welcome... Tom RocketPlume.zip

-

Planes Trains Automobiles Image Contest Results!
Simon Edmondson replied to robcat2075's topic in Contests/Challenges
Robert Thank you very much for all your work on this project and all your help to me on previous productions. The very least I can do is donate my copy of the book to you. Please accept it, as you stopped listing desired items some time ago. regards simon -
When I started out in using Animation:Master, part of it was because I liked the movie Shrek and wanted to learn how to do 3-D animation. Another part of my motivation was making a movie to tell a story. I can't afford to hire actors, buy cameras, etc., so I thought it would be great if I learned how to build the actors, sets, and props and use the cameras and lights in the software to make a movie. One of the things I really like about 3-D is building the environment or set and then using it like a real location. I have experimented with using flat pictures in a rotoscope fashion, as background but as I moved my characters, the background did not look real (in the sense that it looked like a flat picture background). I took a small free course in visual fx offered by Hitfilm (about 6 lessons) online, and one of the techniques was to place what looked like cutouts in different locations in a 3-D environment and project a 3-D motion visual onto the flat cutouts. That seemed to give more of a 3-D feel to the movie, but there seemed to be quite a bit of set-up required to make it work properly. I thought that building the 3-D environment itself might be better in the long run. Once I have the environment, I try to place my characters, cameras, and lights in a variety of ways to see how it looks. I guess I have a poor imagination, because I cannot figure out how it's going to look until I do all of this. I have a general idea beforehand, and I may even have sketches, but without moving characters, lights, and the camera into various positions, I don't know which I'm going to like the best. The pictures I have made so far to illustrate my books are in choreography files, and can be used as starting points for camera and character movement and zooming in or out and panning and various transitions. I hope to one day, if I live long enough, go back to my choreography files, improve the quality of pictures (even though they might still have a cartoon style) and create animated movies. I started trying to animate my own stories so that I would have some content to provide motivation and experience that would call forth the need to learn more technique. All of this is to explain that although I am very slow in getting to know a lot of the ins and outs of the animation program, I do have a general strategy in mind for accomplishing a goal. I really appreciate the huge amount and quality of help I have received on the Forum, and although I might not use every lesson in helping me to approach my goal directly, I am learning techniques that I will be able to apply in some small way to my project. For example, I have admired for years the way artists use texturing, and I am very impressed with how closely 3-D artists can simulate reality, especially in special effects in movies. I have been very glad to learn what I have about using textures, even though the style of my work is mainly cartoons. For example, I made a picture of dirt and rocks that had fallen down a cliff. The dirt did not really look like dirt enough to communicate what it was. The rocks did not really look like rocks. I plan to use some dirt texture and some rock texture on those items in my picture even though the rest will remain cartoony. I may even do something to the texture image in Photoshop that pulls it back slightly from hard reality to make it communicate substance without looking photographic. It's just a style choice for these projects, although, as I said before, I really admire the ability of 3-D artists "to make it look real."
-
Had a hard drive crash ..now fixed wit new drive and with a reimage as of mid January ...decided to do a simple project and did a rough test... the project looked okay when it rendered but the playback is weird and windows even at one point said it was invalid format to play ... my machine did not like the format microsoft video 1 so I changed it to mpg for my avi file and now it plays on my machine test.avi roughbun.prj

-
I am very please on how fast it simulate and results were good with the example project file posted. Can you assign the bullet to a weight map or set of points that you want to be effected?
-
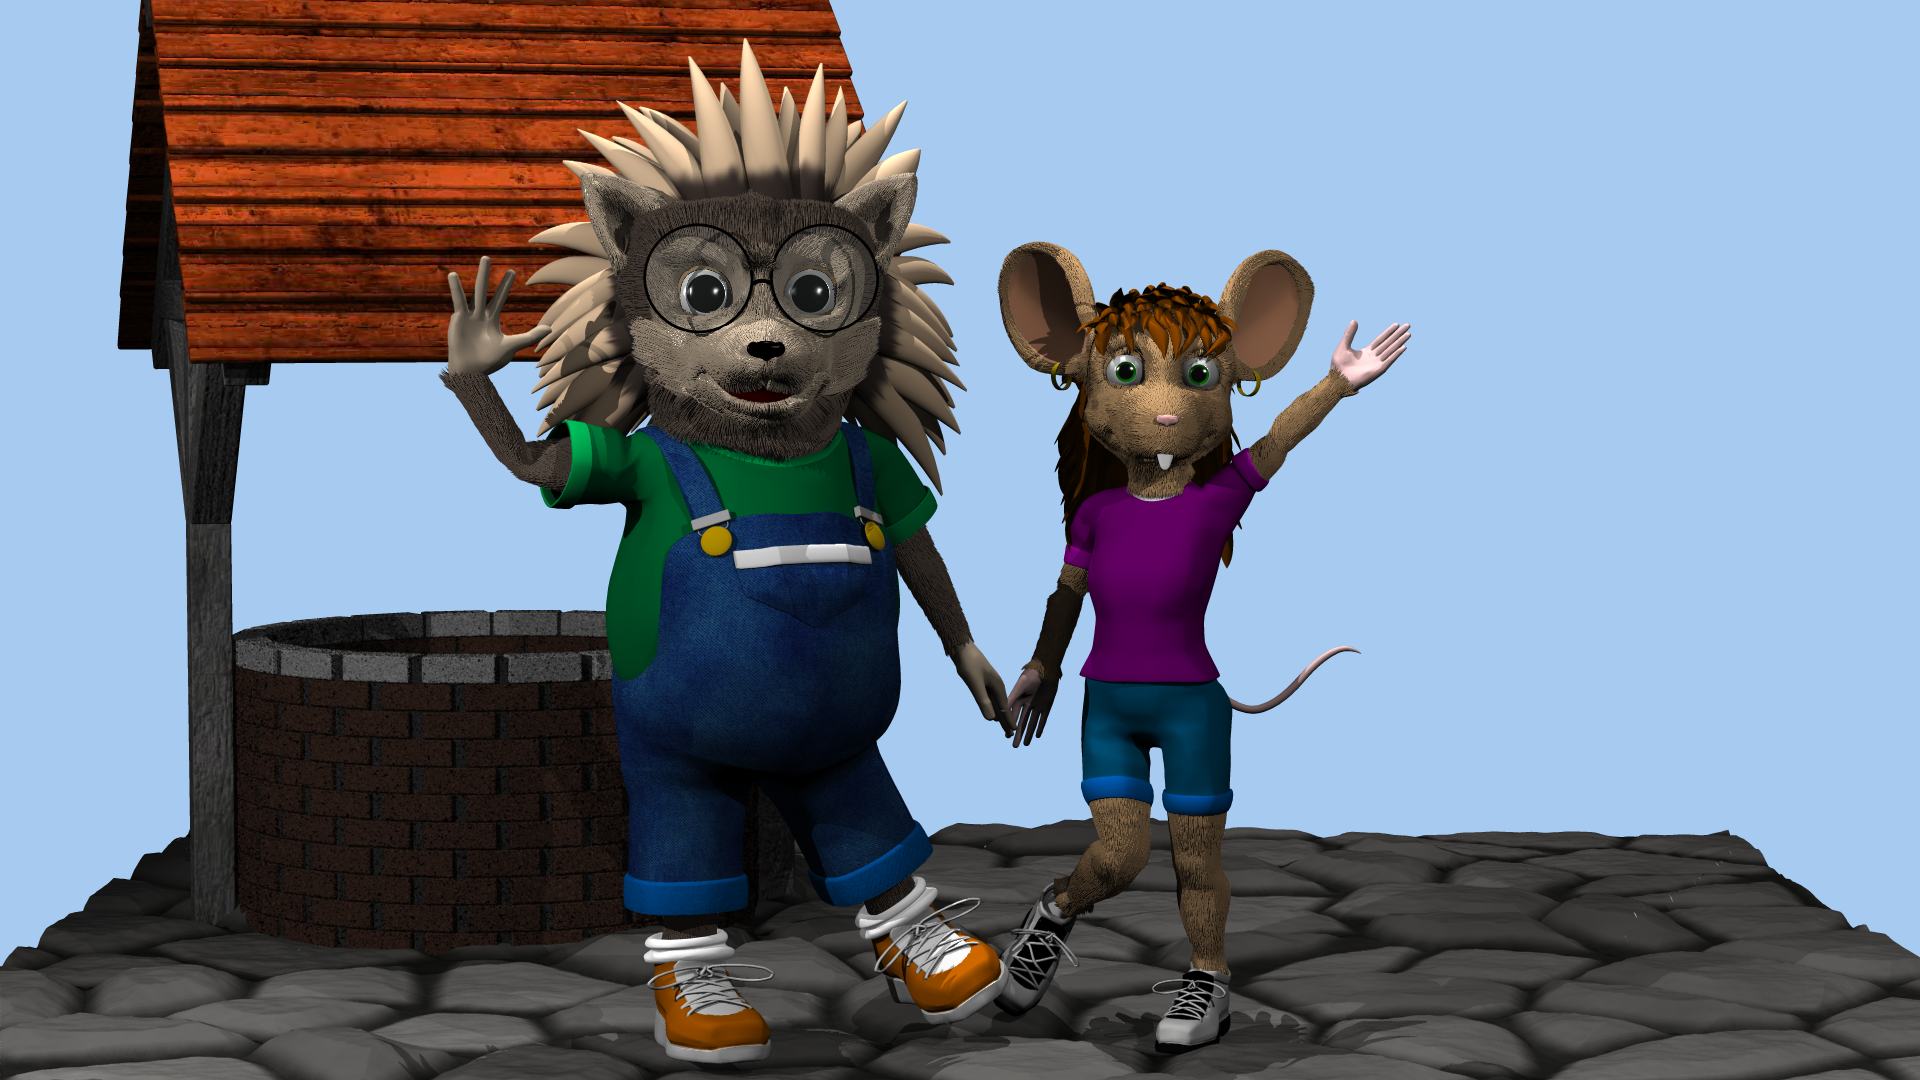
I've been working on my kids' book project and modelled Bernie's best friend Eleanor 'Nellie' Aisling. Also, it seems that when I transferred all my A:M stuff from my old computer a few of Bernie's textures didn't make the trip. I'll fix all that eventually, anyway, I just thought I'd post this little W.I.P render.