

entity
-
Posts
895 -
Joined
-
Last visited
Content Type
Profiles
Forums
Events
Posts posted by entity
-
-
I read a lot about Edge loops:
They control the topology of the surface, and they follow the pattern of muscles and bone structure under the skin. It also helps you see your character's volumes better.
Doing this with splines gives you less to try to smartskin to correct the shape of moving geometry.
Something interesting about controlling splines to make a hard edge: The closer two loops are, the harder the ridge or edge you can create.
Thanks for bringing this up, it's been a while since I modeled something.
-
I forgot to address the brows being less pronounced, but toned down lip sync, more. Made all moving holds harder and stricter. (No more bouncing brows- floaty lips). Have not gotten to body motion yet, strictly lip sync.
I would love to get this one completed in another day. I have to have my broken tooth extracted tomorrow... YUCK! I was just trying to chew some gum and *CRUNCH*----OWE!
-
...
Keep on tuckin (Hope you've heard the phrase before. I may be dating myself)
I'm 40. I've heard that before. Funny you should state that with a misspelling... tucking= truckin' ?
answer: 10-4, good buddy!
thanks,
-
This is just another lipsync pass... Toned it down a tiny bit. Tried not to loose the excitement of the green monkey at his anticipation of being changed back to Woot.
Still haven't done anything with the body yet... but my next post will have some body acting in there... I think woot/green monkey should be bobbing with excitement at this point in the movie, or at least that's my plan.
-
thekamps: thanks... I will tone it down.
-
Woot is talking very oddly here. But, TWO was written a long time ago. I'm only complaining because this dialog was quite hard to get through. Sometimes it is difficult to pull out the important poses from such a dense population of phonemes. To keep it simple I just used the "face interface" and no "preston phonemes".
Take a look:
-
Jake,
Very good comeback! Your animation skill is great... I like the fact that you improvised and added some character to the walkcycle. So now your going to use this walk on Lady Goodbody? I have to see this.
P.S.- Are you going for a comedic effect here?
P.S.S.- I like the way you set-up the character to show the walk from many angles (+the walk/path in background) all in the same view. Maybe we should all start showcasing our new models and animations with this in mind. It makes it easier to see what we did all at once... I am going to start doing that my self. Thankyou for the idea.
-
I like that... It gives me some ideas.
-
It can be fixed in the hip if you do not wish to change the leg's angle. But you must move the knee forward a little if you wish for a slight knee bend. Can the foot tilt more without deforming too much? If so that may help reposition the leg. Keep plugging away and don't give up... there is a solution, at worst you might have to go back to the previous keyframe and stick a new keyframe in just to stop it before it happens.
-
Impressive muscles. It's neat and clean, too.
-
I'm in AWE!!! Exellent work! Are your reflections blended, they seem to be dulling the nice punch the red metal is giving in the other renders. It is one hell of a great rendition of a character.
-
Geeze!
It's been over 25 hours so far and my image for the Sci-fi contest is still over 30 hours from finishing!!! The bad thing is, the estimated time is continously going up!! Is this normal? I did make some adjustments to it to try and save some time but this is too long. I have like 18 lights in the scene tho. maybe thats why. Any tips?
I just hope it finishes before Sept 1st! lol
Could you post your render settings... have you tried rendering with no extra settings... rendering with only shadows and no multipass or motion blur? Try turning everything off and see if the render still acumulates time. If it does then it is a setting outside camera settings... look into the chor settings next and change those. Keep taking the settings away until you have found what part of your chor is causing this... if nothing changes then it must be your model.
Hope you find a solution!
-
Had a great time guys.
Thanks, John, for hosting...
Don thanks for getting me there and home (there was so much going on, I forgot to make a font for my handwritting- I promise not to discuss politics along with vintage sci-fi.)...
Vern, if you chose to work for the "devil" does that make you a "demon"? Good luck on your new venture...
Mack, I'm blown away by how your rigging has come along. I learned much! Do you get any sleep?
...
I think I'm really becoming a Sith Lord. Darth Entity!
-
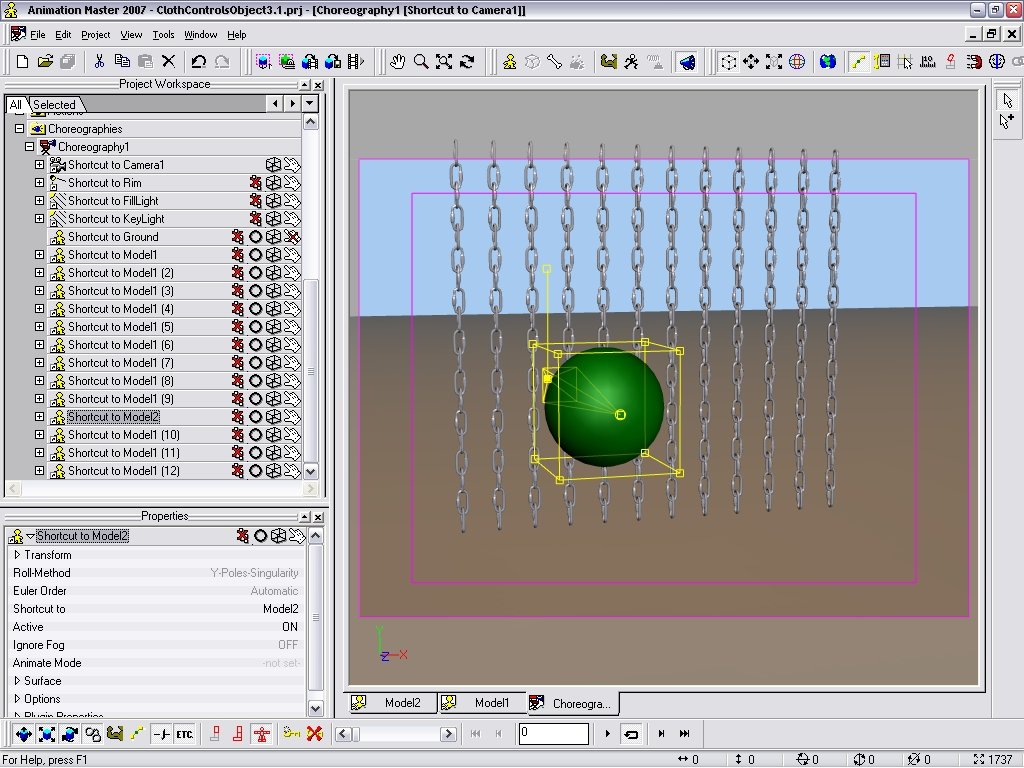
No. The chain's bones are constrained (translate to) to the bones that are constrained (path) to the cloths splines.
So it's just the cloth's collision radius keeping the chains from one model from colliding with the chain geom of the
neighboring model? That's more what my question was about. The rest I get.
...
Sorry, I tend to babble.
-
I notice in that movie, the chains bounce off of each other. I would expect the cloth geom would bounce off of each other, but it looks like the objects constrained to the cloth also deflect off of each other. Is there a collision setting for the chain geometry as well?
No. The chain's bones are constrained (translate to) to the bones that are constrained (path) to the cloths splines.
That is a most impressive display of enginuity, there entity! Thanks a whole bunch for showing us how it's done.
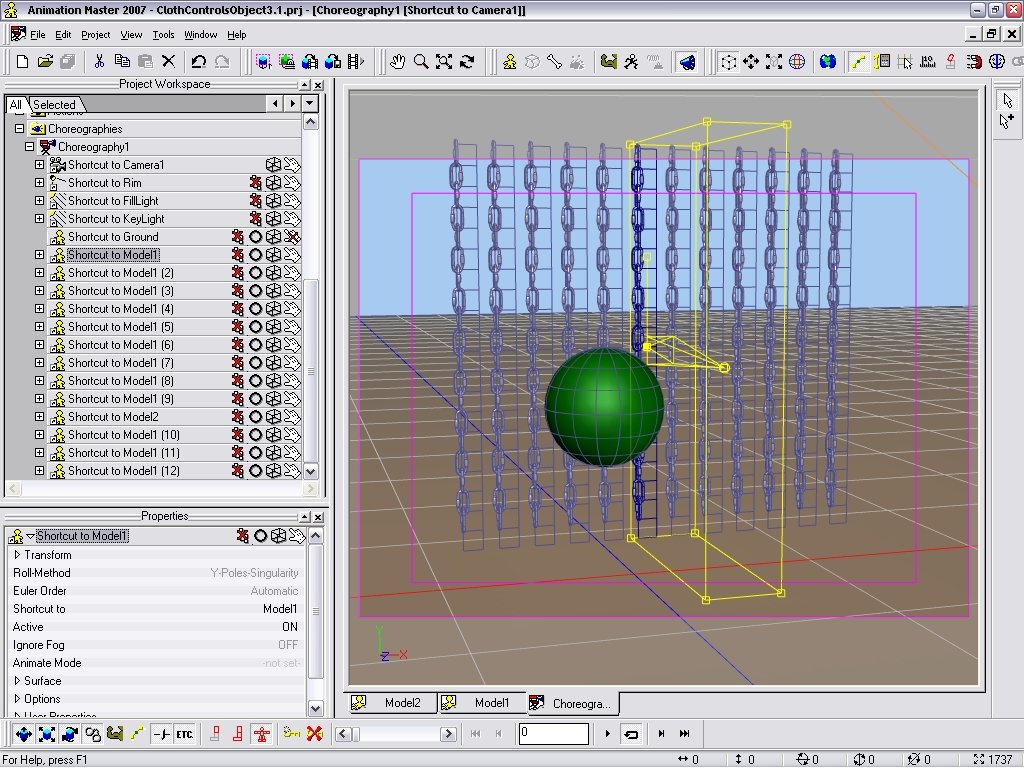
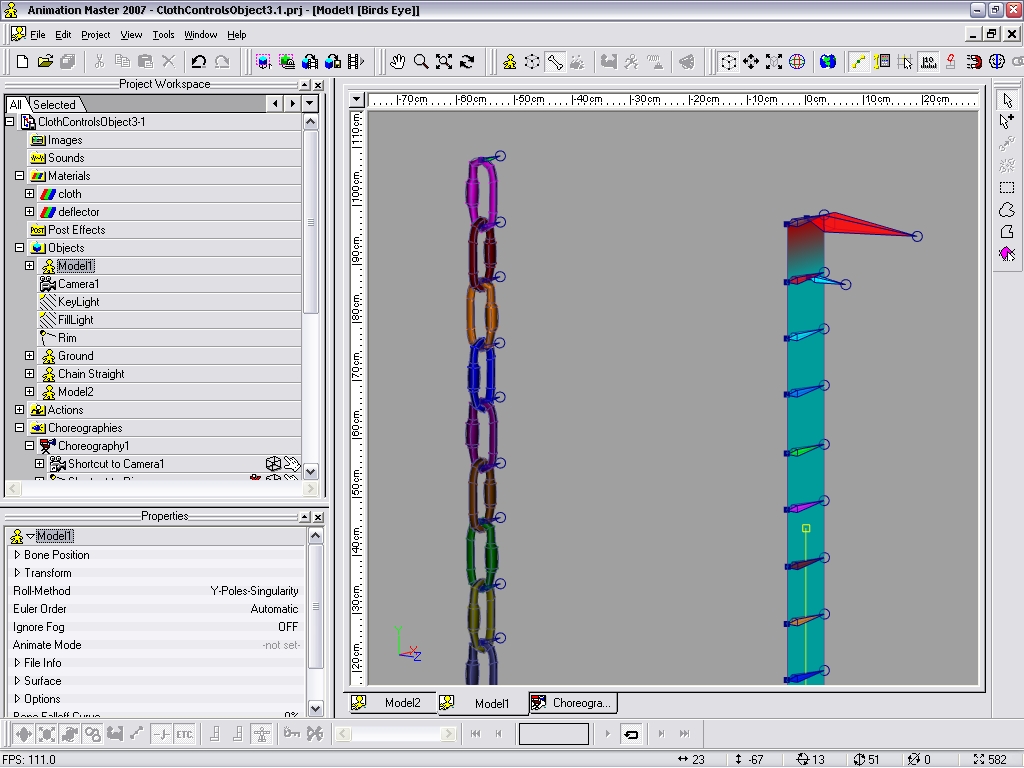
Quick question: In your cloth grid rig, I see the bones pointing perpendicular to the grid. I see the large bone at top is to keep the cloth from falling to the ground. What is the smaller bone below it for?
Okay... the large bone at the top is the bone that holds the strip up, and the top spline cps is grouped to. The rest of the cps are grouped to the small bone which is the cloth's bone.
I constrained to each row spline a bone and each bone will point/ align itself in the positive direction of the spline, the base of the bone is at the start of the spline (0% ease). If you wanted you could "offset" it's position from the origin of 0% ease by translating it after the constraint is applied in the action or pose or chor... wherever you are animating it, and it would follow the paths curve and direction still, it would be off the path though... that is good for compensating for thickness. I suggest using ease to position the bone on the spline if you want it to sit in the middle or between cps.
The small bone you see highlighted in the screen capture is the chain link bone. I did that so you could see that the bone is "attached" to the cloth spline bone.
It is also interesting to note that you only have to build one set of chains but can instance it multiple times and still have the cloth simulate with the other cloth in the scene. So when you have many cloth objects in a scene, it will react to all the cloth you have in the scene if it comes in contact with it.
The cloth does the work and the chain is just following the cloth via the constrained bones constrained to the cloth's splines. The chains have no cloth on them... they are not in the simulation at all. Only the cloth strips and the ball are in simulation. The chains do rotate and bounce and stretch... that is the only real problem with it, but it's quick and relatively easy to set up.... you could do the chains better with Newton dynamics. I just want to show that you could change the geometry of the object without having to re-simulate again.
I will try something way more complex soon, so you can see what I really want to do with this.
Thanks for the replies!
-
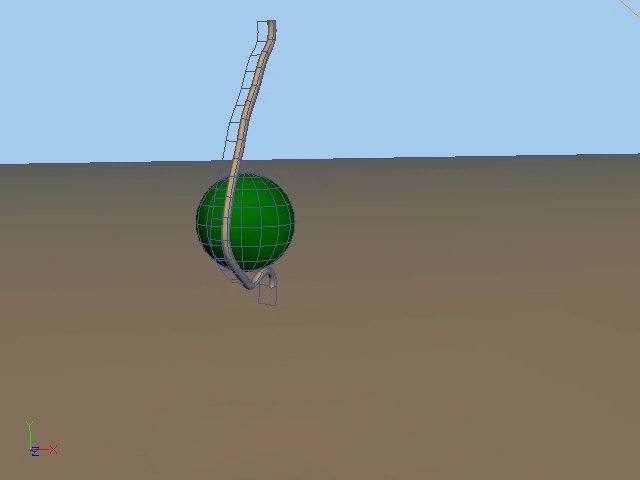
Good experiments. I tried to simulate a rope/chain for Robert's "We're off we're gone" song, however, I couldn't control cloth enough to simulate a heavy chain. If you can make it so that it doesn't flip way over itself I could definitely use it

Here look at the settings and the speed of the ball:


-
On
#5-There seems to be some sort of cyclic pattern to the birth of particles. You can see this in the left to right emission and death of the sprites in the fire above. I couldn't find a way to control this or "tone" it down. It would be nice to be able to randomize it more, though this "effect" has its uses as well, so I'm not asking to lose it... just to have another option for the emitting pattern.I'd say just, make the emitter more random in shape like hills and valleys and the angle of the slopes will cause the sprites to emit in a more broken up way. To take it farther, you might animate the emitter to undulate or oscillate a little as it emits. That should mix up the points of emitting more... or even getting it to spin slowly. Or all of these together can be controlled via pose sliders.
-
What about toon render with lines only... I don't know anything about toon render, but is it possible to do the fading from normal render to toon with lines only?
That's a great idea.
Do you think the toon render characters will have to be composited into the scene? Sounds trickey... I've tried to render a character with toon lines only and the whole scene is rendered with toon lines and the camera's background color. Is there a way to render a character with toon and have the rest of the scene render with normal settings? Is someone out there testing this?
-
Good experiments. I tried to simulate a rope/chain for Robert's "We're off we're gone" song, however, I couldn't control cloth enough to simulate a heavy chain. If you can make it so that it doesn't flip way over itself I could definitely use it
Only slowing down the deflector's movement worked to make it not flip so high... also what helps is changing the settings to 1/4 of the default settings in the cloth, but having the ball hit lower in the chain also works. DUDE... it's true physics at work here... if the character impacts it fast, that energy has to be causing a reaction like that! Accept the results of a fast moving object hitting a chain or rope... the only other way I can think of is to change gravity making it higher to keep the chains from being able to go so high... think "real" physics.
-
This topic is also posted here:
http://www.hash.com/forums/index.php?s=&am...st&p=243770
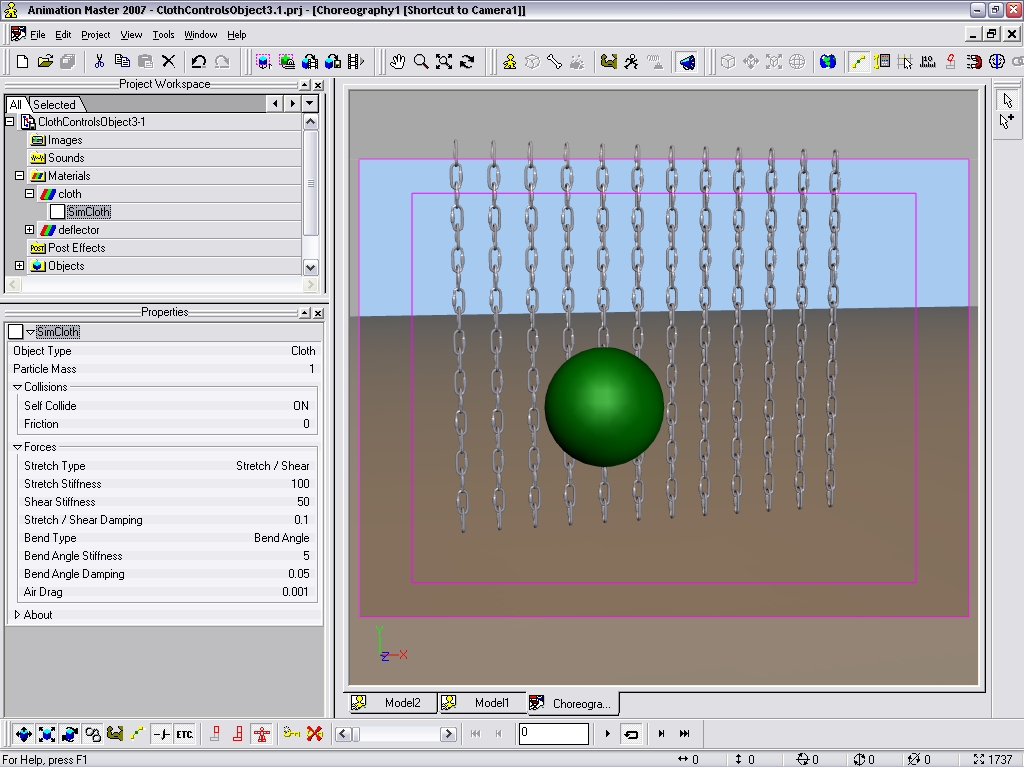
Basicly, this technique is a way to have cloth deform a bulky object, just like it does with a button except using a bunch of bones instead of one.
Since cloth is made up of a flat mesh, you can add objects to the surface via path constraint to the cloth's splines, to allow the objects to stay with the cloth... well! This is done with constraints/bones, so why couldn't you do it also with bones in an object like a rope or a backpack (Woot).
:: You can create a cloth grid and set up as you would normal cloth on a character. Don't forget to make a deflector object for the cloth to react to.
:: Create some bones at each of the cp's of the cloth. Now you have a grid of bones (don't parent them... keep them all seperate).
:: Create a pose (ON/OFF) and start constraining those bones to the splines (path constraint). You will have to use "ease" to get the bones into the exact position on the spline, because the bones will attach to the spline at "0% ease" which is the begining of the spline. If you want to use 0% ease you must enter "0" into the "ease" field to create a keyframe in the pose, otherwise A:M will animate the ease automaticly in the chor from 0 to 100% over the span of time in the chor.
:: Now, you need to keep these bones handels pointing to the bone above in the grid, so use "aim roll at" to do that. Now, you got all these bones attached to the cloth when you turn on the pose in an action... wait... theres more!
:: You can create or import that belt or chain or backpack and rig it like your cloth grid (these bones need to be controlling the bulk object... only use the amount of bones you really need to make it work: the bones nearest the cloth will be the main bones. You can make other bones that are parented with these bones to control other parts of the object you made or imported.)
This object will not be a deflector... it is not cloth either so it doesn't need a simcloth material on it.
:: Make a new pose (ON/OFF). This pose will constrain your object bones to the closest cloth bones using "translate to" and "orient like".
MAKE SURE CORRESPONDING BONES ARE ORIENTED AND IN THE SAME POSITION!
That is a basic rigging rule... even if your not "orienting like", it's always a good idea to do it so your rig looks clean (it doesn't have to be perfect, just neat).
... Now you have all these object bones in the exact position and orientation of the cloth bones.
:: Hide (H) your object and simulate your cloth. This is just a test... doesn't need to be perfect or long lasting!
:: Un-hide your object and make sure your two poses are ON. Make the cloth transparent 100%, so it doesn't show, unless you want it to show.
Scrub through... Look at it!
There is an object distorting and bouncing around your character, something that can't be done as well with dynamic bones. If your object is sinking into your character... try setting your collision radius larger to keep the object from penetrating your character too much.
Hope you can understand this... I have a sample animation and project (There are some animations of the strap and chain examples here below, and two of the objects projects (Rope and Chain projects).)
I tried a rope object and a strap object and a chain object (the chain was created by Mike Muncy and is available on the A:M extras DVD)
FakeRopeDynamics_finalvback.mov
FakeStrapDynamics_finalvback.mov
-
...
I recall it used to be possible to select a spline on model as a path constraint target, but now I can only select a spline made in the chor with the path tool. What's gone wrong here?
Hold down the shift key when choosing the spline, according to this thread:
Creating a path, can it be done in a model?
Here above is explained how to select a spline in chor.
-
Create a pose (ON/OFF) and start constraining those bones to the splines (path constraint)
Me and Steve Sappington were trying to get the path constraint to work in an ON/OFF pose a couple weeks ago but I couldn't get it to work. I tried turning the constraint ON AFTER the simulation in the chor and also BEFORE the simulation, but I could never get the pose to actually constrain the bone to the spline unless I defined the constraint in the chor.
How did you get the Path Constraint Pose to work in a chor?
Well it's a good habit to close the chor and action windows that are using the pose as well... that could be it. But I was using v14.0 when I did this... never tried it in the betas or v13.
Did you download the project I uploaded? I didn't have any trouble...
... a work around would be to do this in an action and copy the keyframes to the pose.
-
Okay guys... a quick test... Say you want to add someobject that has the properties of cloth, but is made up of variable shapes and parts... like say you want to make a chain or rope that can act like cloth. What do you do?
Well since cloth is made up of a flat mesh, you can add objects to the surface via path constraint to the cloth's splines, to allow the abjects to stay with the cloth... well! This is done with constraints/bones, so why couldn't you do it also with bones in an object like a rope or a backpack (Woot).
:: You can create a cloth grid and set up as you would normal cloth on a character, then create some bones at each of the cp's of the cloth. Now you have a grid of bones (don't parent them... keep them all seperate). Create a pose (ON/OFF) and start constraining those bones to the splines (path constraint). You will have to use "ease" to get the bones into the exact position on the spline, because the bones will attach to the spline at "0% ease" which is the begining of the spline. Now, you need to keep these bones handels pointing to the bone above in the grid, so use "aim roll at" to do that. Now, you got all these bones attached to the cloth when you turn on the pose in an action... wait... theres more!
Next: you can create that belt or chain or backpack and rig it like your cloth grid (these bones need to be controlling the bulk object... only use the amount of bones you really need to make it work: the bones nearest the cloth will be the main bones.). Next, make a new pose (ON/OFF). This pose will constrain your object bones to the closest cloth bones using "translate to" and "orient like". MAKE SURE CORRESPONDING BONES ARE ORIENTED AND IN THE SAME POSITION! That is a basic rigging rule... even if your not orienting like it's always a good idea to do it so your rig looks clean (it doesn't have to be perfect, just neat). ... Now you have all these object bones in the exact position and orientation of the cloth bones.
Now hide (H)your object and simulate your cloth. This is just a test... doesn't need to be perfect or long lasting!
Now, unhide your object and make sure your two poses are ON. Make the cloth transparent 100%, so it doesn't show, unless you want it to show.
Look at it.
There is an object distorting and bouncing around your character, something that can't be done as well with dynamic bones. If your object is sinking into your character... try setting your collision radius larger to keep the object from penetrating your character too much.
Hope you can understand this... I have a sample animation and project (2.62mb-prj^v14.0...and mov files zipped) I did of a simple test, but the object could almost be anything that dangles... hehehe (get your mind out of the gutter!)... well you will see.
I'm going off to play with this idea a little more... it might even be good for making characters rigs react to a gun blast. Hmmmmmm. I'll be back later!
::basicly, this technique is a way to have cloth deform a bulky object, just like it does with a button except using a bunch of bones instead of one.
EDIT:I noticed later that the ease changed during the animation from 0% @ frm0 to 100% @ frm120 in the chor (I set the poses to ON in frame 0 of the chor). I'm going to look into this, but I think you have to set a value for ease in each (path)constraint in the pose so it doesn't change over time.Edit#2::It's true. For the path constraints, the"ease" must have a keyframe set so it doesn't automaticly animate to 100% over the length of the animation in the chor. (I was using 0% to position the bone on the spline: but I must enter "0" into the "ease" field to create a keyframe in the pose, otherwise A:M will animate the ease automaticly) I fixed the pose in the proj I uploaded here so you can get the new one. Sorry.....Now I'm off to test this on something else!
-
What about toon render with lines only... I don't know anything about toon render, but is it possible to do the fading from normal render to toon with lines only? If not, it is worth it just to chime in here. Xray and micro materials don't have any effect on some of the parts of characters with materials on them. This is a very interesting thing to investigate. I don't want to sidetrack the wonderful ideas everyone has come up with, but this brings me back to the old cell animations I remember from childhood, when invisable charcters would just become monochrome outlines when they turn invisable.


3_05_39 "the cursed green monkey" says:
in TWO Animating
Posted
Blocking first take.
3_05_39_take1_5_BLOCKING.mov