Julian
-
Posts
779 -
Joined
-
Last visited
Content Type
Profiles
Forums
Events
Everything posted by Julian
-
You could create a copy of the character's model with no decals and add a transparent glowing material to it, put it in the same pose as the character when he starts his move, then animate the transparency.
-
I made a revised version of the star sphere a couple of years later in this topic: http://www.hash.com/forums/index.php?showtopic=23594
-
You could fire out a small 8-patch sphere set to 100% transparency, which would be a sprite emitter. The emitter would produce two kinds of sprites: a small dot, which would be the trail of sparks behind the projectile, and the electrical arcs that look like lightning (making the sprite an animated image sequence would be a plus), which would have a very short life expectancy so it wouldn't leave a trail. The sprite system should not be influenced by gravity. Constrain a light with a lens flare to the projectile to produce the blue glow.
-
You could try something like a material with Perlin turbulence, but it would help if you told us what kind of object you're creating: a projectile, a containment field, a Star Trek-style warp core?
-
Can you use muscle animation to deform the tiles?
-
You're thinking of the design by Gabe Koerner, right?
-
Stian, I find it interesting that even though the vehicles are low-res, you still put beveled edges on them. Do you spline the bevels manually, or do you use Yves' primitives?
-

Additions to my astronomical gallery
Julian replied to Julian's topic in Work In Progress / Sweatbox
I've made a couple of posts on the thread about PlanetGlow in the Newbies forum, but as I said there, I meant to write up a tutorial a year ago but I haven't gotten around to it. -
If the glow shows up over the planet model, the Halo Starts % value is too small. The important thing is to keep track of exactly how much bigger the glow object is compared to the planet object, then set Halo Starts % to the reciprocal of the scaling factor. For example, if you created the glow by scaling up the planet mesh by 120%, then if you set Halo Starts to 83.33%, the glow will touch the surface exactly. BTW, I misremembered in my earlier post -- the maximum value for transparency on a group with PlanetGlow is 99.5%, not 95%. You can set transparency to 99.49% and it'll be OK. I don't think you should use that page on Yves' site as a guide to using the modern PlanetGlow shader, because he created the page back in version 8.5, and PlanetGlow works differently after Yves rewrote it to work in version 12. Putting PlanetGlow inside a material isn't necessary. Also, if you use PlanetGlow on an object with Receive Shadows turned off, the glow will show up even on the nightside of the planet, which isn't strictly realistic and may not be the kind of effect you want. However, if you have Receive Shadows turned on, the planet will cast a hard-edged shadow on the PlanetGlow object. I've discovered a way of softening the transition on PlanetGlow from the dayside to the nightside, but it's pretty complicated to explain: it involves a gradient material with a huge increase in diffuse falloff, whose rotation is linked with an expression to a bone constrained to orient like the sun. This is kind of thing I'd want to write a tutorial for.
-
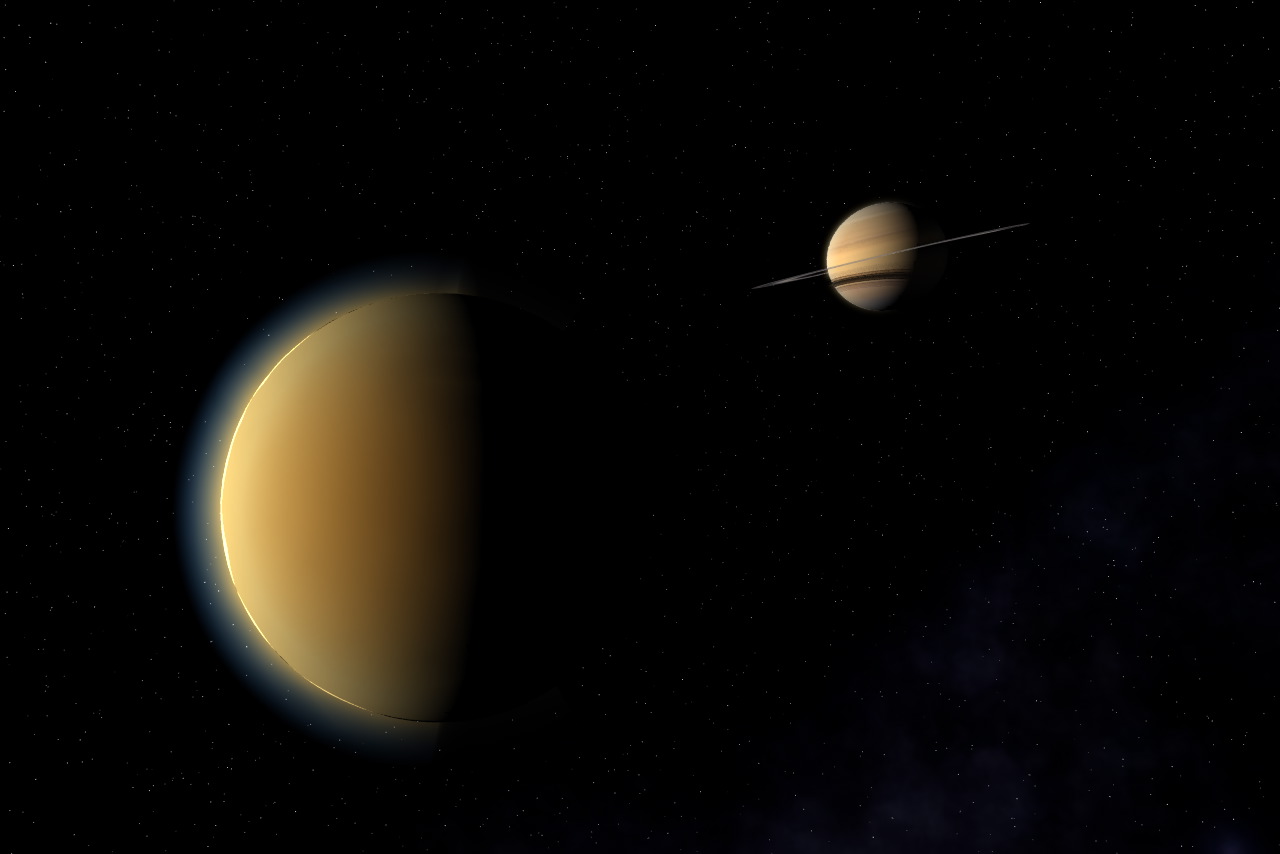
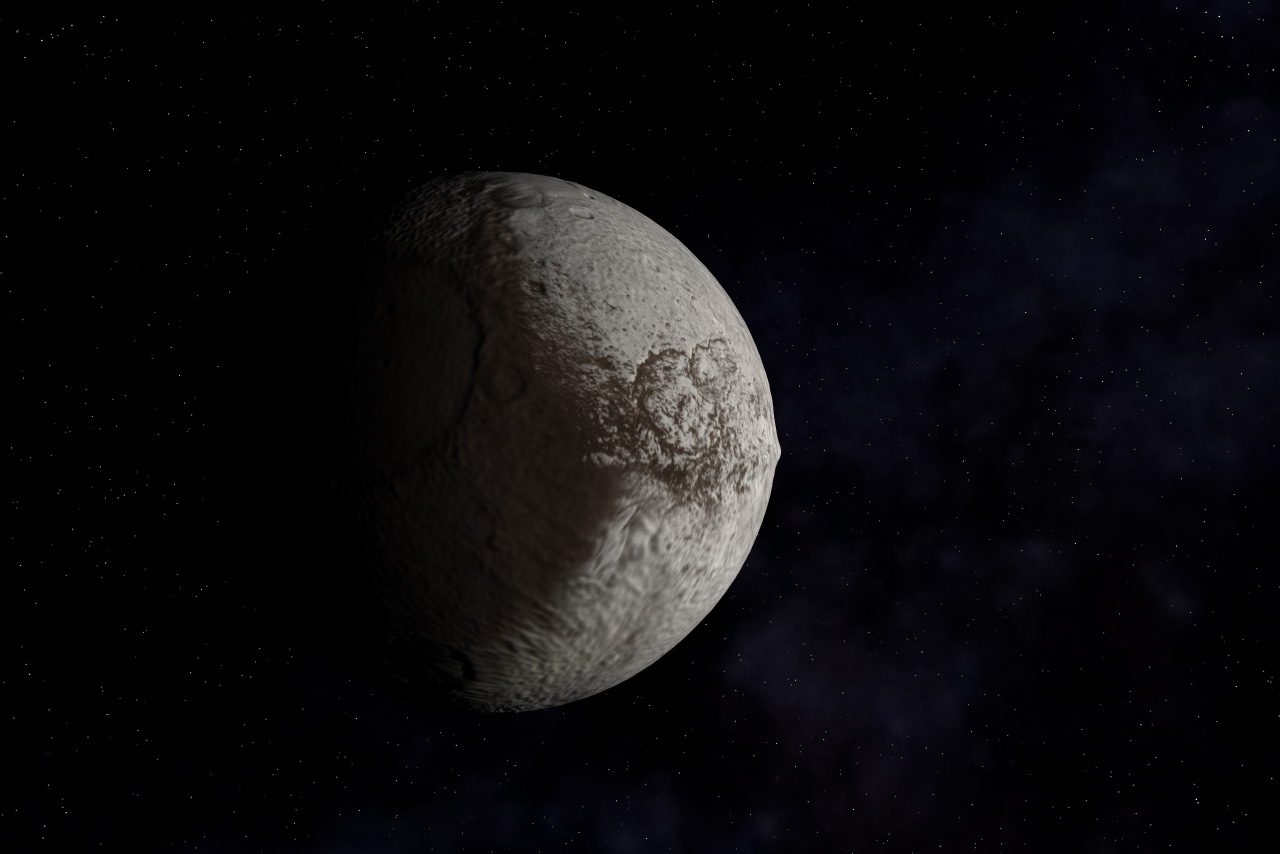
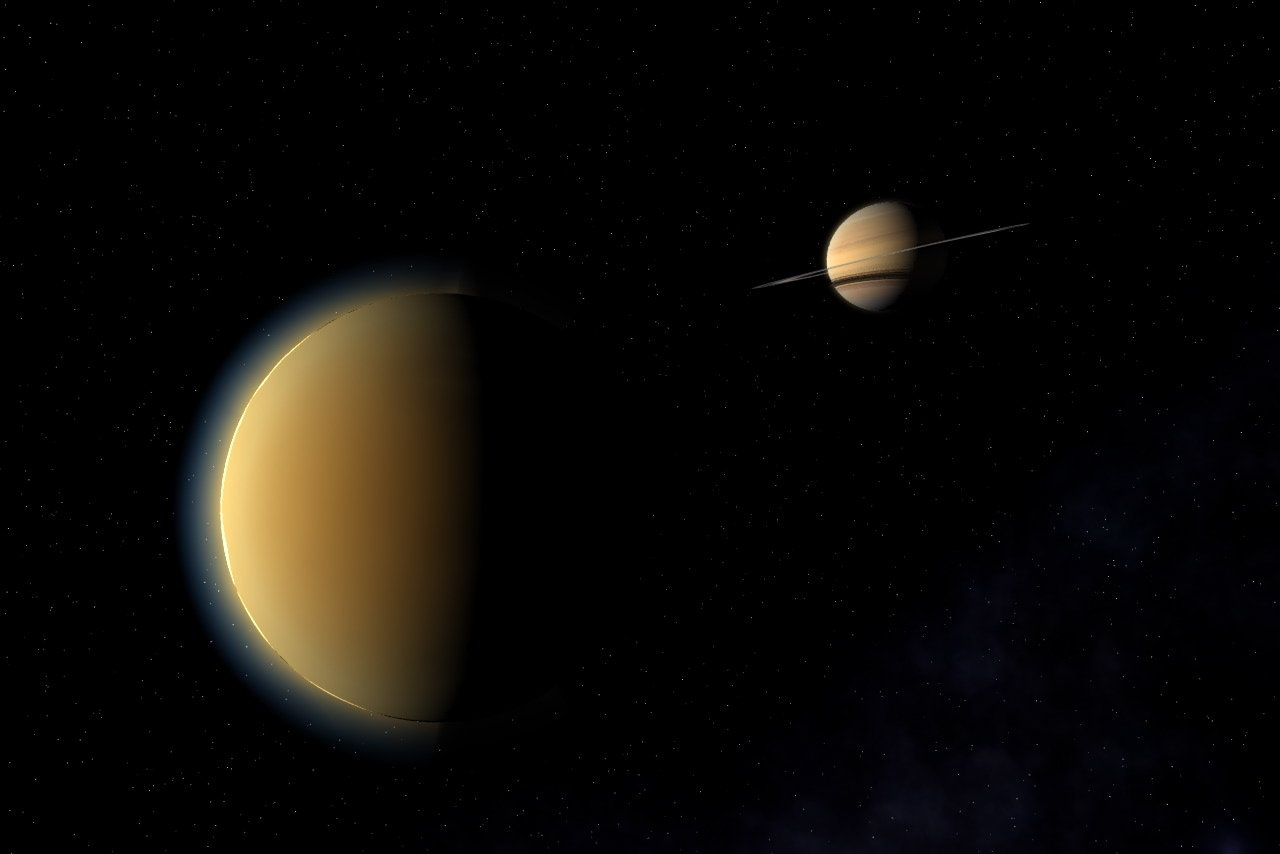
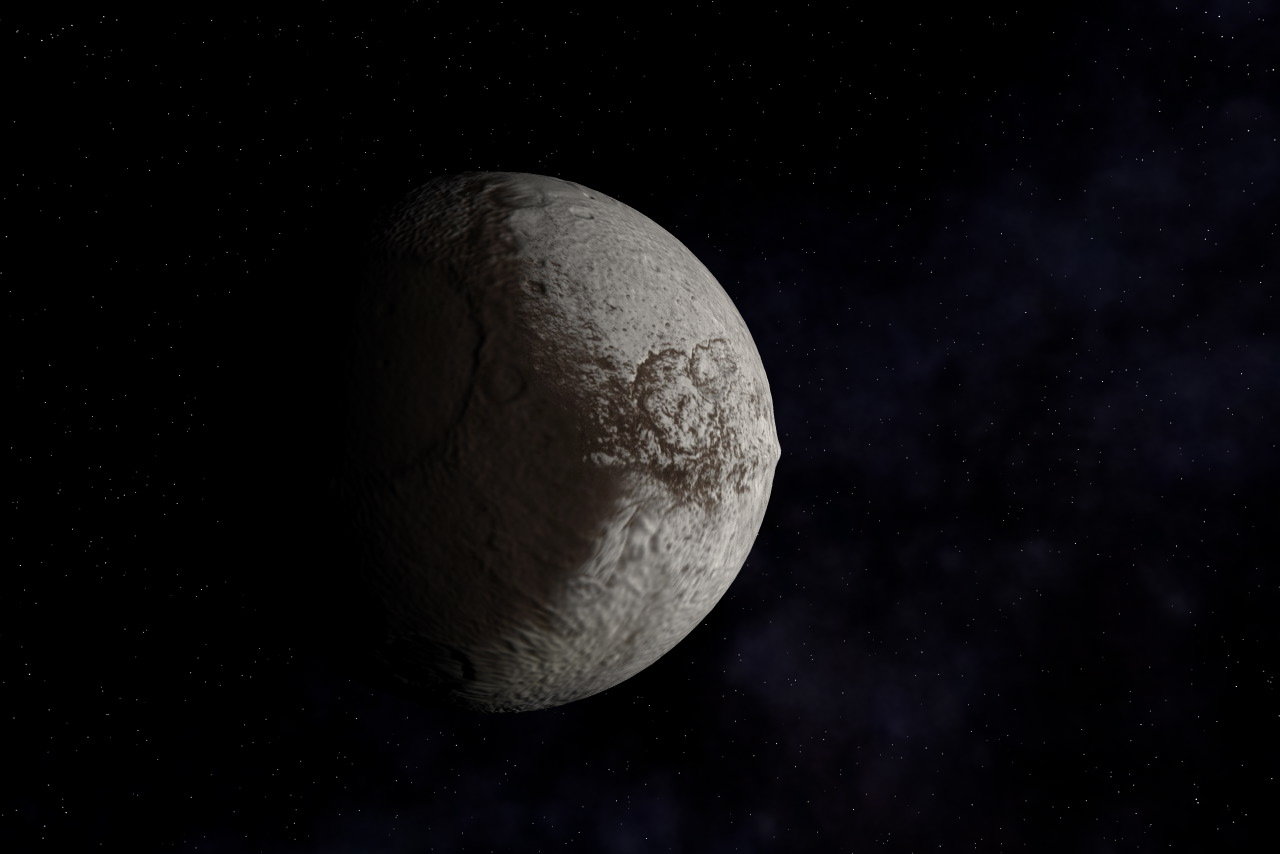
I've added some new renders to my A:M Stills gallery of astronomical art that I first announced in this thread nearly a year ago. Having found some improved textures, I've finally been able to finish modeling the Earth's moon and the seven major moons of Saturn. The Saturn moon maps come from Steve Albers' planetary map site. Titan was rendered with PlanetGlow, but it doesn't look exactly right. You shouldn't be able to see the horizon at all, but I can't think of any other solution that would work, except for vibrating the model really fast in multipass, but I'd rather not do that. I used a displacement map (16 bpc EXR file) to create the equatorial ridge on Iapetus. I expect I'll need to update the the Iapetus texture next month when the Cassini probe goes in for its closest approach and fills in most of the "terra incognita" areas.
-
First of all, when using any shaders, you have to turn on Plugin Shaders in your render options. Second, the larger sphere has to be less than 95% transparent, otherwise the shader disappears. For the last year, I've been meaning to write a tutorial about using PlanetGlow, but I haven't gotten around to it.
-
I see the lines shooting out problem only when I PageUp to set the number of realtime polys per patch to 16 (the second-highest setting), or if I enter Bones mode. The lines are shooting out of the CPs under his fingernails, which seem to be modeled in a peculiar way. Deleting those CPs may solve the problem.
-
In shaded mode, if the normal is turned inward it looks like a tiny yellow dot.
-
On the A:M CD, it's in Data\Materials\Geometry\Porcelain.mat. When you open it, it looks just like a regular material with one attribute, except that at the very bottom of the Surface properties there's an extra value called "Normal Weight". Usually, you want to set it to 100%, unless you find that this amount of smoothing is obscuring some detail you want to keep.
-
When you extend a spline with the intention of making a hook, press Shift-A instead of A. (A lot of longtime A:M users will forget to tell you do that, because this behavior was introduced with the stitch feature back in version 10.)
-
Do you have porcelain turned on? I can see from your screenshot that the patches with dark corners have their normals flipped inward. Select a patch with inward-pointing normals using the patch selection tool (Shift-P) and flip the normal by pressing F. At least, that's what I have the shortcuts set to, but I don't remember if they're the defaults.
-
This is normal when you add a light inside a model. The light in the model overrides the light that usually comes from the camera, so the light in the model is now the only light source. To see how the model looks when lit, you could add another light outside the model and delete it when you're done modeling, or you could put the model into a choreography and look at it there.
-
Are you running Vista? Did it look like the screenshots provided in this thread?
-
just noticed particle emitter called fluid emitter
Julian replied to johnl3d's topic in Work In Progress / Sweatbox
I posted my test of the fluid emitter here in the 14.0 beta 5 download thread when the feature was introduced. -
Have you checked the model's properties to make sure that Ignore Fog is turned off?
-
Were the glows on the warp nacelles and the Bussard collectors created by simply turning on the Glow attribute?
-
Press Shift+A and then click and drag on a CP to extend the spline. When you weld the CP you're dragging to another spline, it'll form a hook instead of stitching in as another control point.
-
That's actually a decal! I started off with Axel Mellinger's Milky Way panorama, applied the Dust and Scratches filter in Photoshop to blur out all the stars, blew it up to 9600 pixels wide, added detail with fractal clouds, and decaled it onto a sphere 11 kilometers in radius, so it would lie outside the star sphere. Babylon 5 started a trend where CG artists would stick nebulosity all over their starfields, which serves to define the shapes of objects when they lie in shadow. But a lot of the time, people overdo it and make the nebulosity too brightly colored. B5 sometimes even showed huge nebulae even when the scene is supposed to be taking place within the Sol system, and obviously you wouldn't see any of that if you looked up at night on Earth. I prefer to aim for a realistic look by using only the Milky Way and keeping it fairly faint and subtle, they way it actually looks in the sky.
-
So you think I should give up on including a sample project? Because I'm using 80 megs of texture files and I don't think it'd be worthwhile to ask people to download all of them. And what I really want to demonstrate are common mistakes that can be made when using Planet Glow -- like setting the transparency too high, or not using 100% shadow darkness, or the planet casting a sharp-edged shadow -- and how to work around them. I suppose the tutorial could be in two parts, first using the sample project and then giving a full explanation of all the techniques that went into the image. At the top of the page, there should be an "Upload File" button and an "Admin Mode" button (it'll say "User Mode" if you're already in Admin Mode.) Admin Mode is for creating and modifying galleries.