

GruberR
-
Posts
31 -
Joined
-
Last visited
Content Type
Profiles
Forums
Events
Posts posted by GruberR
-
-
Hello there!
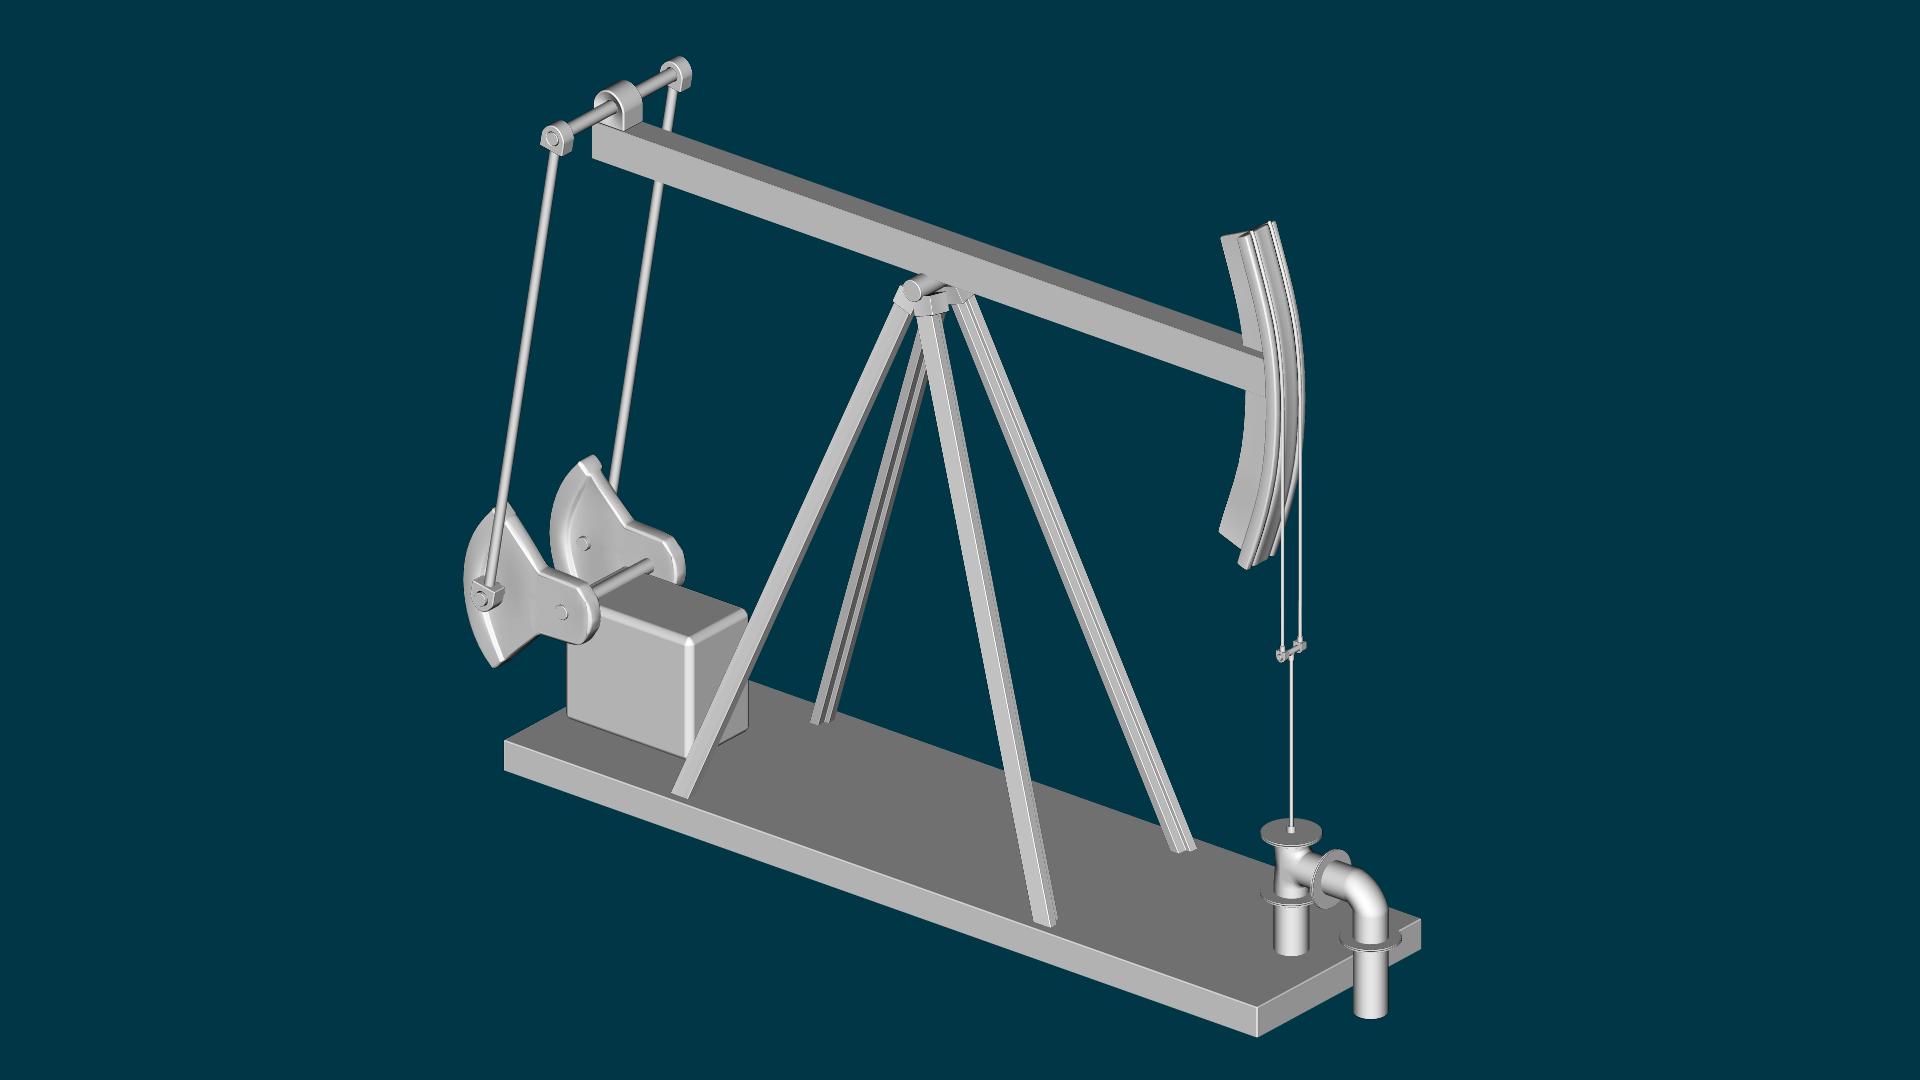
After longer abstinence I finally started A:M again and thought that a pumpjack would be a good exercise for a mechanical object. Moving parts in various directions for rigging, both big and small parts to model. Right now it's in the "big parts completed" stage (attached is a quick render from the modeller).
Next steps: adding details like nuts and bolts, some gears and vents for the engine box, struts, walkways and ladders. Still lots of work to model but I'll post this with a question: any good tutorials or how-to's out there when it comes to texturing/weathering? I think... no, I know that I'll suck at that
 - and even though this is just a little side pet project I'd like it to look as good as possible. And a chrome bling-style pumpjack won't look realistic at all
Greetings,
Roman

-
Hi!
I'm in the process of preparing for my first (hopfully paid!) commission and of course - as it is with such first-time commissions - money is tight with my client and time is scarce with me. Since I need to do the animation and several technical models already, I was hoping to find a reasonably well done, free (or at least cheap) male character model to use. I'm not at liberty to discuss the specifics yet - it is a "product presentation" for an upcoming product is all I can say right now. This model doesn't need to have a facial rig (even the face is optional and can be very generic) but the body should be realistic human shape with - preferably - some sportswear no "full nudity" required, it *is* a serious project. Rigging is optional - I can do with TSM2 if the model doesn't have a rig. I already searched the forums and could find only toon or semi-toon style characters.
So here's the big question: does anybody out there have such a model around? I'm not asking to have something like that created, I *do* know how much work that is.
And on a related note: how are the licensing terms for the models on the A:M extras DVD/download? Specifically modification and commercial use.
Greetings,
Roman
-
v13 works for me on Win7.
I have an up to date 15j+ version running on Windows 7 64bit and except the odd crash here and there (usually during simulations or clumsy delete/undo operations) it runs just fine. You might want to try to set the cmpatibility options and/or disable Aero if an older version won't run. And you could run the installer in compatibility mode too if it doesn't work like it should. In general: the more "low level" an application is, the more likely will it have compatibility issues in new OS versions. And Direct-X and OpenGL is about as low-level as it gets

Greetings,
Roman
-
I watched that bit of animation over and over and still can't stop smiling

-
that's great. Can you explain me exactly what to do to get a 5 cps patch?
I'll jump in - in hope to save somebody some time
Generally, you have to select the five cps that make up the patch and then click the "make five point patch" icon (lower end of the modelling toolbar, the pentagon shape)
The problem is that there are a number of internal rules before a five point patch can be formed and the icon will only turn active when the selected five cps meet all the expectations of A:M - Personally I had the best results when selecting not only the cps but als the splines in order - i.e. click not only on the cp but on the spline next to it - the cp turns green and the spline will also be highlighted. Then hold the shift-key and do the same for all the other patches in order. That's how it works for me 97% of the times.
Greetings,
Roman
-
Greetings!
Since I couldn't find any posting about this and came up with a working solution I thought I'd share - hope this is the right place for it.
The problem was: How to easily animate an analog clock (hour/minute hand) without having to calculate movement. Think of a "time-lapse" kind of animation that should show a realistic time of day.
My solution:
1.: create two bones in the clock model: "MinuteHand" and "HourHand" and attach the CPs.
2.: create a "percentage" pose on the model, call it "TimeOfDay". Use "settings" to set te maximum value to 1440 (60*24 minutes to cover the entire day)
3.: select the minute hand bone in the relationship and set the rotate-y property to an expression. "..|..|..|..|..|User Properties.TimeOfDay*600"
4.: repeat step 3 for the hour hand and set "..|..|..|..|..|User Properties.TimeOfDay*50"
Expressions might not do much for the character animation but they can ease mechanical prop animation. A more complete reference for possible values would really be nice.
Would there be another way to do the same without keying the hands every 90 degrees and still use only one slider to set both of them?
Kind regards,
Roman Gruber
-
A side note to transparent PNGs from Photoshop: I have found out (through programs that don't support transparent PNGs) that the color channel usually contains garbage in the "fully transparent areas". This isn't an issue normally (because these are invisible anyway) but maybe the displacement map ignores the transparency information and uses the "garbage" to displace the surface? My 2c...
-
Wow! Looks awesome. Given the "simple" structure I guess they are easier to animate than ordinary models. Now it would only need some "noise" in the keys to suggest stop-motion
-
Not seen this yet .
Maybe You should try to link with the actual libs (VS2008) A:M 150 SDK
I have discovered an issue with an "AFX_MANAGE_MODULE_STATE" (cited from memory) it works now. Don't know which sample I used to copy/paste that line but it was wrong.
The return value from a plugin must be always true , didn't remember correct, when this was changed , I think V14 or earlie V15 .I have changed that as well. But it's still a strange way of handling a "false" return value IMHO.
Greetings,
Roman
-
-
If you can make something that exports a "standard" that can be used with programs like Vue or Particle Illusion (or terragen) that would be great.
OK, I don't know if it's "standard" but it works with Terragen 2 (I have a licensed version that supports animaion and full resolution renders, I don't know off hand if the free version supports animation)
I decided to slightly modify the provided "RAW" export plugin. The math might be incedibly funny and complicated (hey, I'm no math major
 )
)BUT: I have a little problem here. When I call the "SaveRequest" function to prompt for a filename, AM becomes unresponsive AFTER the user selected a filename. I have validated it, no other plugin code after the call gets executed. On a related note, if the user cancels the selection, AM will call the plugin nother two times. I might have missed a setting in Visual Studio (I use 2008 by the way) but since every other operation works fine, I doubt it.
Attached is a quick test-render, combined with Premiere. One of the frames didn't render in TG so there's black background for a bit....
Greetings,
Roman
-
Well, after countless tries I've downloaded the A:M SDK and took a look at the provided source code (thanks!) - the "export camera as RAW" plugin is hard-coded to export only the first 30 frames! I wonder if anybody has EVER used it... Besides ther's a comment in there: "Dan: finish implementing this" for the depth of field vlaues. It seems that the plugins don't have access to these properties...
I'm tinkering around a bit with the format now and have already managed to get my own little export plugin to be loaded and executed by A:M, also I have found out about the format that TG2 uses (.chan) and have successfully created one by hand. Now the last step involves some math to convert the A:M data into suitable numbers for TG2...
Greetings,
Roman
-
Inferno (Raw) is an Autodesk format, no? They have no specs on their format?
I tried several Google searches - but nothing even close to a file format spcification came up. Blast them for using a generic extension like "raw"
The format could be discerned by exporting a file with one known keyframe and a file with two known keyframes and comparing the two.True, but if somebody has an idea where to look for the specs it would be more reliable. There are a bunch of "0" values in there even though I animated every aspect of the camera...
Partial other ideas:I didnt even find a way of creating a BVH file from my animaion - the camera only has the "raw" export - which ist simply too short as well.
Did you check these other threads the reference TerraGen?Yes, just about any of those. But most (if not all) of them refer to pretty old versions (2005/2006) whereas I'm running current versions of both packages.
Thanks for the fast reply,
Roman Gruber
-
OK, after literally hours of searching specs and the internet I just have to post my problem:
What I'm trying to do: I want to do a pretty simple animation, a "walk through" through a virtual building. I have the building modelled already and the camera movement is easy enough to animate (constrain to path, look at...) BUT: the scene is supposed to start outdoors and I'd really like to use a nice landscape created by Terragen 2 as a backdrop. To combine the two outputs I would of course need to replicate the camera movement from A:M inside Terragen.
Here's the first problem: A:M has an "export" feature on the camera inside my coreography and it writes a "raw" file. Terragen would like to import a "mov" file.
Here's the second problem: A:M always exports 30 entries in the raw file - I take it it's exporting one second with 30fps worth of data, although I've set just about every "duration" and "range" option to 53 seconds and my project is set up for 25fps.
I'm capable of writing computer code - so I could build my own convertion tool for the raw/mov conversion but I couldn't find either file specification... Any ideas/pointers? I even tried exporting my building in various formats and place it in Terragen as an object but not a single format could be read.
Greetings,
Roman Gruber
-
In addition to what Mark said, I'll just inquire why you want a spherical constraint? You're probably thinking you need that for a knee or an elbow but proper character rigs almost never need such a thing.
If you're just making a rig by putting some skeleton bones in your character you will be making animating it 100 X harder than it needs to be and be unhappy with the result.
There are some easy to install rigs in the rigging forum. Have you tried those? Is there a reason not to use them?
Well, mostly the unique anatomy requirements for the character. I don't really want to go into a whole lot of details here, but if you mean "proper rig" as in "reusable" and "automatically balanced": that I don't need in this case. Just a few quick constraints so that IK doesn't mess up the bones on every little animation is enough in this case. It's not a feature length animaton anyway, just some unique poses with in-between aimation so no need for reuseable stuff anyway
Still, if there's an easy way of building joints without spherical constraints I'd be happy to know.
Besides, I better understand software by trying something "the hard way" first. So I *know* what's easier or harder the "common way" and can help myself with minor issues becuase I understand what's happening then (I hope)
Mark: Thanks, I didn't make the connection to the "on/off" pose, that works!
-
Hi!
I put this in the newbie section because it seems an RTFM question, but I couldn't find an answer in that FM...
Here's my problem: I created a little character model, added bones to it (created a bone hierarchy even) assigned CPs (weighted even) and would be all set to animate. BUT: I would really like to have the bones constraint to certain movement ranges. According to the manual, the spherical constraint seems to be what I need. And here's where I'm stuck. It seems that I can only add constraints to a pose or an action... not the rig (bones) in general. At least I couldn't find any info an that. Thing is I don't want to create any specific poses and or actions for that model. It's sort of an animate once thing but without any constraints even bone based animation is *hard*...
Am I missing something here? If so, what???
-
here's a vase with a 0-100 pose slider that changes the color from 255,0,0 to 0,255,0
doing "Show more than drivers" in that phantom Action is the key to making these non-obvious, non-bone related sliders
Thanks for the quick reply! I'll try it tomorrow - it's 12:30am here - and let you know!
That did it! Thanks! But I noticed something: To make the new pose slider work in the choreography, I had to delete and re-add the model there. As long as I kept the original "shortcut to model x" in the choreography, the pose slider did show up but had no effect whatsoever on the rendering... so maybe my approach worked as well - I got to try it out when I got the time again. Thanks anyway, the hint with the pose did bring me new knowledge!
Sincerely, Roman
-
here's a vase with a 0-100 pose slider that changes the color from 255,0,0 to 0,255,0
doing "Show more than drivers" in that phantom Action is the key to making these non-obvious, non-bone related sliders
Thanks for the quick reply! I'll try it tomorrow - it's 12:30am here - and let you know!
Sincerely, Roman
-
Without fully understanding what your desired result is , I'll just say that you shouldn't have to use an "expression" to make a pose slider control a color value.
the +-100% settings on a pose slider can represent/control any value on another property.
btw, +-100% aren't the limits of pose slider values.
the right-click "Settings" allow you to enter any number for the limits.
Let me see if I can describe it - I can't render it for obvious reasons...
The material is made up of three elements: one gradient that goes from a "chrome" surface to a second gradient that goes from "glowing red" to "transparent". Both gradients have turbulence added to them. The idea is to make the logo text either appear or disappear (haven't decided yet) with a "glowing edge". Hence I want to move the start/end of the gradient between the chrome and the second gradient from "left outside the model" to "right outside the model" or vice versa.
I'm just at a total loss with the property paths and values of said properties... the handbook only briefly covers the list of functions available and every tutorial on expressions I could dig up only used functions...
Hope this clears it up a bit.
Sincerely, Roman
-
Hi!
I want to animate a little logo - i.e. spice up a fly-by type of scene that holds just one model that was done using the font wizard. Here's my problem however:
I'd like to have the text object change it's appearance over time as the camera moves past it. I do see two options for this.
1.: Use a material effect and aminate it as desired. Problema: The effect just doesn't "look right". This may be a bug or the font wizard object I can't tell but the material just "dissolves" and not the way it's intended... Also the effect just ends with the effect object. So there is no way I can have the object "all 100% effected" at the beginning and gradually move to "100% not effected" over time.
2.: Use a user property pose slider to change a material property. I'd very much like this approach since it wouldn't effect other objects like the material effect would. I figured: Add a pose slider to the model (0-100%) and make the "Start.X" and "End.X" value of the gradient combiner in "shortcut to material x" an expression that turns the percentage into a usable distance. So far: no luck. The expression I used for the Start.X property is "(..|..|..|..|..|..|User Properties.BurnEffect*200)-100" since I figured a percentage should give values between 0 and 1 and I need a value between -100 and +100. But no matter how I slide the property the effect seems to be stuck at 0. Since expressions are pretty undocumented and it took about 1.5 hours even to get rid of the "syntax error" message: can somebody answer these questions:
a.: What units are expected by properties that are shown in "cm" in my UI?
b.: What values does a user property slider have?
c.: Where can I find a list of available property names or the "relative path" that's required to change them? The manual says: "click on the property" but once the expression input box is shown, the tree won't let me click on anything at all...
Sincerely, Roman

Trainint WIP - Pumpjack
in Work In Progress / Sweatbox
Posted
Added a whole lot of details to it, texturing still pending... The engine box is lacking some detail still and some nuts and bolts are missing. But I'm getting there. almost 12000 patches though. It HAS to hold up for some close ups, so everything is beveled.
Here's where most of the new patches are:
Still looking for some (render) time saving materials and weathering tutorials - any tipps?
BTW: I now have an actual plan for a short video with this - so it's still non-profit, but more than an exercise I hope to have it done by mid January... So modelling should be complete around Christmas.
Greetings,
Atkelar