

Kaijubait
-
Posts
11 -
Joined
-
Last visited
Kaijubait's Achievements
New User (2/10)
0
Reputation
-
Hi guys, I was in the q and a this weekend and tried to ask this question, but I don’t think I communicated it very well. Attached below are scans off the tutorial I’m trying to follow. The main question is: How do I select modeling mode from inside the choreography? I can’t, it’s grayed out. What is bizarre is that somehow or other I got it to work briefly, I have no idea how… I was testing things out, pressing a number of options at the top and all of the sudden it became selectable. I selected it and started building the cube as instructed, and when I turned my head (or whatever), it went back to being unelectable, and the cube I had drawn could not be selected… it was grayed out as well. I have tried building simple models and moving them into the choreography, but I can neither do that nor cut and paste into the chor. I wonder if my software is just whack? It is pretty old. Also, please refresh me on how to switch to a camera view from within the choreography. Thanks - - Mike

-
Many thanks for that video, Rob! It helped in what I was doing as well as opened some new avenues that I'll explore when I find the time. I may investigate Live Answer Time one of these Saturdays, but I'm juggling quite a bit right now. I'm usually up at the Dallas Maker's Space around noon. But I will try to find the time... maybe if we get another freeze this February and there's nothing else that I CAN do... - Mike
-
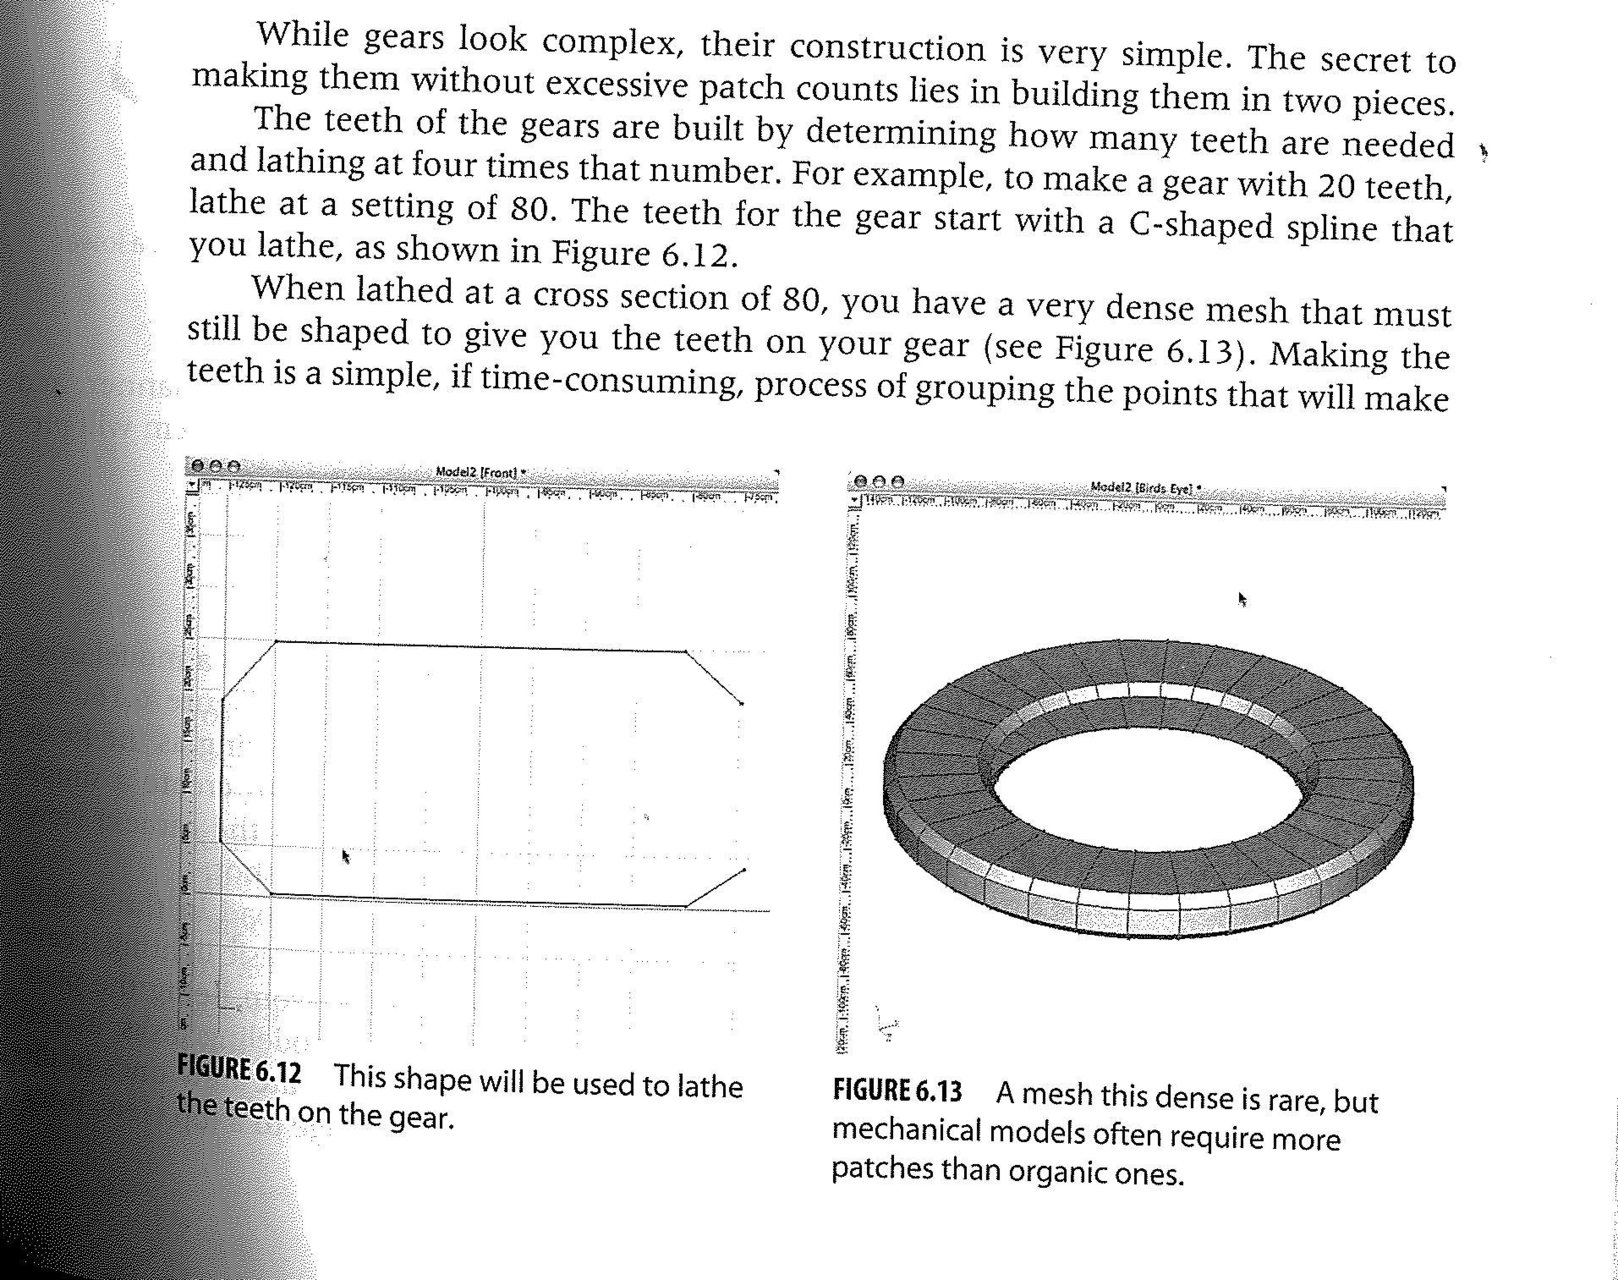
Hi guys, Well, I come to you now because I find myself at another impasse. This is something which I get the impression should be simple but I’m making it harder than it really is. This is also an instance where I think I would benefit much more from an in-person, class type setting then trying to interpret words out of a book. It’s a communication issue. The project is the creation of a gear. Everything up through the first image I am fine with. I can get something which looks like figure 6.13 I have also gathered that when they go on to say “select two CPs, skip two CPs”, we are actually talking about groups of eight CPs at a time. The illustrations certainly display that. “These points are scaled down to make the valleys…” Stop right there… Am I scaling X, Y or Z, or all three? I’ve tried all those combinations and I do not get what I want (figure 6.14), or do they mean something else? And scale them by how much? The next sentence also baffles me “Select the entire gear and change the magnitude of all the splines to 10”. I’m afraid I don’t know what they’re talking about. Help clarifying any or all of this would be appreciated. Also, I seem to recall that one of you was in the DFW area and if you are available for one on on tutoring in this semi-post covid universe (I got the booster, FWIW), I would definitely like to talk. As always, thank ye much. - Mike

-
Many thanks!
-
Howdy guys, I run across a new problem today as I continue my AM learning journey. Suddenly, when I use "copy, flip, attach" on my model, the objects are placed on top of and upside down to the original piece rather than becoming an attached mirrored image (thus making a whole) like I want (and what I used to get). I assume this means that an X or Y axis needs to be changed somewhere, but where, on what, and how? Thank ye much... - Mikre
-
I got it to work, but it was not going to happen the way the book was instructing (or showing) me. My spleens were not all one spleen, which was giving me the issue. But, in order to make it one spleen, I had to delete and break additional points that were not indicated and patch them up afterward.
-
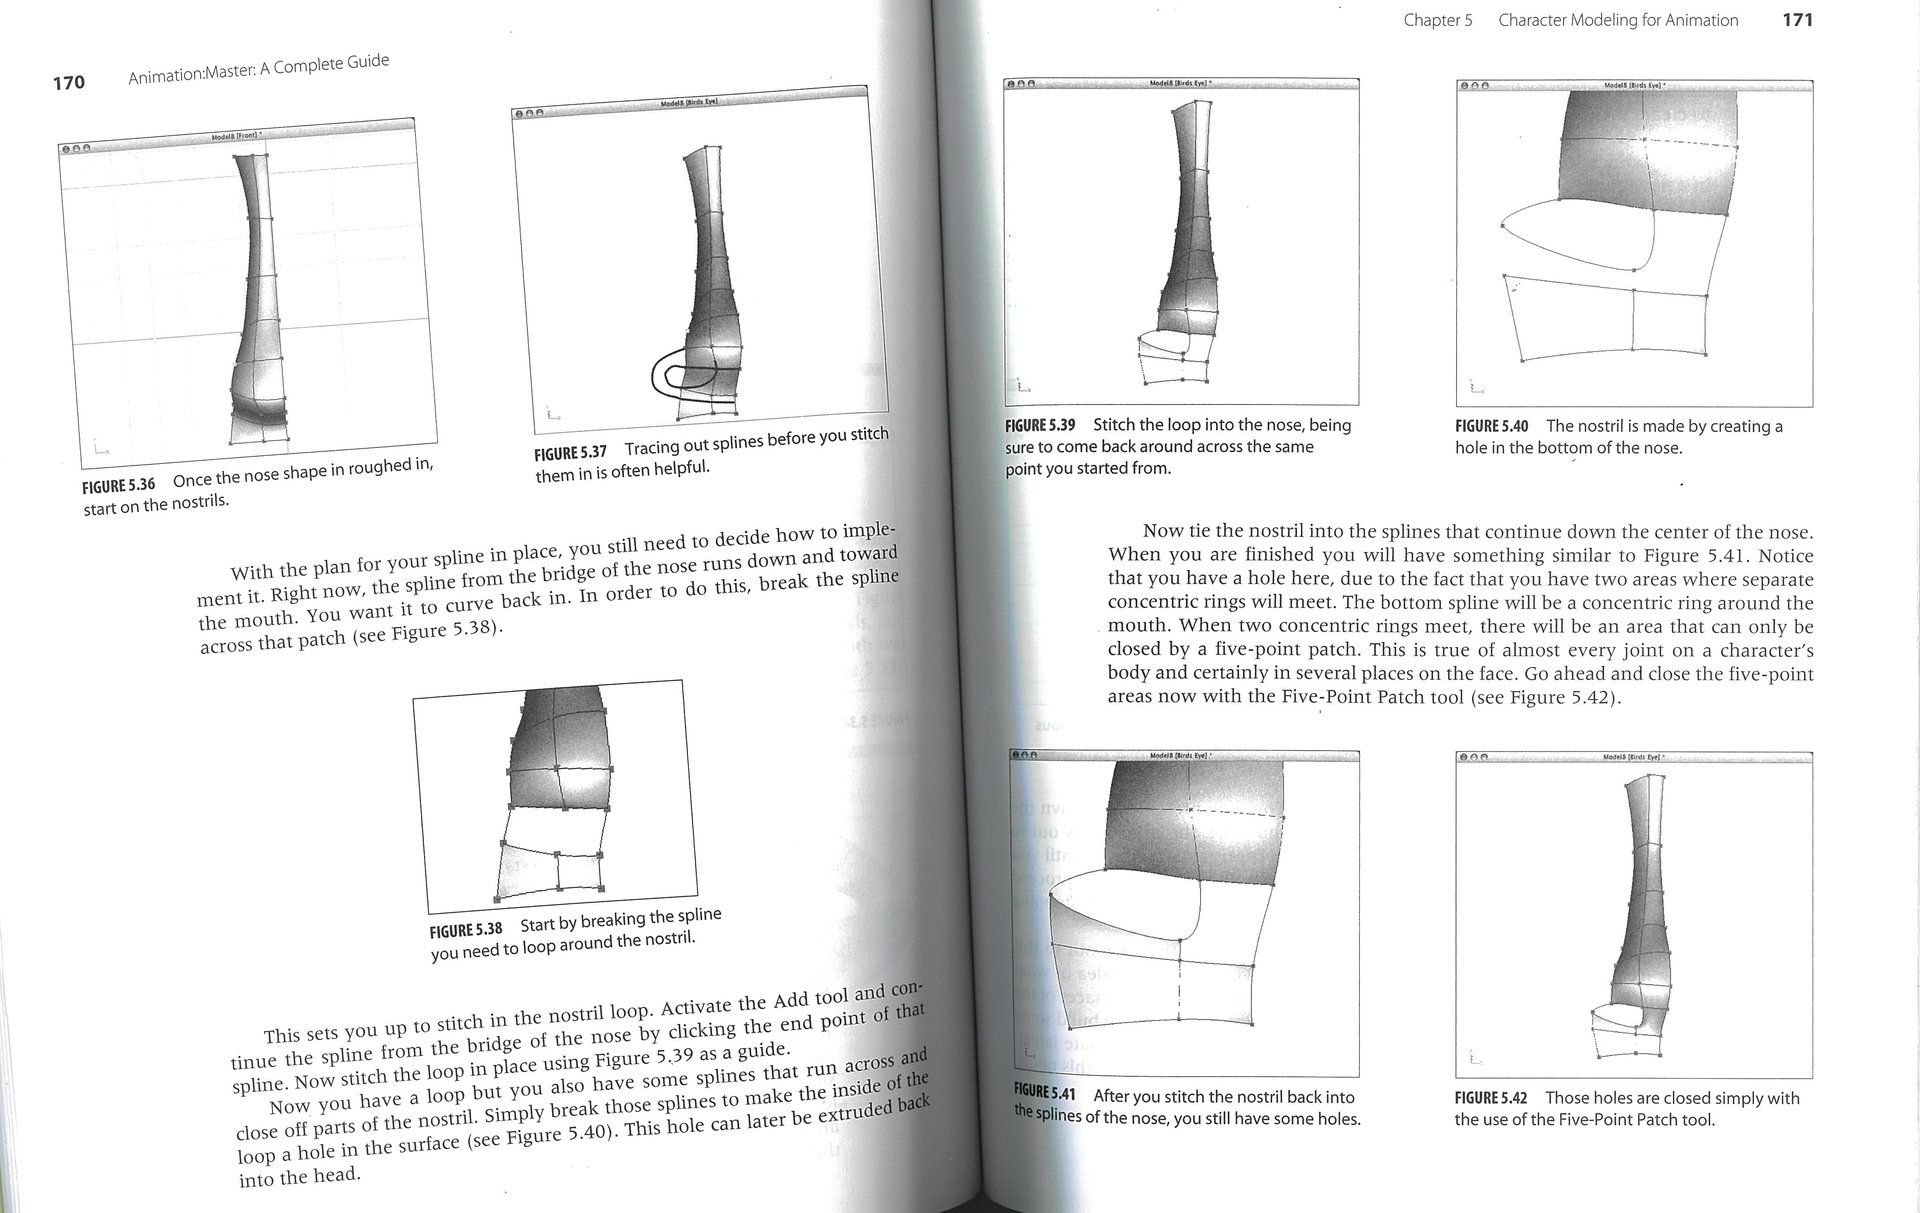
Righty-O folks, I come before you with a new quandary today. I am working my way through the tutorial attached in David Rogers' "Animation:Master A Complete Guide" book (modeling a face). I am ok up through what you see in figure 5.38. I break the spline and it looks just like that. It is what comes next that gives me issues. I am unable to create the nostril hole as instructed in figure 5.39 WITHOUT that hole patching/filling in. It is obviously not supposed to fill in, it is supposed to be a hole, but it isn't happening for me. Two other things that confound me, but not as much as the first, main issue are that: 1. In addition to drawing the loop in figure 5.39 there seems to be an added patch drawn between the nostril hole and the bottom of the nose piece. Not sure why that's there, especially since we get rid of it in figure 5.40 and then... 2. Add it back in in figure 5.41. If we wanted it all along then why did we get rid of it? But those those head scratchers are not the main issue. Figuring out how to create my nostril hole without it filling in is my main issue. Thanks - - Mike
-
Your post was a huge help Robcat. The book did not explain this well AT ALL. Part of the confusion is in both the way they explained it and the illustration (which did not show the appropriate drop downs) but I'd also have to say a failure on A:M's part to label what these drop downs are rather rather just using cryptic symbols. At the very least I think the name of the interpolation/extrapolation method should come up when you hover your mouse over the icon. The only thing I'm still not that clear on is "translate W", but I seem to be hearing that's mostly a superfluous item so I'm not going to worry about it. As for attaching screenshots. Well, I wanted to, but it only seems that I can attach images that are already uploaded to webspace. I tried uploading a scan of the book with the text that was confusing me to flickr, but when I entered the URL, the site didn't like it. I see now an option to drag or attach files, but I didn't see that when I created the topic, only something that called for web links. Just for the heck of it, I'm going to attach the text that was confusing me now.
-
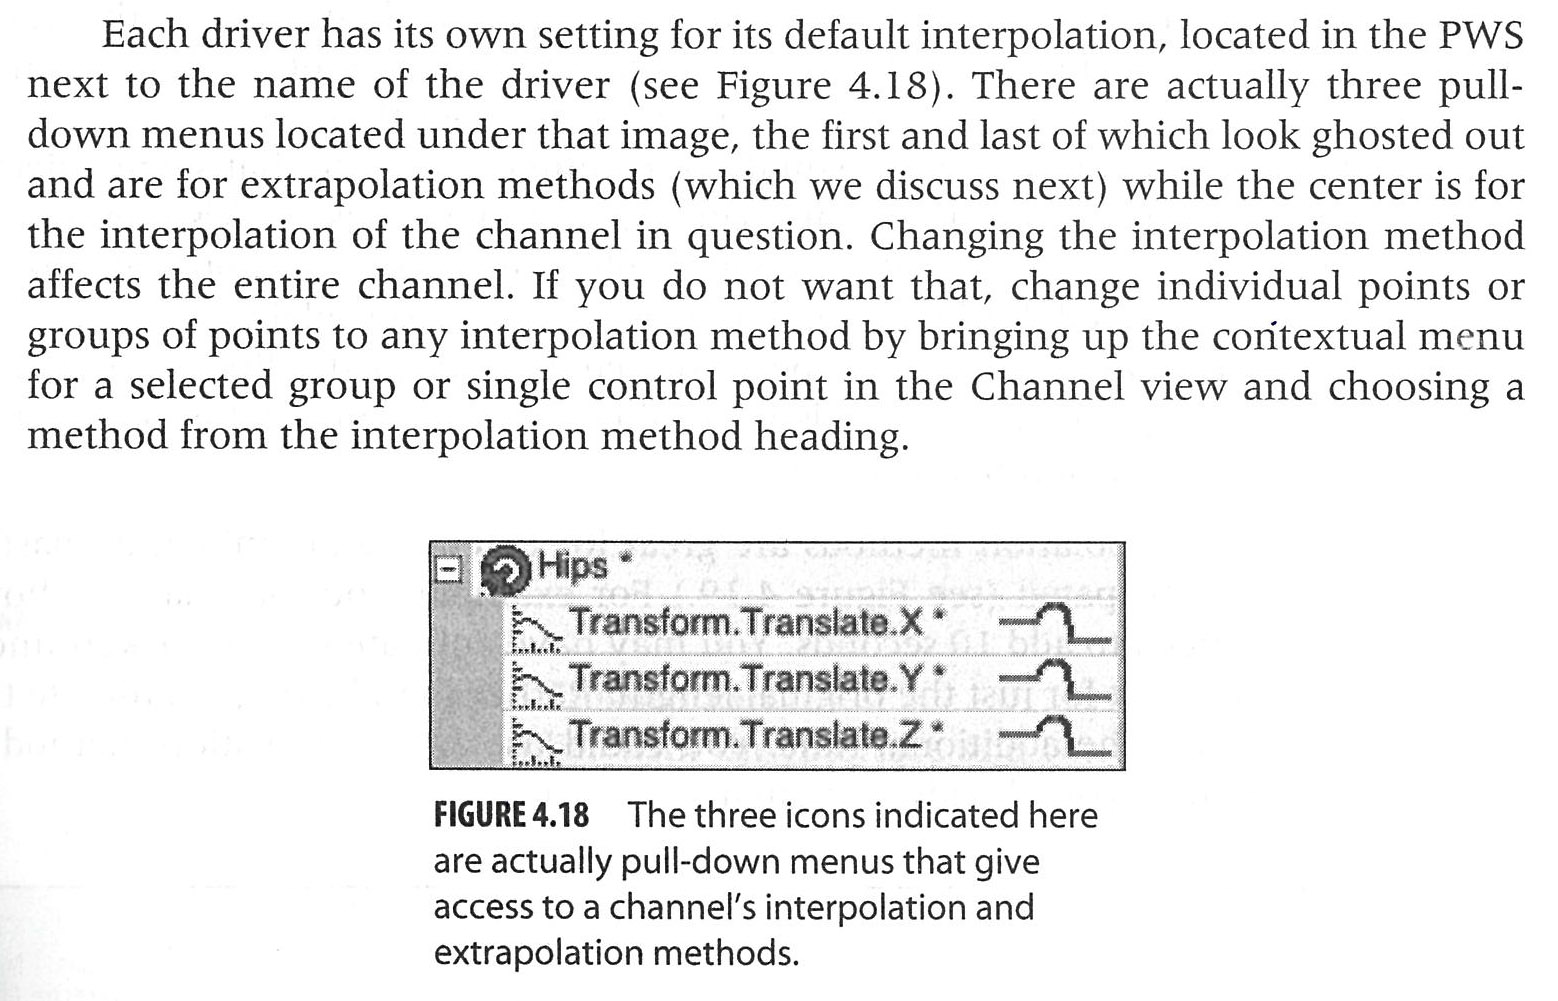
Hey Hashers, Didn’t think I would be back so soon with another question (s). I tell ya, I was doing just fine breezing through this book until I got to Action Basics. This is deceptively the shortest chapter in the tome, yet it’s the one that’s caused the most head scratching. Ok, so I tried to scan the part of the book that's befuddling me and upload it here, but that's just not working out for me. I will retype it: “Each driver has it’s own setting for it’s default interpolation, located in the PWS next to the name of the driver. There are actually three pull-down menus located under that image, the first and last of which look ghosted out and are for extrapolation methods (which we discuss next) while the center is for the interpolation of the channel in question. Changing the interpolation method affects the entire channel. If you do not want that, change individual points or groups of points to any interpolation method by bringing up the contextual menu for a selected group or a single control point in the Channel view and choosing a method from the interpolation method heading” Underneath this text is an image showing a "Hips" bone in the PWS. The bone has been selected and has three pull down menus, marked "Transform.Translate X*", "Transform.Translate Y*" and "Transform.Translate Z*". Text under the image reads "The three icons indicated here are actually pull-down menus that give access to a channel's interpolation and extrapolation methods" OK, wow, where to start here… Let’s start with what I understand. I pretty much get what the different interpolation (and extrapolation, for that matter) methods are supposed to do, and I understand the last part of the paragraph - In fact the ONLY WAY I see how to apply these different methods is by doing so in the Channel view of the timeline, by selecting individual points or groups of points and bringing up the contextual menu. As for the rest of it: 1. The names, “translate X”, “translate Y” and “translate Z” (my own version also has a “translate W”, and some other bones/channels have additional letters not mentioned). I understand what the X,Y, and Z axis are but don’t see how that relates to anything that is being discussed here. Are these adding interpolation and extrapolation methods to actions that only happen along certain axis’ (just what is the “w” axis, then?), if so, I can grasp that, but why the statement “center is for the interpolation of the channel in question”. The center? The Y axis? Why does that and that alone translate everything that happens to the bone? Are these in fact the “three pull down menus” being referred to? The image certainly would seem to suggest that. 2. “There are actually three pull-down menus located under that image, the first and last of which look ghosted out and are for extrapolation methods”. No, actually, they’re not. They aren’t even in the image used for illustration, unless I’m looking at the wrong thing, which I kind of suspect that I am. 3. When I click on any of these “translate whatever” pull down menus, I only seem to get different options when I click on the curvy shape - which allows me to chose different sorts of shapes, but I see nowhere to chose different interpolation or extrapolation methods. For that matter, those options that I DO see are explained nowhere in the text. OK, I think that covers my quandary here. Thanks to anyone who can make this clearer. - Mike
-
Thank you so much for your replys Robcat. The book DOES mention to select the key skeletal, key skeletal scaling and key skeletal rotations keys but, unless I just missed it, did not instruct to select the key model key. I was able to successfully do what I wanted, both through the timeline that comes out of the PWS as shown in your video and ctrl copy and pasting after navigating through the frame counter. The key model key might have made all the difference in the world. I notice you are also in Dallas. Depending on what the future holds I might be interested in tutoring/instruction in the coming year if you offer that.
-
Hey there, Hashers. I purchased a copy of A:M way back in 2007, and am only now getting to the point of learning it. I know it’s 13 years out of date by now, but it works for me and I have no immediate desire to upgrade. I am learning by going through the ANIMATION: MASTER, A COMPLETE GUIDE book by David Rogers. It’s as old as the version I’m using so everything seems to synch up well for the most part, but I have hit a snag in Chapter 4 (Action Basics) that I just can’t move past. In the process of animating my model (a flower sack), it instructs me to copy frame 0 and paste it on frame 24…. OK, HOW? I don’t mean how do I do a copy and paste, that’s computer 101 and I’ve been doing that for decades, Ctrl-C Ctrl-V, I get it... I mean how do I select the frame? Where do I even see the frame? (This is an action and not a choreography, FWIW) I was able to create the frames well enough from the frame toolbar but see nowhere to select them and I certainly do not see any sort of markers for them. I notice that the timeline is mentioned a couple pages later, so I brought that up and thought it was the answer (although I found it odd that I would be instructed to select things on the timeline before we opened it or talked about it), but it seems I was wrong, the timeline is only for accessing raw components. It may show where some components change on a keyframe but you can not copy and paste a keyframe from the timeline. I tried and it only copied and pasted some raw components, and not in the exact positions they were on the frame I copied them from. So that is my question: how do I select keyframes to do anything with them, copy, paste, anything… I can’t go any further until I figure this out. - Mike


