Montanto
-
Posts
31 -
Joined
-
Last visited
Montanto's Achievements
New User (2/10)
0
Reputation
-
Hi all After using AM for modeling for over two years I'm embarrased to say this is my first attempt at actual rigging. Since I've primarily been using AM for background shots for a comic strip. This has been working great except that I hadn't been able to certain focal shots because the walls kept getting in the way. I finally decided to try and solve this problem by rigging the set so i could swing the walls out of the way of the camera whenever the need arose. (see attachment) It mostly worked except at that the walls appear to be attached to the floor and distort it every time I move them. Other than making the floor a separate model, is there anyway to fix this?

-
Not sure, it's 250*358 at 86KB which I am guessing is too high since a gif for a black and white sketch at that size would be in the twenties tops. Just to be on the safe side, I deleted the front rotoscope. (I'd just been eyeballing it for a while anyway) It's still being uncooperative on the front top and back views (though the front view is the worst offender) Sides and bird's eye are behaving just fine though.
-
Hardware Overview: Machine Name: iMac G5 Machine Model: PowerMac12,1 CPU Type: PowerPC G5 (3.1) Number Of CPUs: 1 CPU Speed: 1.9 GHz L2 Cache (per CPU): 512 KB Memory: 1.5 GB Bus Speed: 633 MHz
-
That worked. The embarrassing thing is I know that's come up before in past attempts. I should have remembered it, thanks.
-
Okay I think I fixed all of the crease problems. And I managed to take nearly all of the hooks off. There were two remaining points that refused to take but at least there weren't anymore hooks that were stretching across the models so I made the last two attachments manually. Now if there are any suggestions on a good way to "sand" the object that don't involve blowing an after noon tweaking it.. On another note I'm having two technical dificulties the first big one is that the processing time is beginning to pick up. Fortunatly it's mostly just in the front view but still some times it get's to the point where I get the pinwheel every time I so much as touch a spline. I originally thought this problem was caused by making my models too big, but this one's barely ten centemeters across. The other problem is I've been unable to select the entire object. This is the reason I didn't regroup and fix all of the white patches along the seam.
-
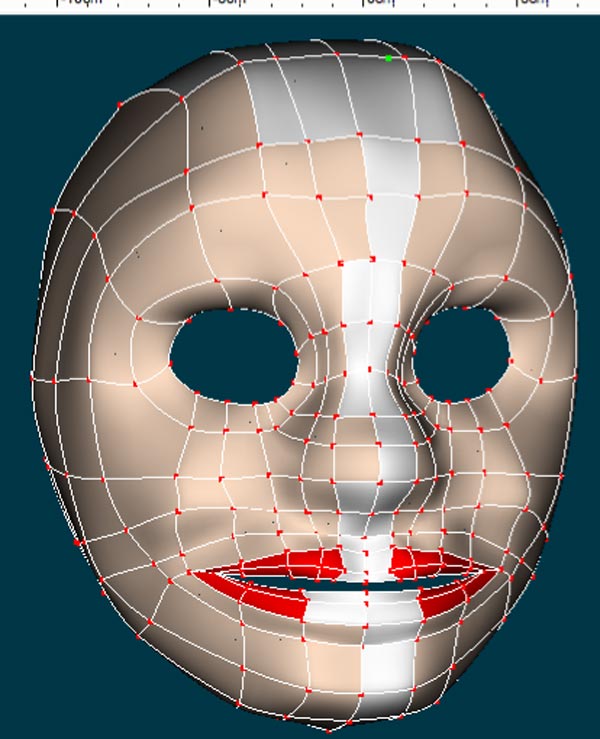
Just dusted this one off after a long hiatus. I've found a couple of tutorials about how to fix creases so i've cleaned up the ones I was complaining about the last time. Though as you can see in the picture, I still have a few bits on the forehead and the area between the nose and the lips that at the moment seem immune to any adujstments. Also I've been having some problems with where the nose starts right after the eye around the tear duct. (the yellow arrow) I've managed to simplefy it a bit and get rid of a five point spline but it is still being problematic. I suppose if I were less stubborn I would chalk this up as experience and start again from scratch. On another note, out of a little bit of impatience in the process, I occasionally try to make the whole face after saving the session and get this recurring problem. As you can see a few of the splines didn't attach along the seam and I usually find on the back side several splines have attached in unusual ways ( for example a line from the top of the head to the lip. (you can see it right behind the nose, apologies for not labeling it) deleting them usually causes a mess.
-
Sorry I accidentally made a duplicate of the previous entry when editing the attachments. I haven't figured out how to delete an entry so the best I can do is change it into an apology in the edit. My Bad.
-
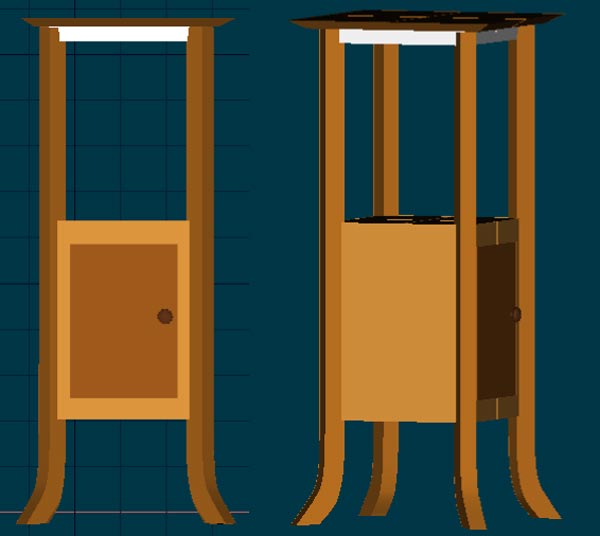
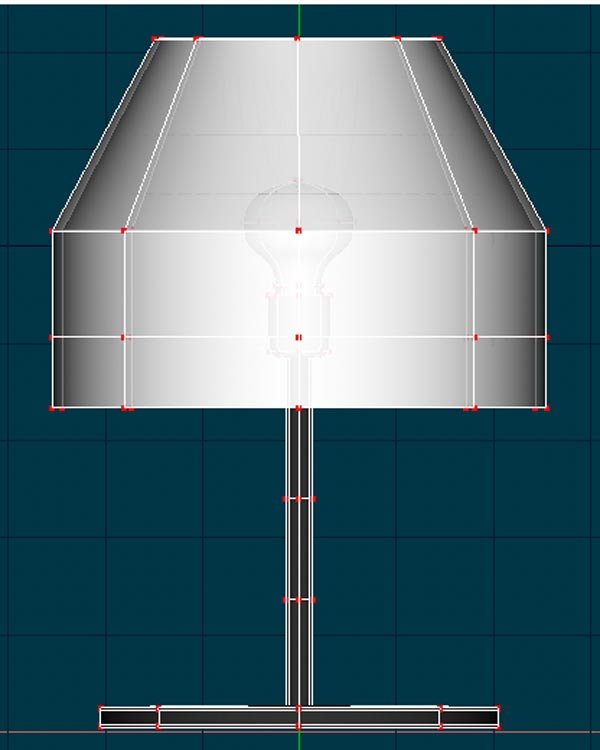
Well, Folks here's the latest. One of the recurring props I've been using is a phone stand in Nancy and Michelle's house (first seen here) Anyway for the longest time I'd been using some clip art that I'd made in Illustrator (See bellow) obviously the big problem with this is that I'd have to use the same camera angle every time I used it. Finally I decided enough was enough so I just finished making the Stand and the lamp. I cheated and used a phone from the archive file (which I may correct.. I don't know if the wire is intended to be animated but at the moment I don't have the time or inclination to rig it) Anyway I think it came out all right otherwise. The only problem I had was that one of the groups wouldn't change color no matter what I did.


-
Looks like ypou're going to have to work on that six pack. The abdominals look like they're sticking out two inches from the obliques.
-
A little of both I use color for the sunday strips. And it's easier to visualize the project having it exactly as it should be instead of just white blocks. I suppose I could tinker with a grouping so I can switch back and fourth from color to plain line art. But as long as it's a cartoon render I have at least two filters on photoshop that can flush the colors fairly easily. On another not I finally finished the premier piece for this set. I'm afraid it's not my funniest joke but I think it gets the job done.

-
Hi all Once again I dived in the deep end and decided to take another crack at character modeling. This time, partially for an overly ambitious idea for advertising my webcomic on youtube, I started playing with one of my newer characters a cute, perky and petite goth punk from Devonshire: P. Blossom Hannaford. anyway as per usual i whipped up a rotoscope and got to work. So far it's coming along nicely so far. For what it's worth, I think it's much more successful than my previous attempts Mainly because this time I worked a lot smaller so the computer isn't choking on it yet and since this is a cartoon figure I went in with the Kiss principle in mind which gives me the luxury to add more splines if I have to. as the arrows indicate their are a few creases I haven't been able to correct just yet. (Yes I'm aware of the one bellow the lower lip but I know what I did on that) I also am having a little trouble smoothing it out completely. I don't know if this is a side affect of working too small or that this will be corrected in the render. Anyway as always all comments and nitpicks are welcome and appreciated. Thanks in advance. Bill
-
A brief deviation from the recurring sets this is something I threw together for the finale of one of the storylines I've been doing for half a year. It's going meant to be a homage to the first Wintermute sequence in William Gibson's Neuromancer where the protagonist walks down a wall of payphones and each one rings once as he passes it. The model was easy enough though I think I overdid it with the number of them in the set. AM was choking on it at the end and it took me forever to move the camera even a little bit.

-
Okay Here's the latest progress report. I've thrown all of the components together and mostly it's looking good. As you can see with the second image I'm going to have to tinker with the glass a little bit. At this point I'm going back and looking everything thing over. From the perspective of a director I want to embellish I can think of more ways of making this into a convincing working independent bookstore, a few more posters on the wall, paperwork next to the counter perhaps a magazine rack next to the door or window... However from the perspective of a cartoonist I think I have to reign myself in and remember the KISS principle is law. There is no point putting in more props when you know that they are going to be hidden by word balloons. So at this point I think it might be better to master the finer points of the cartoon render, somehow see how I can tweak the line work and add lighting. A quick technical question. Does anyone else have a problem with props moving around on them? At this point my only hypothesis is that I'm somehow animating them by mistake. On another note I also started working on the outside of the store for establishing shots. So far I think it's looking all right. Based on what I've learned thus far I'm using decals whenever I have the opportunity. I think I'm going to need at least two more buildings (and any thoughts on how to cheat on them are appreciated.) Along with that headache there's still a bit of set dressing to go. Other than having to do most of the architecture, that I'm going to have to build from scratch, I have plenty of street accessories to spruce this thing up with. My biggest concern is at the moment I how to keep everything cartoony and not looking like a photograph that I ran through a few filters (Like the Volkswagen bus in the picture.)


-
Yeah, he's a nice guy. As far as Cartoonists Northwest is concerned he kind of disappeared over a year ago. Last time I saw him was this Easter at the local Science Fiction convention where he had a table at the artist alley.
-
Everything is coming along nicely I pretty much fixed the counter manually, it's just digital carpentry after all. The next thing I added was a bookshelf. At first it was pretty self explanitory (again, digital carpentry) but I started stumping myself on the books themselves. After wasting a good amount of time and memory trying to make individual books. I took a screenshot of the front and put books into it on illustrator which I then turned into a jpeg. Then I went back into AM and put a panel inside the shelves making them about "two inches" deep. I then put the jpeg onto this panel as a decal. It wasn't a perfect fit but that's what adjustable shelves are for... and besides it's for a comic strip, I'm not exactly going for photorealism.