jmart714
-
Posts
25 -
Joined
-
Last visited
Content Type
Profiles
Forums
Events
Everything posted by jmart714
-
Thanks guys. I'll look into these options. I thought about rotating my camera and all my objects, but I wasn't sure if I was missing something with AO. Looks like I've got some testing to do.
-
Is there a way to change the direction of the source light when using Ambiance Occlusion. I've set up a scene that has no lights in it, I just want to use Ambiance Occlusion for light, however, it seems like the source of light is directly above the object. I need it to come in from the side, but I'm not sure there is a way to do this. My other option is to use lights and turn on Radiosity?
-
Awesome. Thank you guys!!!
-
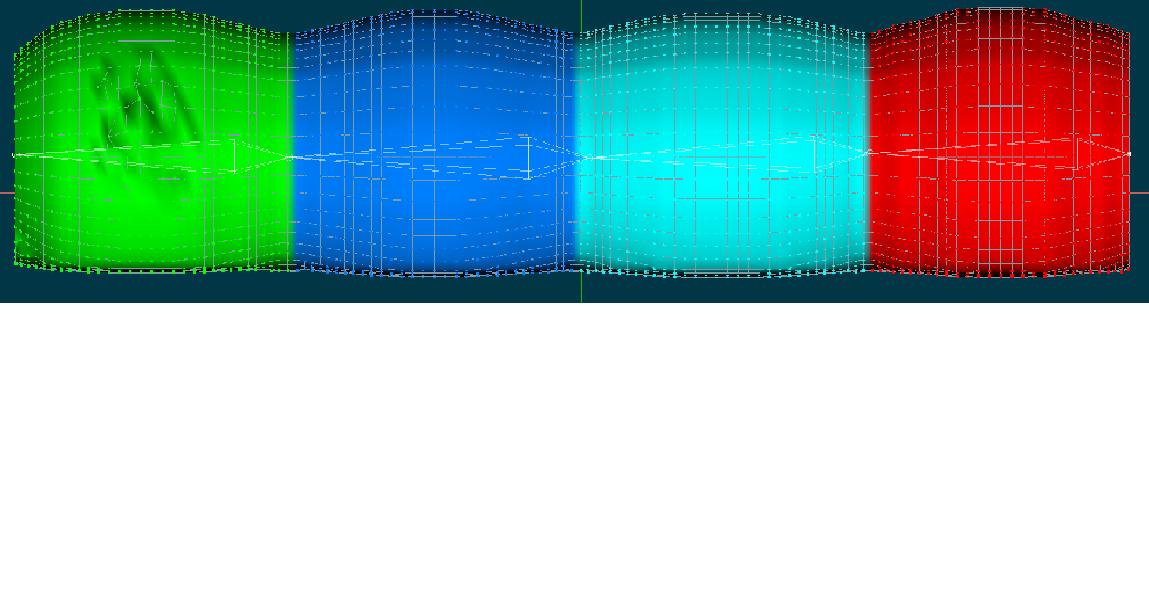
Hey Guys, Is there an easy way to blend the CP weights between two bones? Here's what I've got below. I just want even distribution between the bones. I have a lot of CPs because I'm going to make the thing rough like rock and I didn't want to do it using materials and combiners. I just don't want to have to go spline by spline to fade the weight between each bone. Thanks. Justin
-
My prediction, 2 months modeling sets and characters, 4 months animation and effects, 1 month for tweaks, lighting, etc., and probably 5 months rendering HD 1080p. Of course I could always scale back and get it done sooner, but what's the fun in that. Justin
-
Well thanks, can't wait to show you a longer movie. Justin
-
Thanks, I think once I get the 2001 rig on him, I'll have an easier time keeping his feet on the ground. Justin
-
Yes, I have to model and rig a human at some point. It's going to be tough. I like the color scheme you tried out. Normally I stay away from adding blue to simulate night, just because it seems cheesy to me. But for a stylistic look, it could work. Probably looks completely different on everyones monitor. At least the contrast, I know many people have had a problem with how dark it is. Thanks Ken, I'll keep this in mind. Justin
-
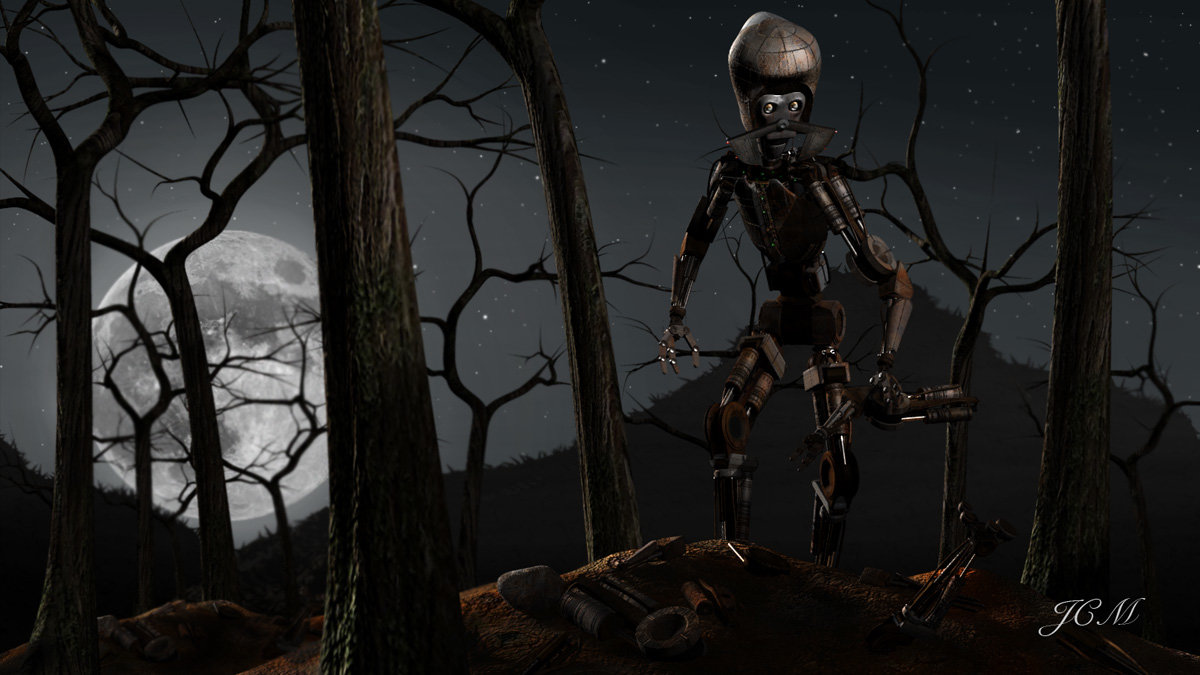
Just in case anyone is interested. I attached a picture of what the actual movie and character will look like. The story is post apocalyptic, and follows the last remaining human and his companion robot on a journey to escape Earth; along the way battling a large virus infected robot that threatens to stop any plans of leaving forever. I'm about to start modeling the large infected robot. Should be interesting, since I visualize him as a T-Rex sort of beast. Justin
-
Thanks, it really is my first 3D animation. Before this, I did a lot of After Effects and Flash 2d, but it's just so limiting. With animation master, anything I can think of, I can make. Never been able to say that before.
-
I agree with you 100%, my 10 minute short will have many camera angles, and lots of movement. However, for this project, I wanted to keep it simple, almost like someone left the camera on in their house. I just let the action on screen tell the story, without editing. Thanks for the comment.
-
Technically its not all 3D. The attached picture is what I composited everything into. If I really sat down with it, I think I could model all of those objects, and create a set that looks very close to this, but that wasn't my goal. The object of this was to see if I could composite my 3D characters into this footage. Surprisingly, this project didn't take me too long. The robot was created for a bigger project, it was my first real model, so I learned as I made it. Modeling and Decaling took about 1 month, though I'm sure I could do it in about a week now. I spent 1 day creating quick models of the set that would allow me to project shadows and reflections. I also did most of the lighting this day as well. Day 2 was spent modeling the items on the counter and the ship. Day 3 I started animating. Days 4,5,and 6, I continued and finished animating. Day 7, I tweaked lighting. Originally I was planning on doing the ship jets in After Effects, because I don't really know a lot about particle effects yet. But on day 7, I experimented with the idea of using glow on semitransparent models, and it seemed to do the trick. At least it beat the amount of work I would do in After Effects. It took a couple days to render. I spent the final day creating a sound design and adding a few effects and titles. If you count the robot that I already had modeled, it was about a month and a half of work. It should also be known that I worked 15 hour days, which I don't recommend. I will be pacing myself for the bigger project. Thanks.

-
I agree, the worst animation is near the beginning, which makes sense because it was the first thing I ever animated in 3D. I felt like I got better the farther in I got. It took about 4 days to animate, and has definitely done its job. The number one thing I learned is that I need a new rig. I made a very basic rig that forced me to move each individual bone, almost like stop motion. I think I may redesign the robot to work with the 2001 rig, at least the legs and mid section. Right now, he has very mechanical joints that only move in one direction. I need to learn more about workin with the interpolation, as it is, I don't even mess with it. But if anyone knows any good tutorials, I'm there. As for facial expressions, I agree, the real project will go up close, so he's going to need it. The hard part is making facial expressions without warping the mesh. I think I'll study Wall-e for that, they seem to have done a good job of getting those expressions across without adding fake eyebrows and such. I don't want to do what they did in the movie Robots, not my style, too cartoon like. As for the shooting sound, I was trying to make the gun seem as small as possible, in comparison to how small they are. But I probably should have messed with the EQ instead of the volume. I only put one day into the sound design, so I could move on to the big project. I think the ship crashing suffered from this as well. That's what happened when he flew off screening, you hear the pots and pans crashing, but I obviously didn't get the levels right. Thanks for noting these though, I will keep them in mind. Actually thanks for everything guys, this is all good feedback. Justin
-
The Robot, spoon, coffee cup, butter knife, steak knife, and blender are 3D objects composited into a rotoscoped picture. I created rough models for the counter, toaster oven, etc. Then turned on front projection target for those objects to receive shadows and reflections. Which brings up a question I have. Is there a better way to composite characters into a live action shot, or am I on the right path? The only problem I have with the current process is that it's hard to light, but it works. Thanks. Justin
-
It's funny, I started out the animating process trying to make it look as real as possible. Right after he tosses the spoon, I changed my style and went with a cartoon like approached. I'm always torn between making the effect look real, and giving it the character movements you would see in a cartoon. But I think I like the idea of amping up the performance with snappier moves. It works for Pixar. Thanks.
-
Thanks, that's one of the things I really need to work on is the timing of my leaps. This was actually the first thing I've ever animated in Animation Master, so I learned along the way. I think I got better at his leaps and jumps when I had him leap over the cup. As for the shooting at the end, I was going to shake his legs, but I decided that was to morbid. But your right, maybe blowing up the cup or something would make it work better. It definitely needs some sort of effect. Thanks again. Justin
-
Hey guys, I did this animation about a week ago using AMv14. I've tweaked it as much as possible, but something feels like it could be better. Since it was a test animation for a bigger project, I may not do any more tweaks, but I would love suggestions to make the real thing the best it can be. Thanks. Justin NanoWar2.mov
-
I wish I didn't have to do that, but I'll give it a shot, thanks. Justin
-
Hey guys, I've been trying to import a quicktime movie as a rotoscope for sometime without success. The only real info I've found says to rightclick on the camera and select new rotoscope. It also says to change the file type to what ever I'm importing, but I never see that option. The video shows up in my choreography as black video, which I think means it doesn't read the codec. I have a MacPro, running OSX tiger, with quicktime pro. So I would think that my computer has the proper codec for Quicktime movies. I've tried many different compressors on the quicktime movie, Animation, Sorenson, and even None. Neither work. What I really want to do, is insert a model in live action footage, so if there is a better way to do this, I will take that advice too. Thanks. Justin
-
Thanks, I'll keep messing with it. I'll definitely chime in if I figure anything out. I wasn't even going to do hair, but I liked how cool it looks. I really hope there's a way. Justin
-
Hey guys, So, I've been trying to figure out how to stop hair from passing through my characters face. I've read a post that said, turn on object collisions in dynamics. I did this, but it only keeps the hair from passing through the scalp. I changed the collision radius, but the higher number I go, the hair becomes a crazy mess. It looks like my character is under water. Thanks. Justin
-
Thanks, I'll try some renders. I just wanted to make sure that I'm going in the right direction. Justin
-
Thanks Eric, I may have close ups on some of the characters. If I use higher resolution images for my decals, will that help? I'm not worried about things looking super real, I just don't want to have it look like I'm zooming in on a digital image. My knowledge with decals is very basic, I just finished the airplane tutorial that comes with the program. I think I will eventually need to learn how to flatten my model and all that advance stuff, to make it look really good. But it looks like decals may be the way to go, or a mix, if I can figure out how to make good looking materials. Thanks. Justin
-
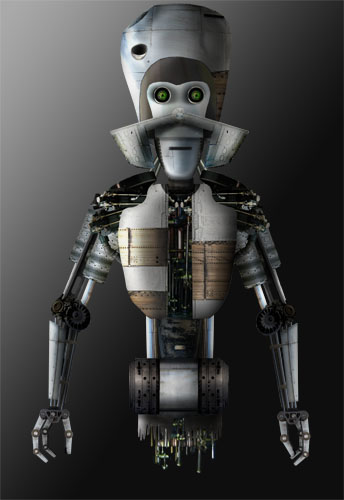
Thanks guys. It seems like there are a ton of ways to add a look to models. So far I've got the modeling part down, and I've been able to add decals, which I think is a great feature. I'm going to be creating a photo-realistic robot for my movie, and I'm not sure what direction to go for materials. I'm still going through tutorials and learning, but I'm not sure if it's better to use decals or material settings to get the look I want. The included picture is a character that I designed in Photoshop, so he's 2D. This is what I'm going to model, and I want to try to get it him to look as detailed as the 2D version. If I can make him look exactly like that, even better. I'm sure I can use decals, but is this the best way. Maybe there is a great tutorial on creating materials, starting with the basics, and working to something more advanced. Cause all I know right now, besides decals, is how to change the color of my model. I really want to make all different types of metal, some shiny, some dull and aged; dirty and weathered. Thanks.

-
Does anyone know if Enhance:AM is included with the new version of Animation Master? Thanks. Actually, I think it doesn't matter, since I have a MAC, and it probably doesn't work with MAC. Justin